
Making Faux Bricks with Polymer Clay
 There are things I love about my house -- it's comfy, it's spacious, it's got a nice big backyard. And then there's the things I'm not so crazy about. Like the tiny kitchen and its stuck-in-the-70's vibe. And while the red brick walls in my kitchen & family room fit more in the not-so-crazy-about realm, there's so many more important things to do that I know I'll be living with them for a good while longer.
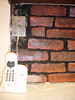 One thing that always bothered me more than the bricks themselves was the gap in the bricks. When we moved in, there was an ancient avocado green metal GTE Starlite phone hanging on the kitchen wall. We replaced it fairly quickly -- but when we took it down, we found that the bricks had actually been set around the phone... so not only did we have an ugly old silver phone jack cover, we also had big gaps around the phone jack.
The Phone Jack Cover
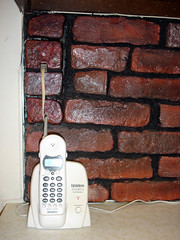
My local polymer clay guild was meeting at my house last month for its play day, and I decided to take the opportunity to work on a decorative phone jack cover. While I originally considered entering the (now-ended) Poly Clay Play Switch Plate Challenge, I decided that style (flowers & ladybug required) didn't fit my kitchen. Instead, I decided to make it blend in as much as possible with the bricks around it. This was my first time to make a switch plate cover, and I was initially concerned about the weight. I knew I wanted it as thick as the other bricks, so I'd be layering thick sheets of clay. Turns out I didn't need to be worried about weight on something this small -- especially since you can pop the clay right off of a metal plate after baking. Still, I decided to use mostly UltraLight Sculpey to keep it lightweight. Since the UltraLight's a white clay, I used quite a few things -- including alcohol inks, chalks, acrylic paints -- to make it match the bricks (more on the specifics below) . And when I realized the bricks weren't as tall as the phone jack, I made a black "grout line" down the middle to give the appearance of being two bricks.
One Project Leads to Another
 While I was happy enough with the way the phone jack cover turned out, it didn't solve the problem of those gaps.
I rationalized that I'd made one brick-looking thing... so I maybe I could fill the remaining spaces with more polymer clay "bricks."
The "Bricks"
 I started by using paper to trace the brick size I needed. I hadn't really paid attention to the brick shape before this -- once I studied them, I realized the edges were rounded and uneven, so I copied this on my paper pattern. I cut the paper out & transferred it onto cardboard, then cut out the cardboard. I actually ended up cutting out two copies of each template, then gluing them together to match the thickness of the other bricks.
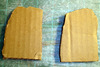
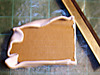 I wrapped a thick sheet of polymer clay around the cardboard template, then trimmed off the excess.
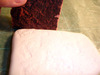 I used an extra brick for texturing, pressing it in in random spots to make an uneven surface.
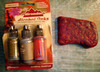 After texturing, I added a few colors of alcohol inks, keeping the colors a little uneven to match the mottled effect of the bricks. On top of that, I layered some chalk colors. I basically just kept messing with them til they looked enough like the actual bricks, then I baked them.
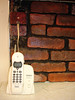
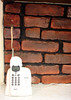 After baking, I decided to take them off their cardboard templates and glue them to the wall with E6000. (Hooks, nails, etc. would be good options, too.) Once they were on the wall, I felt like the colors weren't quite right. So I sponged on little dabs of orange, pink, black, & white acrylic paints here & there. I also added some Future floor finish to help them match the other bricks' slightly-shiny finish.


Things I Would Do Differently
I was pretty happy with the way these turned out -- in fact, I'm tempted to do a brick cannister set, a brick soap holder & more! But, as with any project, there's a few things I'd do differently if I were starting again.- Make sure the opening in the phone jack cover is big enough. I didn't leave enough room for the phone jack opening the first time, then cracked my cover when I tried to force-fit it. While I was able to patch it with TLS, I could have saved myself some trouble by leaving enough room the first time -- or even just using a craft knife to trim it, instead of trying to force it.
- Make the cardboard template smaller than the actual space available. My paper patterns and cardboard templates were exactly the size I needed the finished project to be. I wasn't thinking about the extra thickness 1-2 layers of polymer clay would add to the edges. Fortunately I thought to do a quick check before baking, or I would have been starting over! As it was I ended up having to trim both my clay & my template when the covered cardboard was too big for its spot.
- Study before starting. I didn't really study the kitchen bricks until I had already finished the phone jack cover, so its edges are straight and even. Adding a little uneven-ness would have made it blend in better.
- Start with the right color of clay. As I mentioned, I was concerned about weight so I used white UltraLight Sculpey for the project. This made the color matching a lot more difficult. If I were starting again, I would mix clay to the brick color first, then use inks & chalks for small adjustments as needed.
