Main

November 7, 2013

CraftyGoat's Notes: Leaf Pendant with Liquid Clay and Alcohol Inks

I was sad to learn that my favorite local rubber stamp store was going out of business after many years. Admittedly, I hadn't visited much lately, but I'd sent many folks their way... and I just liked knowing they were there. So on their final week, I had hubby watch the kiddos while I shopped their 75% off sale. I was thrilled to get to stock up on some new colors of alcohol inks, and I found some fun new stamps.

I decided to combine those finds to make some pretty autumn leaf pendants in the style of Isabelle Ceramy-Debray's faux enamel from Polymer Clay Beaded Jewellery (reviewed here). My pendants are actually serving multiple purposes here: I'm using them to decorate some autumn gift bags and pillow boxes, after which the recipients can string them onto a necklace of their choice.

Here's what you need to make this project:

Continue reading "Project: Leaf Pendant with Liquid Clay and Alcohol Inks" »

May 22, 2010

Sage Plant Marker in Garden

I love the idea of gardening. I want to snip fresh herbs to toss with pasta. Or make fresh salsa with homegrown tomatoes and peppers.

Unfortunately, my biological gardening clock (if there is such a thing) is a bit off. It's usually around Memorial Day weekend that it occurs to me to plant something. By this time, even the pre-started plants at the nurseries are on clearance, because (I'm guessing) everybody except me understands that it's too late to plant stuff. This does not deter me. I see an abandoned plant in a clearance bin, and I go into rescue mode. How could I just let that poor thing sit there and die, alone and unloved? So I bring home plants I shouldn't and do my best to save them from the coming blazing-hot summer days. Eventually the Oklahoma sun and dry winds win, and I give up on the poor wilted plants. But by Memorial Day of the next year, I'm ready to give it another shot.

A few years back, I (unintentionally) did something smart. I got some perennial herbs, oregano and sage, that have made a happy life for themselves despite my lack of gardening expertise. Both of the past two years, these herbs have come back without a bit of effort on my part. Since these plants make me so happy, I decided to make them a little gift in return.

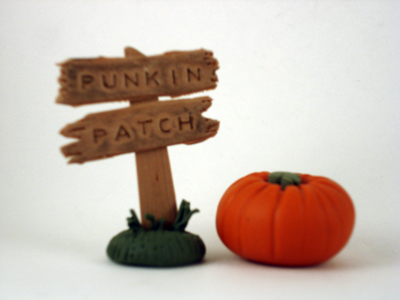
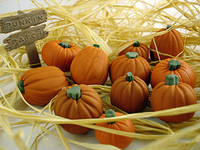
These polymer clay plant markers are simple to make and they're a great way to identify your favorite plants... whether you're the type who starts them from seedlings, or — like me — just feel fortunate that the plants have chosen to grace you with their presence one more year. I'm showing you how to make two slightly different styles of plant markers. The first is a more sculpted look, and it's great for flowering plants, fruits, or veggies. The second is a more natural look, well-suited for an herb garden. Both projects start and end the same way — it's the step in the middle that make the difference.

Plant Markers, Complete

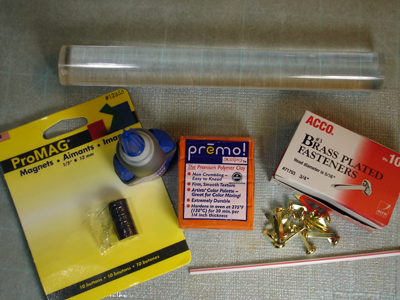
Plant Marker Instructions

Continue reading "Polymer Clay Plant Markers... 2 Ways!" »

July 2, 2009

Alcohol Ink Postcards

Last time I showed how to make recycled postcards using cereal boxes and crumpled tissue paper. Today I'm taking a cue from these plastic bag prints, using alcohol inks and a plastic bag in a postcard project.

Materials

  • Paperboard (like from a cereal box), heavy poster board, or card stock.
  • Plastic bag. Thicker, more opaque bags are better for hiding the pictures and writing on the packaging underneath. If you don't have plastic bags around because you only use shopping totes (good for you!), then you could also use the slick side of a cheap shower curtain. (Thanks to Filth Wizardry's shower curtain play mat for the shower curtain idea.)
  • Adhesive. A Xyron works great for this project.
  • Alcohol inks and applicator.

Instructions

Continue reading "More Recycled Postcard Fun" »

June 26, 2009

Recycled Tissue Paper Postcards by CraftyGoat

If you're like me and have trouble throwing away possibly-useful things, then you may not even want to read this post. I had a lot more storage room before I realized I could cut up all my cereal boxes and use them for crafty purposes. And I used to only keep the tissue paper that looked nice enough to re-use... now I feel obligated to keep even the stuff the gift recipient crumples up and tosses aside dismissively. So, pack-rats, consider yourselves warned. This may be another thing you'll have to find room for in your "nest."

The postcards are made from cereal boxes and recycled tissue paper. Or other stuff (see more suggestions in the materials). And the possibilities are pretty much unlimited.

Materials

  • Paperboard. You can recycle this from cereal boxes, soda can boxes, Kleenex boxes, etc. If you don't have those, you could use heavy duty poster board or cardstock.
  • Tissue paper. Old, crumpled stuff works fine. You could also use other patterned paper products, such as paper tablecloths or paper napkins (if using 2- or 3-ply napkins, make sure to separate the layers first)
  • Adhesive. I used decoupage glue (i.e. Mod Podge or Crafter's Pick) for my project. A Xyron machine or spray adhesive would also work.
  • Decorations. Stamps, paint, antiquing inks, chalks, glitter, etc. (Nothing 3-D, though, or it won't qualify for the postcard rate.)

Instructions

Continue reading "Recycled Tissue Paper Postcards" »

February 6, 2009

Valentine's Day Shoe BoxBack when I was a kid, we had to walk 10 miles...

Oh wait, no. That's my dad's story.

Back when I was a kid, Valentine's Day was a big deal. We'd always decorate shoeboxes with lace doilies and pink and red construction paper hearts, then we'd set those boxes out in hopes of collecting special Valentine's Day cards from special someones in our class.

Apparently this has changed, at least in some schools. Some skip the tradition all together, worried that the less popular kids will feel left out. Other schools use the same reason to mandate giving cards to every kid in the class.

Not so in my day. Getting a card from the kid you had a crush on was of utmost importance. And the design and making of the box was a big part of that.

This Valentine's Day shoebox project is a grown-up version of those school day boxes. But it's also something more. The stamped background is generic, so the interchangeable polymer clay decorations, attached to brads, are what match the box to the season. The heart decorations that make it a Valentine's Day box can be swapped out with four-leaf clovers for St. Patrick's Day, or zombies for Halloween. A perfect all-occasion box!

And it's a totally easy project — it doesn't take much longer than the doily-covered version from the old days. Here's how to do it:

Materials

Continue reading "How to Make a (Not Just for) Valentine's Day Box" »

December 19, 2008

CraftyGoat's Notes: How to Make a Polymer Clay Button Wreath

I love the vintage button wreaths I've been seeing on Flickr. But what if you don't have enough vintage buttons in coordinating colors? Or perhaps you're like me and you're unwilling to commit the buttons you do have...?

Polymer clay to the rescue!

I used mold putty and polymer clay to put together this monochromatic button wreath. Of course, there are unlimited possibilities — using different colors of buttons, different shape bases, etc. And hey, if you've got almost enough real buttons to make a wreath, you could just use these steps to fill in the holes with some color-coordinated polymer clay buttons. Here are the basics to get you started.

Materials

  • Amazing Mold Putty
  • buttons for molding
  • polymer clay in your choice of colors
  • either liquid polymer clay OR a hot glue gun
  • clay blade or needle tool

Instructions

Continue reading "How to Make a Polymer Clay Button Wreath" »

December 12, 2008

CraftyGoat's Notes:  Christmas Card Using a Handmade Foam Background Stamp

Still hoping to make your own Christmas cards? This gingerbread Christmas card is simple to make, but it will be a welcome addition to any friend's mantle. The trick is to spruce up a basic gingerbread outline stamp — or any other outline stamp — by making your own matching background stamp from foam.

Materials

CraftyGoat's Notes: Card Supplies
  • Stamp: Clear Stamps Christmas set by Paper Studio
  • Ink Pads: Distress Ink (Brushed Corduroy), StazOn solvent ink (Jet Black)
  • Paper: Christmas Gingham (The Paper Studio), Spring Green card stock (Double Mates), white card stock
  • Adhesives: Pop Dots, Terrifically Tacky Tape, removable double-stick tape
  • Tools: Fray Check, scissors, bone folder, solvent ink stamp cleaner
  • Fun Foam
  • Ribbon

Instructions:

Continue reading "Gingerbread Stamped Holiday Card" »

October 31, 2008

Jar of Polymer Clay EyeballsNeed one more thing to make your Halloween decor complete? Try this quick and easy project! Polymer clay eyeballs float in a jar of colored water to make a delightfully weird conversation piece for your home or office.

Materials

  • Polymer Clay: White Ultralight Sculpey plus tiny amounts of black. red. and any color of your choice
  • Jar
  • Food Coloring
  • Water
  • Optional: Alcohol Inks, Pasta Machine, Clay Extruder, Small Round Cookie Cutter, Kato Clear Liquid Medium

Instructions

Continue reading "Halloween Tutorial: Eyeballs in a Jar" »

October 4, 2008

Finished Thank You Card 1 I always like to keep a few "Thank You" cards on hand, and seasonal ones are especially nice. In honor of World Making Card Day today, I thought I'd share instructions for this stamped autumn-themed Thank You card.

You won't need to buy special scrapbooking papers for this one. Just use your ink pad with plain card stock to create a beautifully coordinated look. And while this quick-and-easy project is all paper, I've included a polymer clay variation at the end just in case you want to spruce it up a bit.

Materials

Finished Card with Supplies
  • Card Stock: 1/2 sheet (8.5" × 5.5") each of cream and tan
  • Ink Pad: I used Brushed Corduroy Distress Ink
  • Stamps: I used PrintWorks Thanksgiving Blessings and D.O.T.S. Seasons of the Heart Set
  • Tools: Paper trimmer, adhesive, stamp cleaner

Instructions

Continue reading "Autumn-Themed Thank You Card" »

August 8, 2008

Polymer Clay Ultrasound FrameFor this final post in my stamping with polymer clay series, I thought I'd use the heat embossing technique from my video to create a polymer clay frame.

If you've ever had an ultrasound photo you wanted to frame — whether it's to share your own good news with friends and loved ones, or to frame your soon-to-be-grandchild's photo on the fridge — you've probably run into two problems. First, ultrasound photos aren't always a standard size (2 5/8" × 4", for example). And second, well, honestly, they're not always great photos. Sometimes it's hard for the un-educated eye to find which part is the baby. Today's project is a stamped polymer clay magnet frame that fixes both of those problems. It's easy to make the frame in any size. And the hand-formed hanging heart will highlight the important part of the photo.

Even if you don't have an ultrasound photo you need to frame, you can use these steps to quickly frame any size photo with polymer clay!

Materials

Continue reading "How to Make an Ultrasound Frame" »

July 28, 2008

Rubber Stamped Coaster, CompleteIn my previous post, I talked about some of the basic techniques for stamping on polymer clay. Today we're going one step beyond the basics and talking about "masking." Masking is a technique frequently used in rubber stamping, where you cut out a stamped image and use it to block (or "mask") the finish you're applying to the surrounding area. (Here's a nice masking tutorial if you're not familiar with the idea.) For today's project, we'll use a bird mask and chalks to create a coaster from polymer clay.

Materials

Continue reading "How to Make a Rubber Stamped Coaster" »

June 26, 2008

Spearmint Lip Balm Tin (Open)Recently, my dentist's office started including a spearmint lip balm along with their normal care packet of toothbrush, toothpaste, and floss. I'd never tried spearmint lip balm before, and I fell in love with this particular one. I used it daily (at least) and ran out well before I was scheduled for another dentist's appointment. After searching the internet, I found that the maker only sold it in large quantities as a promotional item.

Faced with the options of:
A) buying 500-1000 tubes of lip balm
B) scheduling an extra trip to the dentist, or
C) trying to make some lip balm of my own
... well, let's just say it was an easy decision! And fortunately it turned out pretty well.

Here's some tips on making your own homemade lip balm (with fresh spearmint leaves), plus instructions for making a perfectly coordinated spearmint tin out of polymer clay to put your balm in. Use spearmint straight from your garden to give an extra-special touch to this wonderful homemade summertime gift!

Minty Lip Balm Tin

Continue reading "How To: Homemade Lip Balm and Lip Balm Tin" »

June 8, 2008

Due to popular request, I've put together this video showing how to use & clean the Makin's Ultimate Clay Extruder. The video also shows how to use the extruder to make coiled polymer clay beads, then sand the beads to reveal the colors hidden inside. The video runs about 9 1/2 minutes.

Here are a couple of shots from the video — click the description to see a larger view:

Prefer written instructions over video? See the updated version of How to Use and Clean the Makin's Ultimate Clay Extruder.

Posts In This Series:

Buy the Makin's Ultimate Clay Extruder now.

May 18, 2008

Green and Blue PincushionA couple of years back, I bought one of those generic wood-handled sculpting tool kits at Michael's. While I had no idea what most of the tools were for (& still don't for some of them!), I quickly came to rely on its needle tool. I used it for all sorts of things -- poking, cutting and otherwise. It didn't dawn on me for quite some time that I could have easily made my own needle tool. Furthermore, it wasn't til I was working through Katherine Dewey's Creating Life-Like Animals in Polymer Clay that I saw the benefit of having different-sized needles for different jobs.

I stepped out of my comfort zone and visited the sewing section at the store, stocking up on half a dozen tapestry, sewing & knitting needles to work through Dewey's book. And for the last several weeks, I've had these needles sitting casually on my craft desk... the same desk from which things often mysteriously disappear and which cats have been known to raid.

So I was thrilled when I saw this tin can pincushion project by Design*Sponge. Said cats generate more than their share of kitty food cans to use for the project, and of course I like the recycling aspect. I decided to try making a polymer-clay covered pincushion to store my sculpting needles, so they'd be in a slightly safer environment.

Here's how I made mine:

Materials

Continue reading "Polymer Clay Pincushion" »

May 9, 2008

Finished Card and NecklaceStill looking for a gift for mom? Look no further than your craft supply stash! Here's an easy way to make a matching card and necklace — perfect for Mother's Day or any other time you need a quick handmade gift. The card features a bottle cap button embellishment made from polymer clay, and the necklace features a matching pendant.

Materials

Continue reading "Quick Bottle Cap Jewelry and Card for Mom" »

April 18, 2008

Finished MagnetFinally, a crafty answer to that age-old question: Are the dishes in the dishwasher clean or dirty? This project takes a recycled can lid and turns it into a dishwasher magnet with a reversible Clean/Dirty indicator.

Supplies

Continue reading "How to Make a Polymer Clay Magnet from a Recycled Can Lid" »

April 3, 2008

My guild had an excellent speaker this past weekend, a breast cancer survivor who's helping us get more involved in the Bottles of Hope program. I put together this information for our meeting & wanted to share it with you too.

What Are Bottles of Hope?

Finished Bottles of HopeBottles of Hope are polymer clay-covered bottles that are given to cancer patients to share hope & cheer. The Bottles of Hope (BOH) program was started in 1999 by cancer survivor and polymer clay artist Diane Gregoire. She covered empty medicine bottles from her treatment and took them to other patients, telling them to write a wish and put it inside. The program grew, and now polymer clay artists worldwide create the bottles to give to cancer patients.

Preparing the Bottles for Covering

Bottles to coverYou can cover any kind of bottle, or even other "vessels" like PVC pipe. But if you're going the traditional route and covering a medicine bottle, here are a few tips to help you prepare it for use:

Removing the Lid & Stopper

The medicine bottles with a rubber stopper and metal top can be a little tricky to open. Give these methods a try:
  • Removing lid with pliersUse pliers to pry the lid off from the bottom edge. You may need to go around and pry a few spots for this to work.
  • The metal is fairly thin, so it cuts or tears fairly easily. Working from the hole in the center of the top, use needle-nose pliers or metal snips to make cuts in the metal, then pry it off. (Wear gloves if you're using this method -- the tools and the metal can be sharp.)

Cleaning & Preparing

  • Soaking: You can soak the bottles overnight in soapy water, then rinse them out. This may also help remove any paper labels.
  • Boiling bottlesBoiling: You can also boil the bottles (as long as you remove the lids first). This has the added advantage of eliminating any contamination concerns.
  • Removing labelsRemoving Labels: Paper-based labels are easier to remove after soaking. The plastic labels remove easily even before soaking. Just use fingernails or tweezers to lift an edge, after which the label should peel right off.

Covering Basics

Continue reading "How to Make Bottles of Hope" »

February 10, 2008

CraftyGoat's Notes: Polymer Clay Candy Hearts Tutorial Looking for the perfect candy heart saying for your sweetheart this Valentine's Day? Don't waste time searching through candy bags! Instead, use polymer clay and image transfers to make your own customized conversation hearts.

Materials

Continue reading "Say I LUV U with Polymer Clay Candy Hearts" »

November 21, 2007

Turkey with "Happy Turkey Day" Sign

Polymer clay artists are likely to think of something completely different when someone mentions putting the turkey in the oven! This polymer clay turkey would be a fun addition to any Thanksgiving festivities -- even more fun when you come up with creative ideas for your own personalized signs. Here's how I made my turkey -- no basting required!

Materials

  • Polymer clay: tan, orange, yellow, white, red, black
  • Tools:
    • Pasta machine
    • Clay knife, toothpick, and/or other clay sculpting tools
    • Translucent Sculpey (TLS)

Instructions

Continue reading "It's Turkey Time!" »

November 20, 2007

Glaze drying on polymer clay candy cornsCandy corns are one of those candies -- like marshmallow eggs or candy canes -- that are definitely seasonal. Around here, it just doesn't seem like autumn til we've bought that first bag of candy corns. It's a yearly tradition.

Another yearly tradition is when I take a few of those candy corns up to my craft room to use as a model for my yearly batch of polymer clay candy corns. These are easy & fun to make -- and they can be turned into any number of things (earrings, thumbtacks, etc.). Course the best thing about the polymer clay version is they're not sticky & they won't ruin your diet!

Here's a quick tutorial on how to make your own batch of candy corns out of polymer clay:

Materials

  • Polymer clay: orange, yellow, white
  • Tools (optional): pasta machine, round cookie cutters

Instructions

Continue reading "How to Make Polymer Clay Candy Corns" »

October 29, 2007

Pumpkin - All Wrapped UpTo wrap up my pumpkin series, I wanted give you a few tips & tricks -- things that didn't fit anyplace else...

October 28, 2007

Q: How many crafters does it take to change a light bulb?
A: Just one -- but you better believe she's not just gonna throw away that old light bulb!

Pumpkin with Top HatBurned out light bulbs can be a wonderful base for making rounded vessels. Today I'll show you how to cover a light bulb with polymer clay to make a cool light bulb pumpkin.

Materials

  • Polymer clay: Orange for the pumpkin; your choice of color(s) for the hat. I strongly recommend not using "Sculpey" clays for this, since we'll be flexing it & cutting into it after baking. I prefer Premo, but other strong brands like Fimo or Kato should work too.
  • Translucent Liquid Sculpey (TLS)
  • Light bulb
  • Toilet paper roll
  • Tools:
    • Pasta machine or brayer
    • Clay blade
    • Toothpick or other texture tool
    • Craft knife

Instructions

Continue reading "How to make a Light Bulb Pumpkin" »

October 24, 2007

Friendly Mr. Pumpkin HeadYour kids will love switching out the interchangeable eyes, nose & mouth on this refrigerator magnet jack-o-lantern -- but I'm betting you'll have just as much fun making it as they will playing with it!

Materials

  • MaterialsPolymer Clay: Orange (< 1/4 pkg) for pumpkin, plus assorted other colors for facial features. I strongly recommend not using "Sculpey" clays for this, since the all handling & poking may cause it to tear. I prefer Premo, but other strong brands like Fimo or Kato would work too.
  • Tools:
    • Pasta machine or brayer
    • Straw for punching holes
    • Super glue (I like Loctite brand)
    • Texture sheet (optional). I used ShadeTex's "Linen" texture
  • 1-2 magnet(s)
  • 10-20 brads

Continue reading "Meet Mr. Pumpkin Head" »

October 22, 2007

My Little Pumpkin PatchMaking polymer clay pumpkins is simple -- and they make for a quick & easy Halloween decoration. This week, I'm going to give you a few tips on creating your own pumpkins, starting with the basics:

Making a Simple Polymer Clay Pumpkin

Materials

  • Polymer Clay: (I prefer Premo brand)
    • Orange & green (required)
    • Brown & white (optional)
  • Tools:
    • Toothpick or other pointy-stick tool
    • Clay gun (optional)

Instructions

Continue reading "How to Make Polymer Clay Pumpkins" »

July 31, 2007

Watercolor Heart Thank You CardPolka Dot Creations just posted a tutorial I wrote on how to make a "Thank You" card with polymer clay and alcohol inks. Check it out here.

While you're there, check out the rest of their tutorials (all free!) here. Lisa from Polka Dot Creations has also set up a Flickr group for projects related to the tutorials, so you can see some of my variations there & upload your own. Hope you enjoy!

July 25, 2007

Silver Leaves NotepadI love my local polymer clay guild -- wouldn't miss a meeting unless I had to! But I have to say I wasn't sure about our last project. Granted, I was eager to learn about how to use Ultra Thick Embossing Enamel (UTEE) with clay. But the project itself was a photo album, and I just don't do photos. Or at least, I don't do printed photos. All my photos are the digital kind, and I'm happy that way.

Guild members Penni Jo Couch and Sue Kerr did a wonderful job teaching. I enjoyed the UTEE, and had a couple of "a-ha" moments with the project itself. But when I brought home my covers, all ready to assemble into an album, it was my husband who offered the "a-ha." Why didn't I make it into a notepad instead of an album, he asked?

I've been needing a notepad for my car ever since my PDA died -- so that's what I did. I made me a notepad. Well, three actually. And I took a few pics of the process in case you want to make one too. (Be sure to check out Penni Jo's original instructions here as well.)

Instructions

Continue reading "How to Make a Polymer Clay Notepad" »

July 21, 2007

Finished: Kitchen Wall With Mini-BricksThere are things I love about my house -- it's comfy, it's spacious, it's got a nice big backyard. And then there's the things I'm not so crazy about. Like the tiny kitchen and its stuck-in-the-70's vibe. And while the red brick walls in my kitchen & family room fit more in the not-so-crazy-about realm, there's so many more important things to do that I know I'll be living with them for a good while longer.

Kitchen Wall - BeforeOne thing that always bothered me more than the bricks themselves was the gap in the bricks. When we moved in, there was an ancient avocado green metal GTE Starlite phone hanging on the kitchen wall. We replaced it fairly quickly -- but when we took it down, we found that the bricks had actually been set around the phone... so not only did we have an ugly old silver phone jack cover, we also had big gaps around the phone jack.

The Phone Jack Cover

My local polymer clay guild was meeting at my house last month for its play day, and I decided to take the opportunity to work on a decorative phone jack cover. While I originally considered entering the (now-ended) Poly Clay Play Switch Plate Challenge, I decided that style (flowers & ladybug required) didn't fit my kitchen. Instead, I decided to make it blend in as much as possible with the bricks around it.

Continue reading "Making Faux Bricks with Polymer Clay" »

June 13, 2007

This video goes along with my bamboo skewer polymer clay pen tutorial. The video is 6.5 minutes long, and it shows how to cover a bamboo skewer to make a polymer clay pen.

June 12, 2007

Bamboo skewer example pensOkay, you've covered Bic and Papermate pens, and you've covered pen kits. What's next?

What if you could ignore that whole "oven-safe" thing & convert every pen in your house to polymer clay?

I came across this bamboo skewer pen idea on Glass Attic while I was getting ready to teach my guild's pen lesson. And while a (no-longer-there) pencil tutorial from the British Polymer Clay Guild was helpful in figuring out how to do it, I still had to do a little trial and error -- so I wanted to share my experiences here.

Supplies: skewers, vaseline, pen refill, eyeletsMaterials

  • Get a pen refill. No need to buy a refill -- any pen's innards will work.Ya know that dentist you stopped going to 8 months ago, but you still have his (non-oven-safe) pen sitting on your desk? Yeah, that's a good one to use.
  • You also need a bamboo skewer -- the kind like you'd use for skewering veggies for the BBQ grill. I got mine at a local grocery store, 100 skewers for a buck.

Continue reading "Polymer Clay Pens: BBQ Style!" »

June 10, 2007

This video goes along with my pen kit tutorial. The video is 6.5 minutes long, and it shows how to cover the Amazing Twist Pen sold by Boston Clay Works. It also shows some alcohol ink basics.

June 3, 2007

We've "covered" the basics of pen-covering... now let's take it to the next level.

Mini Keychain Pen and Amazing Twist PenPen making kits are more expensive and involve a little more work than your more basic pens, but the nicer results may make it worthwhile. Traditionally used in wood-turning, these kits basically consist of hollow tubes that you cover then assemble. There are several places online to buy these, with a wide variety of pen types available. While you can buy a pen assembly press for around $40 to assemble these, you can usually hammer them together with a rubber mallet and a little patience. (Upper-body strength doesn't hurt either!)

Of course, if you're interested in that slightly nicer, cross pen-style look -- but not interested in all the work -- you might like the Amazing Twist Pen. These are still harder to assemble than a Papermate -- but they're much easier than pounding with a rubber mallet. And while there's just the one style, they do look really classy.

So here's how to do it:
  • Pen kit baggie and instructionsBuy the pen. As far as I know, there's no major craft stores that carry these pens, so it may require an internet order. The pens will come individually wrapped in little plastic baggies -- and if you're anything like me, you may be a tad intimidated the first time you see one. At this point, they really don't look much like pens at all. Don't worry, though. The other thing they should come with is assembly instructions -- and as long as you have those (and this tutorial!), you'll be fine! <g>

Continue reading "How To Make Polymer Clay Pens Using Pen Kits" »

May 31, 2007

Here's another video that goes along with my basic pen covering instructions. The video is 4.5 minutes, and it shows how to cover a Bic Round Stic pen with polymer clay. Background "music" courtesy of my doggie. <g>

Here's a video that goes along with my basic pen covering instructions. The video is 4.5 minutes, and it shows how to cover a PaperMate FlexGrip Elite pen with polymer clay. Aside from the one I won't get to see til next year, this is my first "talkie" -- so suggestions are welcome!

May 29, 2007

With all the craziness, I forgot to mention it here -- but I taught this month’s lesson at Central Oklahoma's Polymer Clay Guild. Our topic was covering pens with polymer clay, and while I've put a few notes on the guild's site, I thought I'd go a little more in-depth here...

I really enjoy covering pens with polymer clay. It's fast, it's easy, and it's practical. It was one of the first polymer clay projects I did where I was actually happy with the results!

In this series of posts, I'd like to share some of the mechanics of covering pens. I'll start today with how to cover some basic pens with polymer clay -- including Papermate's Flexgrip Elite and Bic's Round Stic. Next, I'll discuss some of the more advanced options -- like using pen blanks and bamboo skewers. Even if you've never covered a pen before, I hope this series will show you that you too can cover a pen and be happy with your results!

Note: Since this tutorial's main goal is to talk about the mechanics of covering these pens, I've used a very simple one-color design. As with any polymer clay project, the possibilities for colors, textures, and design are practically limitless.

The Basics

Find An Oven-Safe Pen

The first step in covering a pen with polymer clay is to find a good pen. Not all pens are oven-safe, so here are a couple of options:
  • Papermate FlexGrip Elite penPapermate FlexGrip Elite. I get mine at Office Depot and they cost about $0.75 each. If you can find them, the Papermate Flexgrip Ultras work great, too.

Continue reading "How To Make Polymer Clay Pens: The Basics" »

March 28, 2007

Altered ClipboardHere's how to turn your boring-looking, utilitarian clipboard into something that's great to look at and totally useful. While I was specifically thinking about hemp projects when I altered my clipboard, there's no reason this wouldn't work just as well for paper crafts or anything else you want to take along with you.

Step 1: Make it Pretty

ModPodge works great if you want to cover the clipboard with decorative papers. Just brush one layer of ModPodge onto the clipboard, trim the papers to size, then adhere the papers and brush another layer of ModPodge on top.

Continue reading "Make your Own Mobile Crafting Station" »

January 8, 2007

Time Resolution Reminder

We're a week into the new year -- how are those resolutions coming along? If you need a little reminder to keep you on track, try these easy polymer clay resolution reminders. Make them into magnets, bookmarks, or whatever works best for reminding you about what you want to do.

Continue reading "How to Make Polymer Clay Resolution Reminders" »

November 22, 2006

Triple Leaf JournalSingle Leaf Journal Want to give someone (or yourself!) a nice journal this Christmas? Covering or "altering" composition notebooks is an easy way to make an attractive journal.

Covering a Composition Book - The Basics

Continue reading "How to Make a Composition Book Journal" »

September 26, 2006

I've talked about making basic bottle cap jewelry and liquid clay bottle cap jewelry. Now I want to share a few ideas for using polymer clay with bottle caps, by putting the clay either inside OR outside the bottle cap.

Continue reading "Other Ideas for Polymer Clay Bottle Cap Jewelry" »

September 21, 2006

Yellow Flowers Bottle CapIn my previous post, I talked about the basics of making bottle cap jewelry. Now I'd like to tell you how to make jewelry using liquid polymer clay:

  1. Find or print an image. Just as with the paper collage bottle caps, you'll want to cut the paper a bit larger than the bottom of the bottle cap. Do any coloring or stamping on your paper image now -- before you put it in the bottle cap.
  2. Use alcohol inks to tint your liquid clay. Be careful -- one drop goes a long way!
  3. Use a paintbrush to spread a thin layer of liquid clay in the bottom of the bottle cap. Now smooth the paper image down inside the cap and paint a layer of liquid clay on top of it. Be sure to get liquid clay around the edges to smooth those down.
  4. Bake at 275° for 15 minutes.
  5. Add another thin layer of liquid clay and bake again. Repeat if necessary to get the right "look" for your project.
  6. You're done! Add a jump ring, attach it to a necklace, and just wait for the compliments to come pouring in!

Just a couple of notes:

Continue reading "How to Make Bottle Cap Jewelry with Liquid Clay" »

September 20, 2006

Blue Bottle cap MagnetsArts and Crafts Collage Bottle cap PinsOur library system has some of the best classes! Last night I went to a Bottle Cap Creations class taught by local artist Kiona Millirons, where the library provided us not only with free instruction — but also free bottle caps and all the free supplies we needed to make a belt, bracelet, pin, pair of earrings — or whatever. How cool is that?

I decided to make a couple of magnets (the blue ones in the picture) and a couple of pins (the "Art" and "Crafts" collages). They were fun and very easy to make. Here are the basics:

Continue reading "How to Make Easy Bottle Cap Jewelry" »

About this Site

CraftyGoat's Notes is all about sharing polymer clay tips & tricks that have worked for me. (And even a few that haven't!)

Read more about CraftyGoat's Notes...

Buy My Book

Archives

Enter your address to get CraftyGoat's Notes by email:

Delivered by FeedBurner