Main

July 11, 2011

The last time I talked about taking better photos, I was using a point-and-shoot camera with a homemade cardboard light box. I really liked that set-up, and it worked well for me for a long time. But when it came time to write and photograph my book, I realized I needed to upgrade. In the process, I learned a lot of things (mostly by doing them wrong!), and I wanted to share some of those lessons here.

Photo Setup, Then

Photo Setup, Now

1. Buying a Light Box: Bigger isn't (Necessarily) Better

Continue reading "Taking Better Photos (Updated)" »

November 9, 2009

It was nine months ago today that Sam was born... and I remember wondering, even that first day, what I'd gotten myself into. Granted, a lot of the things I worried about initially didn't end up being that big a deal. I worried about breastfeeding, which he took to like a pro. I worried about supporting his head, holding him correctly, and changing his diaper right. All that stuff just fell into place. When your baby's there, expecting you to take care of him, you get past the fear of doing things wrong and just focus on doing what needs to be done.

On the other hand, there were a few things I underestimated about parenthood... for example, the ongoing shortage of time. We imagined naps and early bedtimes, with at least some amount of time to ourselves. After months of blaming Sam's sleeping issues on diaper rashes or teething, we're beginning to think the kid just isn't much of a sleeper. So crafting — along with eating, showering, and bill-paying — all get squeezed into extremely limited naptimes.

Over the months, I've come up with some ways to make the best use of the polymer clay time I do have. Here are a few of them:

  • Pre-condition your clay. While someone else has the baby (so you're not worried about being too noisy), use a food processor to bulk condition various colors of clay. That way you can get right to work when naptime rolls around, without being tempted to under-condition the clay just to get to the fun part.
  • Cover your work surface. I got pretty frustrated having to spend precious naptime cleaning dust and hair off my partially-completed clay pieces. Turns out, one of those plastic under-the-bed storage containers fits nicely over my self-healing mat. Now when I finish my crafting session, I can cover my works in progress.
  • Use someone else's project. You may have noticed I started doing more book review projects in the months after Sam's birth. This was my way of keeping my hands in the clay even though I had limited time for creating. If you have trouble coming up with something to work on when you're pressed for time, consider looking at books and tutorials online. Following someone else's guidelines gives you a way to get good results without as much risk of failure.
  • Follow those safety guidelines. Be sure to wash clay off your hands before handling the baby (I love the Polymer Clay Cookbook's sugar scrub for this). You may also want to look at ways to make the baking process safer. I was fine with using a toaster oven in my craft room when it was just me, but I moved it to a separate part of the house when I found out I was pregnant.
  • Try to get some dedicated crafting time. If you have family members who are willing to take care of your little one and give you a few hours alone, take them up on their offer. It's amazing what filling the creative well can do. I can tell a big difference in the way I relate to my son when I've just come from a fulfilling time in my craft room. I'm happier, so I can enjoy my time with him more.

Of course, I'm still new at this. We're just now starting on the getting-into-everything phase, so I'm sure I'll have a lot to learn when it comes to that. Whether you have additional new mom tips to share or suggestions for surviving toddlerhood, I would love to hear from you!

October 26, 2009

Glow In The Dark Skull Photo

Glow-in-the-dark polymer clay can be a lot of fun to use, especially this time of year. But it can be difficult to show off the cool results online. Whether you want to sell your creations on Etsy or just show them off to your Flickr contacts, here are some general guidelines for getting good photos of your glow-in-the-dark creations:

  • Use a tripod and your camera’s timer function (if it has one). A little shakiness can really affect photo quality in low-light, long exposure photos.
  • Turn off your flash. (Seems obvious til you forget to do it! <g>)
  • “Charge up” your glow-in-the-dark creation by keeping it in a bright place for a few minutes before the photo. This will ensure it’s glowing brightly.
  • Find a very dark place for your photo. This is easiest to do if you can shut off all the lights except one lamp beside you. Put the object to photograph in place (preferably against a dark background such as a black posterboard), focus your camera, and get ready to press the button as soon as you turn off the light.
  • Want to take matching daytime and nighttime shots? Since the nighttime shot will be the trickier of the two, take it first. Once you have a shot you like, leave the object in the same position and turn on the lights for your daytime photo. (I didn't do this for my photo above, thus the differences in angle and position.)

Tips for Camera Settings

Let me start this part by saying I'm not a photography expert. These are some of the things I've tried that seemed to give me good results. Any of you who actually know what you're talking about, feel free to correct my mistakes in the comments.

Now that that's out of the way...

Continue reading "How to Photograph Your Glow-in-the-Dark Creations" »

August 5, 2009

Finished Disks

If you've ever tried to give someone directions for how you made a polymer clay project, you probably ran into that question: "What pasta machine setting did you use?"

It's not an easy question to answer. First of all, various pasta machine brands have different settings.

  • Some have #1 as the thickest setting.
  • Some have #1 as the thinnest setting.
  • Some have 9 settings.
  • Some only have 6. (Is my Atlas 150 the only one that just has 6, by the way? Is it just a really old model?)

Aside from all that, it can just be darn hard to remember what setting you used. Oftentimes for me, I kept going til my sheet was big enough for whatever it was I was covering, without regard to how thin it ended up.

Just in case you ever find yourself in the same boat, here's a quick project that may help you tell (after the fact) what setting you used. It can also be useful for comparing two different machines &mash; for example, to help tell your friend with a Makins machine what setting she should use to match your Atlas's #2 setting. Or if you're trying to plan a project that requires a specific thickness, you can use these disks to find the perfect one.

Materials

  • polymer clay
  • pasta machine
  • cookie cutter
  • number rubber stamps or needle tool
  • drinking straw for poking hole (optional)

Instructions

Continue reading "How to Make a Pasta Machine Cheat Sheet" »

May 5, 2009

A few posts back, I talked about using the cookie cutter method to accurately measure polymer clay. While that's a quick way to do it, sometimes one of these methods might work better for a particular task:

  1. Polymer Clay Template
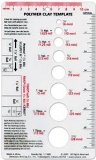
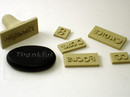
Use a polymer clay template. Polymer clay templates are clear plastic sheets with holes for measuring balls of polymer clay. They also include diagrams showing Fimo, Sculpey, Premo & Cernit clay bars, so you can determine clay amounts for 1/4 block, 1/16 block, etc. About.com's Miniatures site has an article with more info about polymer clay templates.
    • What it's good for: including standardized measurements in project instructions for someone else to use; giving measurements based on package sizes; determining how much of a package of clay a project uses (to help you determine costs).
  2. Marxit / PolyRuler
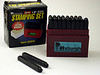
Use a Marxit. A Marxit tool (also called a Polyruler) has equally-spaced indentations along each of its 6 sides, with increments ranging from 3 mm to 20 mm. If you're a seamstress and don't want to make an extra purchase, you could also use your sewing guage. [Sewing guage tip via Katherine Dewey's Creating Life-Like Animals in Polymer Clay, reviewed here.]
    • What it's good for: getting equal-sized slices of canes; cutting even strips from a sheet of clay; cutting lots of same-sized pieces from an extruded snake
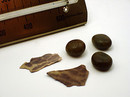
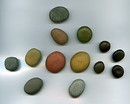
  3. Slice & dice. The simplest methods are sometimes the best. As Sue commented on my previous post, cutting a ball in half is a good low-tech way to get equal amounts. If you don't trust yourself to cut a ball right down the middle, try rolling it into a log and using a ruler to find the halfway point.
    • What it's good for: making measurements when you don't have (or don't want to bother with) special tools; making same-sized body parts for a sculpture

Any other suggestions?

April 9, 2009

Rainbow filigree quail eggs by starlessdesignsIf you're planning on doing some polymer clay Easter egg crafts this holiday weekend, you may be wondering how to get started. Boiling eggs works for kids' crafts, but not so much for something you want to last a while! Here are three ways to prepare your eggs before covering them with polymer clay:

  1. The old-fashioned way. Blowing eggs out is the tried and true method. It works well and leaves just the tiniest of holes... but it can also be time-consuming and headache-inducing. Crafty Daisies has an excellent tutorial on hollowing out eggs.
  2. Operation: Egg. If blowing out the egg is not your thing, try operating on it. The book Altered Curiosities: Assemblage Techniques and Projects by Jane Ann Wynn recommends this handy method. Score the egg, then pop out the section you scored. Wynn recommends sealing it with epoxy to strengthen the egg and make it easier to work with (liquid clay should work just as well if you don't have epoxy). Bonus? This method is perfect if you want to create a diorama inside the egg. Hiding interesting things inside gives a whole new dimension to Easter egg hunting!
  3. Fake It. Both of those methods sound like too much work? Just use plastic eggs. It's a great way to recycle last season's mismatched egg halves. While lots of polymer clay crafters have successfully used various plastic eggs in their ovens, it's best not to assume anything. Test your plastic egg in a well-ventilated oven at clay temperatures BEFORE you invest a lot of time into covering it, just to make sure it won't melt. (Prefer not to chance it? Wooden or paper mache eggs are also options.)

Now that your eggs are prepped and ready, check out these ideas to get inspiration for your own polymer clay egg creations:

Continue reading "Three Ways to Prep Eggs for Easter Crafts" »

August 1, 2008

Whether you're new to heat embossing, or just new to heat embossing on polymer clay, my latest video should help you get a handle on this stamping technique. The video runs about 7 1/2 minutes, and shows how to heat emboss on both baked and unbaked clay.

Here are photos of a couple of projects from the video — click the description to see a larger view:

In my next post (the final in the polymer clay rubber stamping series), I'll show you how to use heat embossing to make a unique polymer clay photo frame.

Posts in This Series:
  1. Rubber Stamping Basics for Polymer Clay
  2. Rubber Stamp Techniques for Polymer Clay
  3. How to Make a Rubber Stamped Coaster
  4. Video: How to Heat Emboss on Polymer Clay
  5. How to Make an Ultrasound Frame

July 24, 2008

So you've stocked up on all the right supplies for stamping on polymer clay... Now what? Not all of the basic rubber stamping rules for paper apply to polymer clay. Plus there are some options for stamping polymer clay that you just don't have with paper — like using your stamp as a texture tool. Here's an overview of some different ways you can use stamps with polymer clay.

Stamping On Unbaked Clay

Continue reading "Rubber Stamp Techniques for Polymer Clay" »

July 11, 2008

Burned Clay PiecesAll too often, the first question I hear from polymer clay newbies is how to keep their clay from burning.

I hate that question. Not because it's a difficult question to answer — but because I know the heartbreak reflected in having to ask it. I've had my share of burned pieces over the years, and some of them were just devastating. I'm not usually overly emotional, but I've definitely shed some tears over ruined work. And I know that kind of disappointment can be enough to keep a new clayer from ever touching the stuff again.

Plus, maybe it's like the Murphy's Law of Polymer Clay, but it seems to me that more work you put into a project, the more likely you are to run into problems baking it. One clay artist calls those burned pieces her "sacrifice to the clay gods." (The quote stuck with me, but not the name of the artist I got it from — please leave a comment if you know.)

In the interest of keeping those sacrifices to a minimum, here's a few tips on keeping your polymer clay pieces from burning:

Continue reading "Polymer Clay: The Burning Question" »

June 18, 2008

Different Powder TypesSaturday's lesson at my guild went well. We had a big group, & I think everyone enjoyed making coasters.

One question came up that I wasn't prepared for, though. I was talking about the different types of "resists" (also called release agents) you can use to keep your rubber stamp from sticking to polymer clay when you're stamping without ink. A spritz of water is one option, though it doesn't work for all clays (specifically, UltraLight Sculpey gets sticky when wet). Another option is dusting the sheet of clay with powder (such as baby powder, corn starch, or baking soda) before stamping.

As I was going over these options one of my guild members asked, "How do you keep the powder from filling in the grooves?" Apparently when she'd tried this in the past, the powdery bits had gotten stuck in the impressions of her stamped clay. I asked which type of powder she was using, thinking some powders might work better than others. But when she answered, I realized I didn't know what I was using!

See, I've had the same little baggie of white powder sitting on my craft desk for years. I poured a bunch of something into it a long time ago, and just haven't needed to refill it. And in the meantime, I've forgotten what I used. As an aside, this makes me slightly uncomfortable every time I drive to guild. What if a highway patrolman pulled me over? How would it look to have a little baggie full of white powdery stuff, especially if I couldn't readily identify what it was? I always drive especially carefully on guild days. :-)

Anyway, after I got home, I did a taste test to see what I'm actually using. (I don't recommend this, by the way. Baby powder and baking soda do NOT taste yummy.) Turns out my baggie's filled with corn starch.

The Test

Continue reading "Comparing Different Powders as Rubber Stamp Resists" »

June 11, 2008

The Makin's Ultimate Clay Extruder has a lot of nice features... but there is one nagging little problem. It squeaks as you turn the handle. Squeaks like a little mouse. It drives my dogs crazy!

Admittedly, it's not a big deal in the grand scope of things. But if the squeaking has started to grate on your nerves, here's a 5-minute fix to make your extruder squeak-free. Credit for this tip goes to my fellow guild member, April (aka Kreative Karma). Our guild meetings aren't quiet by any stretch of the imagination — but since she showed us this tip, I haven't heard a squeak!

Materials

Materials: Squeak-Free ExtruderHere's what you need to make your extruder squeak-free:
  • The extruder
  • WD-40
  • paper towels

Instructions

Continue reading "Silent Extruding: Getting Rid of the Squeak" »

June 2, 2008

Extruder DiscsFor some reason, I always have trouble determining which extruder disc to use on a particular project. I can picture in my mind the size snake I want, for example, but I can't translate that to picking the right size disc. I end up laying all of the circle-shaped discs side by side and studying them, holding each one up next to my project. Still, the snake I choose somehow ends up being bigger than I would have expected from the size of the disc hole.

I think I have trouble translating the hole size of the disc into what the side view will look like once it's extruded, if that makes any sense. Is it just me? Or do you guys have this problem too?

Close-Up of Extruder Disc Cheat SheetIn an attempt to make this process slightly easier for me, I made an extruder disc "cheat sheet." I extruded a sample of each shape and glued it alongside a scanned image of the disc itself. Seeing the actual snake size — not just the hole in the disc — seems to help me pick the right disc for my projects.

Here's instructions for making your own extruder disc cheat sheet, if you're interested.

Continue reading "Getting to Know Your Extruder's Discs" »

April 21, 2008

Cardboard AssortmentIf you do much of your shopping online, you've probably built up quite a collection of cardboard shipping boxes. And, at least around here, cardboard boxes aren't part of the city's recycling program. So what to do with all that cardboard? Cover it with polymer clay, of course!

What Cardboard Is Good For

Continue reading "Tips for Covering Cardboard with Polymer Clay" »

March 21, 2008

 17th January 2008 / Day 17 by Mrs Magic (Creative Commons)Being a "conscientious clayer" (or blogger or artist) often entails keeping track of what inspired you. If someone blogs a tutorial or technique you plan to try, it's important that you have a way to find it again -- not only so you can double-check the instructions as you're doing it, but also so you can share the source of your inspiration with others.

But with all the information available online, it can be tricky to remember where you saw something. If you don't have a good system in place, the best intentions in the world (& sometimes all the searching in the world!) won't help. So here's a few online tools that have helped me keep track of polymer clay art that's inspired me:

Continue reading "How to Keep Track of What Inspires You" »

March 12, 2008

Faux Polymer Clay Rocks One of my favorite things about polymer clay is its ability to "be" just about anything else. I especially like the way it can mimic natural materials -- such as these stones. Today I'm going to show you three different materials you can mix into polymer clay to make "faux" rocks -- which you can then use for jewelry, for desktop rock-gardens, or for stamping with your own custom message.

Continue reading "3 Ways to Create Faux Polymer Clay Rocks" »

March 1, 2008

Custom Polymer Clay Word StampsPolymer Clay Central just posted a great tutorial by Kathy Canuel on making custom word stamps with polymer clay. If you've ever wanted to customize a gift by stamping the recipient's name, or add your own custom mark to a finished piece, or just save money on word stamps for polymer clay, her tutorial's definitely worth checking out.

To start, Kathy has you carve your word, mirror-image, into the clay, then follow that outline with extruded polymer clay. If you're like me & not crazy about your own handwriting (or if you have trouble writing in mirror image!), you could start with an image transfer instead.

Image Transfer & Extruded ClayBe sure to print your word/image normally (not mirror image like you'd do for most image transfers), since you want the stamp to be reversed. The transfer doesn't need to be perfect since you're just using it for a guide. Following the same method I used in my extruded clay texture mold video, I baked the clay sheet before continuing (to make it a little easier to work with), then added a layer of liquid clay. The honey-like consistency of the liquid clay catches the extruded clay pieces and keeps them in place, making it easy to follow the image transfer lines with extruded clay. Once you're happy with the word (check it with a mirror if you're having trouble visualizing it), follow Kathy's instructions to add a cute custom handle & bake it.

Looking for more ways to get your message across in polymer clay? Here are a few things to try:
  • Steel Stamping SetUse Stamps. If you have a set of alphabet rubber stamps, you can use them with polymer clay to spell out anything you like. You can also buy hardware stamping sets (like this one) for a pretty good price. Note: If you've got a Harbor Freight Tools nearby, take a print-out of the website's special price into the store with you. They'll honor the price, and you won't have to pay for shipping. (Thanks for the tip, April!)
  • Use a Label-Maker.
  • Alphabet Pasta, by dumbeast (Creative Commons)Use Pasta. Uncooked alphabet pasta is a good size for lots of projects -- and there's the added benefit of being able to bake it right in the clay, then pop it out after baking. Let me warn ya, though, that it's extremely time-consuming fishing out the right letters to spell a word. Especially if you're obsessive-compulsive and decide that the best solution is to separate each letter into its own little plastic baggie. Just guessing here, mind you... no personal experience at all! ;-)
  • Use Liquid Polymer Clay. Jeanne of ART for the HEART uses liquid clay and extruded clay pieces to create her own rubber stamps. The nice thing about these is you can run them through the pasta machine with your clay to get a great impression.

February 6, 2008

Giveaway: Mold Putty Project Pack + extrasTo conclude this mold putty series, I wanted to share a few additional mold putty tips & tricks. Plus, I'm giving away a project pack that includes everything you need to try your hand at molding.

More Mold Putty Tips & Tricks

Continue reading "Mold Putty Wrap-Up & Giveaway" »

February 2, 2008

If you love texture sheets & have ever wondered about creating your own, check out my latest video, How to Make Your Own Texture Molds.

It runs just over 7 minutes, and includes the following:

  • How to make a texture mold from a basket
  • How to use extruded clay to make a texture sheet
  • How to use your texture sheets along with clay in the pasta machine

Here's a few photos to give you a clearer view:

Other posts in this series:

Start molding today with the Mold Putty Project Pack.

January 31, 2008

Are you a visual learner? If so, check out my latest video for tips on making buttons and button molds. It runs just over 5 minutes, and includes the following:

  • How to use Amazing Mold Putty to make molds from buttons
  • How to use your button molds with polymer clay
  • How to poke button holes
  • How to add button shanks
  • How to use Pearl Ex powders to add a little pizazz to your buttons

And here's a few photos to give you a clearer view:

Continue reading "Video: How to Make Button Molds & Buttons" »

January 29, 2008

Making molds to use with polymer clay is super-easy -- but, like anything else, it can be a little intimidating to try for the first time. I talked about the basics of silicone mold putties in my Amazing Mold Putty review, but here are a few more pointers to get you on your way.

Making a Mold

Continue reading "How to Make Your Own Molds with Amazing Mold Putty" »

August 9, 2007

Rolodex by klynslisJust saw this cool idea on the Craftzine blog: How to Make a Rolodex into a Craft Resource Center.

I think it would work great for organizing polymer clay samples. Some possibilities:
  • Color Samples. Make notes of how many parts of each color you used to come up with this particular shade (more info here). Glue on a sample of the baked clay. File under "Colors."
  • Texture Samples. Whether you're using store-bought texture sheets, or your own homemade tools, it might be handy to know how you created a certain effect. Glue a sample of the baked textured tile to your rolodex card. File under "Textures."
  • Pearl Ex Colors. Same idea as the Pearl Ex Color Strip -- you could file individual powder colors or a whole color strip. File under "Powders."
  • Pasta Machine Settings. I'm always wondering what pasta machine setting I ended up using for some project or other. Make & bake some tiles, numbering them according to which pasta machine setting you used. If you wanna get ambitious, make a note on the rolodex card saying how that setting relates to other pasta machine brands' settings. These samples might be better in a plastic baggie (instead of glued) so you can easily take them out and compare thicknesses. File under "Pasta Machine Settings."

I'm sure there's all sorts of other things this would be handy for keeping track of. Any ideas?

Guess I know what I'm looking for at this weekend's garage sales! <g>

August 1, 2007

Eyelets, close-upIf you do scrapbooking or paper crafting, there's a decent chance you have several colors, shapes & sizes of eyelets in your craft stash. I've shown you a couple of ways to use eyelets with polymer clay -- as a pen tip for the bamboo skewer pen, or as hole reinforcement in the polymer clay notepad. But if you're still looking for ideas on combining these two craft supplies, here's 5 more ways to use eyelets with polymer clay:

Continue reading "5 More Ways to use Eyelets with Polymer Clay" »

May 3, 2007

Alcohol InksI admit it: I'm a tad compulsive. I like to have things just right. You know the little holder for whiteboard markers? I always have to have all the markers facing the same way, all the logos lined up, with the colors in a certain order (ROYGBIV, of course). I can always tell if someone's been using my markers. My husband occasionally calls me Mr. Monk (love that show, BTW).

Alcohol inks work great with polymer clay, and they're a lot of fun. One of the best things about alcohol inks is that if you don't like the results, you can wipe it off or add another color for a completely differently look. Of course, if you're compulsive like me, that's also one of the bad things about alcohol inks -- it's sometimes hard to stop tweaking and re-trying!

What You Need

You just need a few basics for working with alcohol inks:
  • alcohol inks
  • felt or applicator tool
  • alcohol blending solution
  • gloves

Note: I hate gloves -- but to me, this is one time when they're worth the trouble. Alcohol inks can really stain your fingers! The alcohol blending solution isn't totally essential, but it gives you a lot more options with the inks. Plus it's good for cleaning the stray inks off your fingers (or carpet -- oops!).

How To Do It

While alcohol inks can be used on either unbaked or baked polymer clay, I prefer working with it on baked clay so I'm less likely to mess up my clay piece.

Continue reading "How to use Alcohol Inks with Polymer Clay" »

March 18, 2007

Rubber CementThis will probably be a "well, duh" post for most of you -- but I thought I'd share it just in case there's anyone else out there like me.

We stopped by my parents' house on the way back from Austin, and I was chatting with my Mom about her scrapbooking supplies. She mentioned a new glue, and I responded that I could use a good glue. Specifically, I complained that when I'd used rubber cement, it would sometimes peel right off. My Dad looked up and said, "Well, it may have changed since I used it, but that used to be one of its purposes." (I hadn't considered that maybe I learned my hesitance to directly contradict someone from my Dad!) He said that back when he used it, putting the rubber cement on one surface made it such that you could peel it off, while putting it on both surfaces made it permanent.

When we got home, I looked at my bottle of rubber cement. And what d'ya know? It's right there in the instructions: "Low tack: Apply even coat to one surface and press together immediately. To remove, carefully peel from one edge. Stronger bond: Apply even coat to both surfaces."

So I tried it -- and sure enough, that did the trick. The thing is, I'm not the type that's averse to reading instructions -- it's just that I assumed I knew how rubber cement worked. I mean, doesn't everybody...?

Apparently not.

So thanks to Dad for pointing that out. Wonder what other instructions I need to go read now?

February 21, 2007

Abandoned Card, Before and After
Making a mistake is one thing that makes me want to give up on a craft project. But I've noticed that I also tend to abandon craft projects that are going really well. I'll get to a certain point and I'm happy with it... but if I don't have a clear vision for what the next step should be, I'll stop. I guess I'm afraid I'll mess it up.

I usually tell myself I'm just gonna leave it there for a couple of days and see if the perfect idea hits me. Ya know, divine inspiration. But after a couple of days pass, something more pressing comes along and it gets pushed to the side. And months later I find a pile of nice, promising half-finished works in the corner of the closet.

It doesn't matter how promising they were when I stopped working on them. They're still half-finished. And I suspect that finishing something -- even if it ends up being less-than-perfect -- is better for my inner artist than leaving it unfinished.

So here's an abandoned card I finished in honor of this week's challenge at Inspire Me Thursday. Their "Abandoned Art" theme served as a nice reminder that sometimes you need to get over the fear of future failure and just do something.

Any abandoned artwork in your closet? What caused you to abandon it -- a mistake you made, fear of messing it up, or something else? Leave me a comment -- or add your own entry to the Abandoned Art challenge.

Card materials: Stone Washed Denim-Basic Checks (Provo Craft); Denim Seams Printed Flat Paper (K&Company); Black & Cream Polkadot (Colorbok). Doodles Stamp & Design (All Night Media); Seasons of the Heart Set (D.O.T.S.). Blue fiber (Adornaments); polymer clay stars.

Alison Lee interviewed Donna Kato for this week's Craftcast, and I really liked what Donna said about mistakes:

"When you make a mistake -- or something you perceive as a mistake -- how much worse could it get? You might as well cut it up and put it together some other way. You're risking very little.
"If you don't like what you've done, there's no risk in changing it."

A great philosophy on artistic mistakes... and a great interview overall. Listen to the rest of the podcast here.

January 22, 2007

Rubbing alcoholRemoving pasta machine streaks isn't the only thing rubbing alcohol is good for. Here are a few other handy ways to use isopropyl alcohol with polymer clay:

  • Use rubbing alcohol to clean your work surface and clay tools -- including pasta machines, clay molds, and paint brushes (after using liquid clay).
  • Spread rubbing alcohol over the back of your paper for a better image transfer.
  • Smooth alcohol lightly over clay before baking to help get rid of fingerprints.
  • Use baby wipes soaked in rubbing alcohol to clean clay residue (especially that pesky red!) off hands.
  • When making mosaics from baked tiles, use a Q-tip and rubbing alcohol to scrub liquid clay "grout" off the tiles before baking again.
  • Clean any greasy residue off baked clay before applying a glaze finish.

Sounds like rubbing alcohol has earned its spot on the craft room shelf... Can you think of other ways you've used rubbing alcohol with polymer clay?

January 14, 2007

Pasta Machine Streaks - Before and AfterI admit it... I've got a dirty pasta machine. And a dirty pasta machine sometimes means I get dark streaks on my white polymer clay.

There's some obvious solutions -- ya know, like cleaning the pasta machine. There's also work-arounds, like running a baby wipe or some scrap clay through the machine first. But what if, despite your best efforts, you still get streaked clay?

Last week, Victoria James of Victoria James Art posted a solution to this problem on the Polymer_Clay_People Yahoo! group. Turns out that since those streaks are just on the surface, they wipe right off. Pour some rubbing alcohol onto a paper towel or baby wipe and just rub the streaks off the raw clay... Easy as that!

Thanks for the great tip, Victoria. Maybe now I can take "cleaning the pasta machine" off my list of things to do this year!

November 30, 2006

Tired of Christmas presents wrapped in that same old Santa-patterned paper with a red bow on top? Here's some great resources for easy and creative gift wrap that your family and friends will love.

  • Simplify. Real Simple demonstrates how to create simply beautiful packages using solid colored paper and natural accents. A few easy touches -- like attaching a ribbon handle or using inexpensive foam stamps for decorative accents -- can give a humble brown lunch bag a real handmade warmth.
  • Waste less. Concerned about the environmental impact of throwing away all that wadded-up wrapping paper? Try fabric wrap instead. Fabric is flexible -- which can be useful for odd-shaped gifts -- and it's durable enough for multi-year use. Sew your own fabric bags, or use a fabric square to try "furoshiki" (the Japanese art of cloth gift wrap).
  • Don't sweat the large (or odd-shaped) stuff. Some things are just tricky to wrap. These tips help with wrapping bats, balls, and other unwieldy items. Smaller odd-shaped items would fit well in these pillow-shaped boxes, made from recycled cereal box cardboard. But if it's a large item, you may be more interested in this approach. After all, kids of all ages love treasure hunts!

November 16, 2006

You know that bottle cap pendant I showed here a while back? Terri just wrote me to ask if there's an easy way to remove the plastic liner. She said, "I am making some bottlecap pins and taking that plastic liner off is so hard! I have tried to boil them off and that didn't work."

It's a good question -- unfortunately one that I don't know a good answer for. I looked online and found this PCCrafts.com article, which recommends boiling, using an embossing gun, or heating it with a coffee pot burner. Terri's tried boiling it. And I nearly burned my little fingers trying to pry the liner out after heating it with an embossing gun. In the end, I just ended up leaving my liner in and working around it.

Does anybody have suggestions for an easy way to remove the bottle cap liner?

November 9, 2006

Skinner Blend example I thought I'd never figure out the Skinner Blend. Every time I tried it, I ended up with a widened, flat-colored blend of the two colors -- not a nice gradient like I wanted. I assumed the problem was with the size or proportion of my beginning triangles, so I studied the online tutorials and tried adjusting this and that... Still nothing.

Fortunately, Deena Parsons went over this technique at a recent And Bear Makes 3 polymer clay class. Turns out the secret for fixing my problem was straightening out and smooshing in the left and right edges before each run through the pasta machine. That prevented the continual widening, and now I'm happily blending away.

Here are a few other tips, in case you're having trouble with the Skinner Blend:

Continue reading "Tips for Fixing Skinner Blend Problems" »

November 4, 2006

cg-mirror-image.jpgWhen you're doing an image transfer that includes text, you have to make sure the text is mirrored so it will end up the right direction on the polymer clay. Normally you'd do this by changing the "mirrored output" setting in the printer's advanced properties. But what do you do if your printer doesn't support mirrored output?

That's what we found ourselves wondering when our new Dell 3100cn color laser printer arrived. I was eager to try out an image transfer on it, and was stumped when I couldn't find the setting for Mirrored Output. We searched all the settings, and we did some online searches... but we couldn't find a way to do mirrored output on this otherwise full-featured printer. Fortunately, we figured out some work-arounds, so now I'm able to make image transfers whenever I want.

Here's some tips on making your own mirrored output -- regardless of your printer type:

Continue reading "3 Ways to Get Mirrored Output with Any Printer" »

October 8, 2006

Pearl Ex Color Strip I love using Pearl Ex powders with my polymer clay projects, and I have several of the Pearl Ex color variety packs. But more than once, I've gotten stuck on a project, staring at all the little bottles and trying to figure out which color would work best.

To fix that problem, I started making color strips for each box of Pearl Ex colors. It's quick to do, and it makes it a little easier to pick the best Pearl Ex color for the job. Here's how to make your own:

Continue reading "How to Make a Pearl Ex Color Strip" »

About this Site

CraftyGoat's Notes is all about sharing polymer clay tips & tricks that have worked for me. (And even a few that haven't!)

Read more about CraftyGoat's Notes...

Buy My Book

Archives

Enter your address to get CraftyGoat's Notes by email:

Delivered by FeedBurner