" /> CraftyGoat's Notes: November 2007 Archives

« October 2007 | Main | January 2008 »

November 23, 2007

Santa OrnamentAhhh... the holidays. When despite all the hundreds of other things I have to do, what I want to do is create. Something about the holiday spirit just inspires me... whether it's to create something yummy in the kitchen (pumpkin gingerbread & snickerdoodles) or to create something artistic in the craft room (Christmas cards & polymer clay gifts).

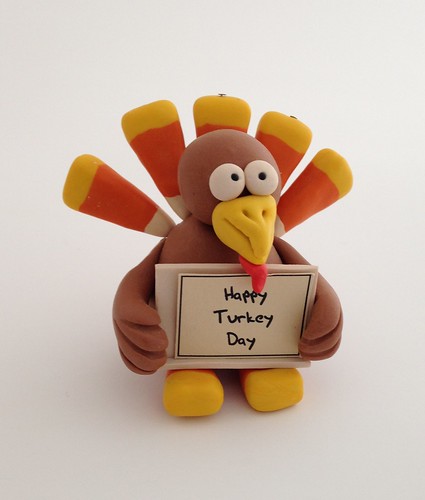
If you're similarly inspired & are looking to make some polymer clay Christmas ornaments, you might want to check out Maria Maestri's "Simply Ornaments and More: 1002 Designs in Polymer Clay" CD. Available for $19.95 (including shipping), this CD has step-by-step instructions for almost 300 polymer clay Christmas ornaments, plus pictures of hundreds more to use as inspiration.

This CD has a nice range of ornaments, including angels, snowmen, Santas, and more (check out the Table of Contents). It also has a generous policy allowing you to sell the items you create based on these instructions. In fact, it includes a lot of good information for folks selling their work -- things like how to work production-style, how to personalize your items & make items that appeal to different customers, and how to create your own designs.

Since the policy specifically mentions craft fairs and the like, I sent an email to the author asking if online sales were also acceptable.

Her answer: "I don't mind where someone sells what they make using my instructions. I have always said, no one's work is exactly alike and their interpretation of my designs has proven that. It would be nice to get acknowledgment for my designs, but I don't require or expect that." A refreshingly generous attitude!

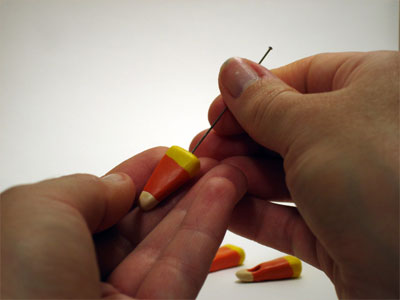
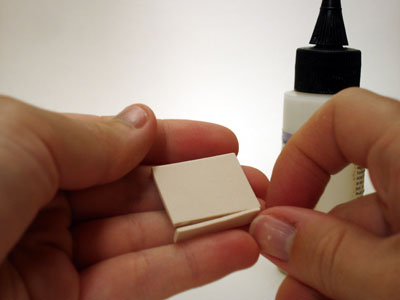
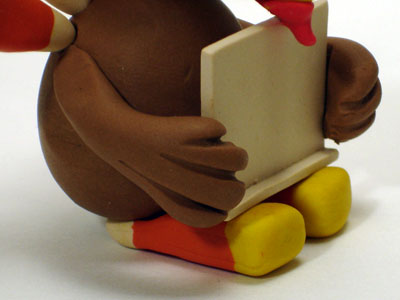
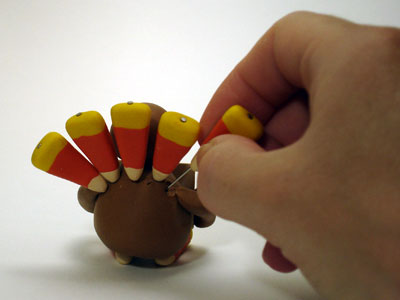
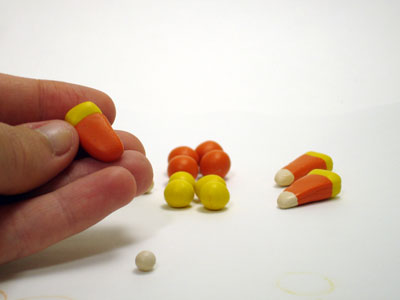
The thing that really makes this CD unique is its wonderful use of step-by-step photos. Not all of the projects include written instructions, but they all include multiple clear and detailed photos that make it easy to follow along (see examples here and here). The author said this CD has 3,000 photos... out of the 30,000 photos she took! She obviously put a lot of work into creating these wonderful pictorial tutorials.

Including all those photos does have a down-side, though. I found the CD very slow to use -- it took almost 2 minutes to start either of the two volumes on the CD. It performed better once it loaded, but the initial delay was annoying while I was exploring the projects. What I did to fix this was to copy the two .exe files from the CD to my computer's hard drive. Since it was no longer pulling all of the data from the relatively slow CD drive, the program started much faster (5-10 seconds).

The only other place I found this CD lacking was in its instructions for creating the ornaments' eyes. From her finished photos, it appears that she paints on the eyes after baking -- but I didn't find that specifically stated anywhere. A couple of paragraphs in the intro discussing eye options, and explaining how she does her eyes, would make this CD more complete.

Still, I am very impressed with this CD. The instruction quality is good, and the huge number of projects makes this a much better value than a similarly priced book. I would recommend this CD for any beginner- to intermediate-level polymer clay artist looking for Christmas ornament ideas -- or for anyone that wants tips for making and selling craft show products.

Summary

  • Title: Simply Ornaments and More: 1002 Designs in Polymer Clay
  • Price: $19.95 (includes shipping)
  • Pros:
    • Huge number of projects
    • Excellent step-by-step photos
    • Generous tips for selling your work
  • Cons:
    • CD is slow & clunky to use
    • Doesn't include any information on making ornaments' eyes

Update (4/9/2014): The Simply Ornaments tutorials are now available in PDF format on Etsy.

November 21, 2007

Turkey with "Happy Turkey Day" Sign

Polymer clay artists are likely to think of something completely different when someone mentions putting the turkey in the oven! This polymer clay turkey would be a fun addition to any Thanksgiving festivities -- even more fun when you come up with creative ideas for your own personalized signs. Here's how I made my turkey -- no basting required!

Materials

  • Polymer clay: tan, orange, yellow, white, red, black
  • Tools:
    • Pasta machine
    • Clay knife, toothpick, and/or other clay sculpting tools
    • Translucent Sculpey (TLS)

Instructions

  1. Insert eyepins into candy cornsMake candy corns. See my candy corn tutorial for instructions. I made 7 candy corns -- 5 to use as feathers and 2 to use as feet -- and I put eye pins in the feather candy corns before baking. If you have time, go ahead and bake the candy corns first. It'll make it easier to stick them into the turkey later.
  2. Add a ledge to the sign bottomMake the sign. I wanted to make it easy to change the turkey's "message," so I created a blank slate with a ledge at the bottom to prop up printed signs. To do this, I rolled out a sheet of white clay to a medium thickness on my pasta machine and cut it to about 1" tall by 1.25" wide. I also cut a thin strip the same width and "glued" it to the bottom using TLS. I baked my sign at the same time as my candy corns, again to make it easier to put the whole thing together without distorting the smaller pieces.
  3. Make your turkey's body. My turkey's body was based on the raven instructions from Joshua Burkhardt's Hangin' Around With Noah, so I won't go into all the details here. (The book is inexpensive, a fun read and great for beginners, so I'd recommend it if you're thinking about making some polymer clay animals.)

    In fact, I'd originally planned for my turkey to have jute legs like Joshua's creatures do -- but decided in the end that I liked his feet snuggled up to the sign. Two additional notes on things I did differently:

    • Turkey fingers, close-upCreate feathered "fingers". My turkey needed a way to hold his sign, so I gave him long, flowing feathered fingers. I used my needle tool to create these.
    • Turkey waddle, close-upDon't forget the waddle. Any self-respecting turkey needs a red waddle under his chin. Use TLS to attach it to the beak.
  4. Adding turkey feathersOnce the body is created, evenly space the feather eye pins across the back of the turkey (it helps to start from the middle and work outwards). Press the feet onto the body, carefully ensuring that the turkey is well-balanced enough to sit upright. Prop the sign on top of the feet, wrapping the turkey's fingers around the sign's edges. Now bake the whole thing according to the manufacturer's instructions (a thicker piece like this will take a little while), using polyfill or other oven-safe props as necessary to hold him upright during baking.

Variations

  • Change up the sign. As an alternative to printed signs, you could use an image transfer for the sign or create the sign with your label maker. And what should the sign say? Here's the ones I sell my turkeys with -- use them as springboards for your own ideas:
    • Welcome
    • Happy Turkey Day!
    • Eat More Ham!
  • Add real feathers: Using real feathers would give your turkey a completely different look.
  • Accessorize. A pilgrim's suit and hat would look awesome.

Good luck creating your polymer clay turkey -- I'd love to see what you come up with. And whether you're sticking a polymer clay turkey in the toaster oven, or basting and stuffing the real thing, I wish you all the best this Thanksgiving!

November 20, 2007

Glaze drying on polymer clay candy cornsCandy corns are one of those candies -- like marshmallow eggs or candy canes -- that are definitely seasonal. Around here, it just doesn't seem like autumn til we've bought that first bag of candy corns. It's a yearly tradition.

Another yearly tradition is when I take a few of those candy corns up to my craft room to use as a model for my yearly batch of polymer clay candy corns. These are easy & fun to make -- and they can be turned into any number of things (earrings, thumbtacks, etc.). Course the best thing about the polymer clay version is they're not sticky & they won't ruin your diet!

Here's a quick tutorial on how to make your own batch of candy corns out of polymer clay:

Materials

  • Polymer clay: orange, yellow, white
  • Tools (optional): pasta machine, round cookie cutters

Instructions

  1. Cut out the clay

    Cut out orange, yellow and white clay pieces. I use my pasta machine to roll out each color of conditioned polymer clay to the thickest setting. I then use a set of small cookie cutters to cut out the right size clay pieces. The cookie cutters I use are 5/8" diameter (yellow), 3/4" (orange) and 1/2" (white).

    This is a quick way to ensure all of pieces of each color will be exactly the same size -- which is important if you're making a pair of something like earrings. But if you don't have a pasta machine and/or cookie cutters, you could just eyeball it. Or you could embrace the uneven-ness as "handmade charm."

  2. Roll each color piece into a ball. Making a ball first will help eliminate creases in the clay when you push the colors together.
  3. Push together the clay piecesPush the colors together. Start by pressing together the orange and yellow balls. Smoosh them together to eliminate the seam between the colors, then roll this between your thumb and index finger to create a conical shape. Wipe your hands off on a baby wipe (to prevent tinting the white clay), then repeat the process to add a white ball to the bottom of the candy corn. If you want to match the traditional Brach's candy corn, the color order should be yellow (top), orange (middle), white (bottom).
  4. Candy corn post earrings

    Shape & bake. Now that the colors are all in place and the seams are mostly eliminated, work to achieve the conical candy corn shape. (Buy a bag of candy corns for "research" if you need a little help. Or you can try Flickr -- but where's the fun in that?!)

    Once you're happy with the shape, do any other pre-baking steps required for your specific project. For example, if you're making dangle-y earrings, you may want to stick an eyepin down the middle. Finally, bake your candy corns according to your clay manufacturer's recommendations (check the package if you're not sure).

    If you want a little shine, you can glaze the baked pieces using Future floor finish or another polymer-clay friendly product. When I glaze my candy corns, I push them into a styrofoam block til they dry.

Enjoy making these fun little candies. Who knows -- maybe polymer clay candy corns will become the new sign of fall in your household!

For more candy corn fun, check out Brach's recipes and Curbly's Candy Corn Cookies. And don't miss the "Ode to Candy Corn" written by Lynn of Lynn's Favorite Recipes on National Candy Corn Day.

About this Site

CraftyGoat's Notes is all about sharing polymer clay tips & tricks that have worked for me. (And even a few that haven't!)

Read more about CraftyGoat's Notes...

Buy My Book

Archives

Enter your address to get CraftyGoat's Notes by email:

Delivered by FeedBurner