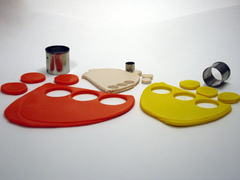
Quick Tip: How to Accurately Measure Polymer Clay
 Sometimes, when you need two pieces of about the same amount of clay, you can eyeball it and get close enough. But sometimes you want to be a little more exact. For example:
- Making same-sized parts: Earrings look best if they're both the same size (unless you're trying for that uneven look!). Same goes for strands of beads.
- Color-mixing recipes: If you're mixing 3 parts yellow and 1 part orange to get the perfect color, it's nice to have a defined size for each "part."
- Re-creating previous projects: For products I sell, I like to keep detailed instructions so I can re-create an item. Knowing measurements means it's much easier to make this pair of earrings the same size as the last pair the customer ordered.
Here's an easy way to accurately measure polymer clay:
- Roll out a sheet of clay to any thickness you like on your pasta machine. (If you're writing instructions for later, make a note of the thickness you chose.)
- Use a cookie cutter to cut out a circle of clay.
- For color-mixing, each circle of clay is a "part" — so the cutter's size and shape don't really matter.
- Otherwise, make a note of which size of cookie cutter you used. I use a Sharpie to number my cookie cutters, starting with 1 as the smallest, so I can just make a note of which number cutter I used.
Got your own favorite way to measure polymer clay? I'd love to hear it — just leave me a comment!


Comments
I roll a ball or create a square flat piece and then cut it down the center. The ball works perfectly for eyes. Not very scientific, but it works :D
Posted by: Sue Choppers-Wife | April 16, 2009 5:05 PM
Great way to do it, Sue -- thanks for chiming in!
Posted by: Angela Mabray | April 16, 2009 11:23 PM
Light turns on...ah, that's what else I can use that set of cutters for. Yousoclever!!
Sometimes I am clueless when it comes to polymer, being such a newbie. But I have learned-by many squished attempts-that when following 'tuts', I need to adapt my holds and the steps so that I don't undo all the carefully carved details. Sigh, why did I have to find polymer. No, couldn't be JUST a potter...
Shaun
Posted by: Shaungrl | April 18, 2009 12:03 PM
Glad I could help ya find another use for the cutters, Shaun!
I know what you mean about losing details by over-handling a piece -- I've definitely done that a time or two! You mentioned doing the detailing last... you can also try leaving the piece on the baking tile for detailing. You can turn the tile to get to the different sides, instead of turning the piece in your hand and possibly squishing something. Using a firmer clay brand (like Kato or original Fimo) -- or letting softer clays cool a bit between conditioning and adding details -- can also help. And just getting more familiar with the clay will help.
I for one am glad you found polymer clay... the more, the merrier! :-)
Posted by: Angela Mabray | April 19, 2009 6:43 PM
This is a great idea. Makes perfect sense!I bought a set of tiny shapes at Michael's for this very purpose.
Posted by: seedplanter | April 27, 2009 11:44 PM