" /> CraftyGoat's Notes: May 2009 Archives

« April 2009 | Main | June 2009 »

May 30, 2009

"Work more hours than the average factory worker." - Robert Genn, "Artist for Life"

Lori Woodward Simons recently posted a challenge to herself and to any fellow artists interested in joining her — a challenge to spend a minimum of 20 hours per week creating art. One thing I especially like about her idea is that she's also doing Show And Tell Fridays, asking folks to use Twitter, Facebook, and/or forums to share their accomplishments and to help hold each other accountable.

Some people think Twitter's just a time-waster... and in some cases it is. But Lori touches on another side of Twitter that people don't always consider. By carefully choosing who you follow, you can surround yourself with like-minded people, productive people who you admire and respect. It can be a way to peek into the daily life of someone who's reached some of the goals you're trying to reach. And it can be a way to announce your goals and feel that others will be holding you accountable to work towards them (Christine Kane likes to imagine her followers as virtual Song Coaches).

For Lori's Show And Tell Fridays, she encourages you to tweet your accomplishments for the week each Friday, telling your hours tally, sharing photos of what you've worked on, or otherwise celebrating your progress. You can label your tweet with the #20hrchallenge hashtag to make it easier for other participants to follow your progress.

While she says 20 hours is a number that works well for her as a full-time artist, maybe a goal of 5 or 10 hours is more realistic for you. What matters most is setting your own goal and making it happen. Crafting time is a precious commodity around here with a 3 month old who seldom naps for long, so I'm planning on setting my goal for 5 hours next week.

Wanna play along?

Update 6/2/09: Lori has now set up a separate website for the 20 Hour Studio Challenge, including a blog, e-newsletter and more.

Update 8/31/09: I haven't seen any updates on Lori's site lately... and a Twitter search doesn't bring back any results from others using the #20hrchallenge hashtag. So this may be one of those Internet fads that quickly fades away. Still, I've personally had very encouraging feedback from some of my followers on Twitter.

I've also found this weekly check-in helpful to me in some unexpected ways. I knew it would challenge me to be more conscious about how I'm spending my time. But my favorite part, as it turns out, is the weekly photo I take of what I've worked on. Whether it's a little or a lot, having that visual evidence of progress is encouraging to me. It's nice to have photographic records of when I worked on a particular project. Plus it's an excuse to clean off my desk once a week, and that de-cluttering makes the next week's creativity that much more enjoyable.

So I'm sticking with the challenge for now, even if the rest of the movement may have lost some steam. I do think I'll change my hashtag to #5hrchallenge, though, so it matches my personal goal.

Update 11/8/09: 5 hours of crafting ain't gonna cut it now that I'm writing a polymer clay book! Thankfully I've arranged for some help with Sam a couple of days a week. Upping my personal crafting goal (writing and photos count separately, FYI) & changing the hashtag to #10hrchallenge

Update 5/10/10: Still at it. The book's done, and I have Sam full-time over the summer... so it's back to 5 hours for me. #5hrchallenge

May 19, 2009

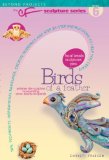
Christi Friesen: Birds of a FeatherSteampunk. Oh boy, oh boy, oh boy!

That's what kept going through my head as I opened the package containing Christi Friesen's new book, Birds of a Feather.

You may remember how disappointed I was to realize Friesen's Polymer Clay and Mixed Media book didn't have any of her latest steampunk stuff. Well, this is the book that has it. I've been eager to try my hand at a steampunk-style project, and I admit I skipped right to that chapter when I got the book. I wasn't disappointed, either. But more about that later...

The Book

At 50 pages, Birds of a Feather is a pretty small book. But Friesen fits a lot into that space — each page is packed with pictures and text. She fits it all in beautifully, too. This book is an example of self-publishing gone very right. I love the cover (much better than the last book's cover), I love the illustrations... I love it all.

Well, almost all. The pages seemed glossier than the average craft book, which made it a little hard for my tired eyes to read (still doing those midnight feedings for the little guy!). The book itself is a little flimsy (think pamphlet or magazine) — but on the up side, that makes it easy to keep it open on the desk while working through projects.

This is the 6th book in Friesen's Beyond Projects CF Sculpture Series. Don't worry if you're like me and new to the series, though. She makes mention of previous books a couple of times, but these projects don't rely on knowledge of previous projects. It's okay to jump in mid-series. (There's a pretty good possibility you'll get hooked, though, and have to work your way back. Fair warning.)

I like the way Friesen starts with a short intro to clay at the front of the book (just 2 pages), then puts the rest of the reference materials in the back. It makes it easy to jump right into the projects. She also puts repetitive instructions in the back — the types of instructions that are needed for multiple projects. That's part of how she packs so much information into such a short book.

The book is full of puns and witty writing. It's also full of fun. Friesen's books encourage folks to just have fun with clay. You can do a "Lookit" blend instead of a Skinner blend. You're "lectured" on the importance of doodles. Creatures don't have to be realistic — they can be completely made-up. She encourages you to focus on the artistic and creative process, which is a nice break from fussier technique-driven books.

The Projects

The book has 10 projects, including:

  • Feather Brooch
  • Parrot Wallpiece
  • Toucan
  • Birdnest Bead
  • Steampunk Bird Focal Bead
  • Phiery, Phlat Phoenix Bead
  • Lil' Blob Birds
  • Flapping Flamingo Pendant
  • Swan Wallpiece
  • Owl Focal Bead (Partial project. The rest is available for free on her website)

I was pleasantly surprised with the variety of projects in this book. I was expecting it just to be birds. (And there were plenty of those.) But the feather project and bird nest project made sure things didn't get boring. And Friesen's always good about including photos of variations for each project.

There were lots of good techniques sprinkled in with the projects, too. Some of my faves:

  • Parrot: Stitching with wire — interesting!
  • Toucan: Nice method for feathering the head color onto the body.
  • Birdnest: Uses twine, thread, and wires. Lots of mixed media in this book.
  • Steampunk: Suggests laying out embellishments so you have lots of choices visible. This is one of my favorite ways to work.
  • Swan: Very pretty. I like how she puts gold mica powder on top of the gold leaf.

All of the projects are illustrated with a nice number of step-by-step photos. However, the photos are pretty small. Sometimes it's hard to see the details she's pointing out in the related text. Not only that, but since they're unlabeled (and scattered all over the page), it's sometimes hard to figure out which photo goes with which text. I got a little lost on one of the projects because of this.

My Results

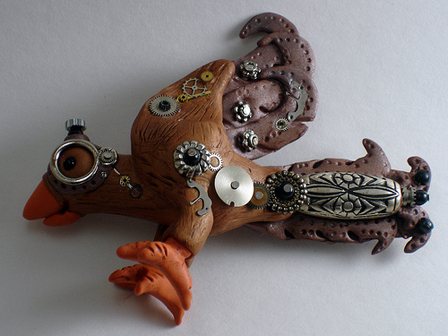
Did I mention I was excited about trying the steampunk project? It didn't disappoint. I ordered some steampunk findings (Friesen lists sources in the book, or you can buy them on her site), spread them out across my desk, and started playing. It was a little more tedious than I expected. I was grateful more than once that I had a magnetic tool close-by for finding tiny runaway screws. (And I didn't trust my cats alone with that stuff for a minute!) But I definitely enjoyed it.

Steampunk Bird

Feather Clay Jar

Summary

  • Cons:
    • It's only 50 pages long (though they're a packed 50 pages), and the book's pamphlet-like
      format seems a little flimsy.
    • The photos are small and unlabeled, so it can be difficult to follow along.
  • Who It's Good For:
    • Bird or steampunk aficionados, regardless of whether or not you've read the other books in Friesen's series.
    • Beginning clayers will enjoy the book and have good results following her instructions. Intermediate clayers will find some interesting tips and techniques, too.

May 12, 2009

IPCA Retreat: I'll Be There. Will You?I am now registered for the International Polymer Clay Association Retreat, which will be held in Chicago this July. This is my first retreat — heck, it's my first time to attend any polymer clay event besides a guild meeting — so I'm sure I'll learn a ton. (It's also our first big road trip with our baby, so there's a good chance I'll be learning a ton on very little sleep.)

Christi Friesen will be doing a day's worth of demos, plus there are demos scheduled with Judy Belcher, Seth Savarick, Kathi Gose, Julie Picarello, Lorrene Davis, and Lisa Pavelka. So it really looks like a great event! Anybody else out there planning on going? Any tips for a new attendee?

May 9, 2009

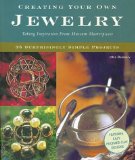
Creating your own Jewelry bookI occasionally watch decorator shows on HGTV, with the hope that one of these days I'll apply their lessons and spruce up my surroundings. One of the shows Tivo faithfully records for me is Sensible Chic, where they take a high-end designer room and recreate it "at a fraction of the cost."

That's kind of what Cris Dupouy's Creating Your Own Jewelry: Taking Inspiration from Museum Masterpieces does. Dupouy gives instructions for re-creating 35 museum-inspired jewelry pieces, using polymer clay, semi-precious stones, acrylic paint, and a few jewelry findings.

The Inspiration Pieces

Drawing her inspiration from as far back as the 7th century B.C., Dupouy uses both actual jewelry pieces and jewelry shown in paintings. Each of the projects starts with a photo and the history of the original piece. This is a nice touch, and would make the book enjoyable for art history buffs. (Art lovers would also enjoy Sue Heaser's Polymer Clay Mosaics, reviewed here, for the same reason.) It made me realize how little I've paid attention to the jewelry in artwork — even the paintings I was familiar with, I hadn't noticed their jewelry. There's a lot of possibilities for inspiration there, far beyond the museum pieces that are in this book.

The Projects

The book includes various levels of projects, but since it's laid out chronologically, the projects aren't in order from easiest to hardest like in many books. I like that Dupouy includes time estimates for each project, breaking it down into preparation time (ranges from 15 minutes to 3.5 hours), baking, cooling, patina and drying time.

Instead of using step-by-step photos for the projects, the book uses gorgeous hand-drawn illustrations. I personally liked this — I thought it was a unique touch that fit with the artistic theme of the book. It might make the instructions more difficult for a beginner to follow, though.

The projects are beginner-level, although the book doesn't cover clay basics that beginners might need to know. Still, there's nothing too complicated here. In fact, in many ways it's the same basic idea again and again. The stones and settings vary, but the technique is always about the same: form the setting from black clay, add texture and some filigree-style embellishments, then bake and patina. Of course, what's not to love about the magic of patina on black clay? (I know I still get tickled when it works well!) So beginning clayers may find themselves hooked, doing project after project. But there's not a lot here for intermediate- and advanced-level clayers, except inspiration.

I'm a bit of a clay purist: one of the things I love is using polymer clay for faux techniques. So I was disappointed that this book didn't include faux instructions for any of its stones — even things like turquoise that would be fairly easy to do. Of course, if that's your thing, you could always combine the jewelry projects in this book with the faux techniques in a book like Irene Semanchuk Dean's Faux Surfaces in Polymer Clay to make some really cool faux projects.

My Results

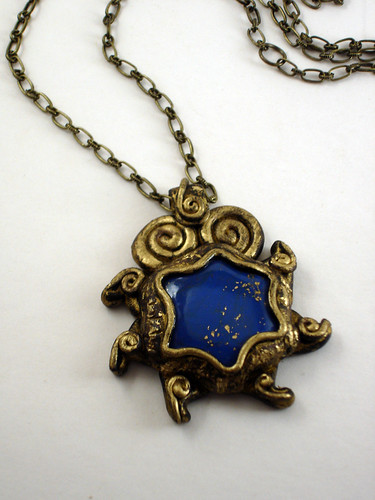
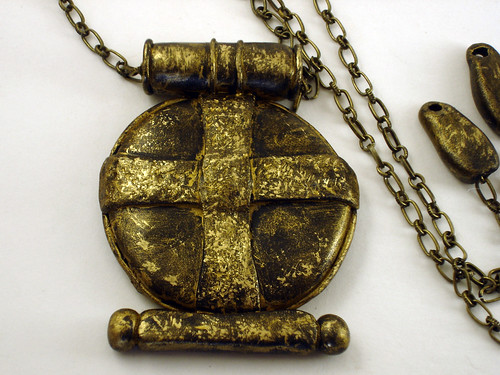
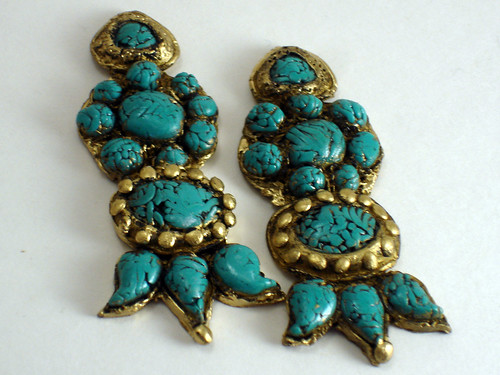
I tried three projects from this book, and was pretty happy with the results on all of them. I chose to create my own faux blue lapis and turquoise stones with instructions from another book, rather than buying those stones. Here are pictures of my end results:

Madeleine of Burgundy's Pendant

Princess de Broglie's Pendant

Tibetan Earrings

Summary

  • Cons:
    • Not a lot of variety in techniques.
    • The instructions cover the settings only. No faux techniques for stones here.
  • Who It's Good For:
    • Beginning clayers who want to try their hand at some simple jewelry-making projects.
    • Artists who enjoy reading about (and getting inspired by) historical jewelry pieces.

May 5, 2009

A few posts back, I talked about using the cookie cutter method to accurately measure polymer clay. While that's a quick way to do it, sometimes one of these methods might work better for a particular task:

  1. Polymer Clay TemplateUse a polymer clay template. Polymer clay templates are clear plastic sheets with holes for measuring balls of polymer clay. They also include diagrams showing Fimo, Sculpey, Premo & Cernit clay bars, so you can determine clay amounts for 1/4 block, 1/16 block, etc. About.com's Miniatures site has an article with more info about polymer clay templates.
    • What it's good for: including standardized measurements in project instructions for someone else to use; giving measurements based on package sizes; determining how much of a package of clay a project uses (to help you determine costs).
  2. Marxit / PolyRulerUse a Marxit. A Marxit tool (also called a Polyruler) has equally-spaced indentations along each of its 6 sides, with increments ranging from 3 mm to 20 mm. If you're a seamstress and don't want to make an extra purchase, you could also use your sewing guage. [Sewing guage tip via Katherine Dewey's Creating Life-Like Animals in Polymer Clay, reviewed here.]
    • What it's good for: getting equal-sized slices of canes; cutting even strips from a sheet of clay; cutting lots of same-sized pieces from an extruded snake
  3. Slice & dice. The simplest methods are sometimes the best. As Sue commented on my previous post, cutting a ball in half is a good low-tech way to get equal amounts. If you don't trust yourself to cut a ball right down the middle, try rolling it into a log and using a ruler to find the halfway point.
    • What it's good for: making measurements when you don't have (or don't want to bother with) special tools; making same-sized body parts for a sculpture

Any other suggestions?

About this Site

CraftyGoat's Notes is all about sharing polymer clay tips & tricks that have worked for me. (And even a few that haven't!)

Read more about CraftyGoat's Notes...

Buy My Book

Archives

Enter your address to get CraftyGoat's Notes by email:

Delivered by FeedBurner