" /> CraftyGoat's Notes: July 2009 Archives

« June 2009 | Main | August 2009 »

July 21, 2009

As I mentioned in my IPCA retreat wrap-up, Polyform (the makers of Sculpey, Studio by Sculpey, Premo, etc.) sent their chemist, Kim, and their education manager, Iris, to hold a question and answer session. This session was very popular with the attendees and extremely valuable to me. Here are the highlights of the discussion:

  • Every batch of each color and type of clay is tested multiple times to ensure it's within acceptable ranges. BUT they err on the softer side when they manufacture the clay, because it can age over its 6-month distribution and warehousing time. The hardness of the clay when you get it depends on how long it took to get to you.
  • Polyform only ships Monday through Wednesday in the summer months so the clay is less likely to get partially baked in transit. Still, once it's out of their hands, they can't control where (i.e., an un-air-conditioned warehouse) or how long it's stored.
  • If the clay is too soft when it gets to you, they recommend leaching to get rid of the extra plasticizer. If you leach too much (or if it's too hard), add Mold Maker or clay softener to give it more flexibility. I've always wondered if this kind of tweaking hurts the strength of the clay. The chemist said that while leaching too much could hurt the strength, it should be fine if you crank up the temperature and make sure it's baked properly.
  • The higher baking temperature was a recurring theme. While the package temperature (275°) seems to be the company's officially-recommended "safe" temperature, they said you'll get stronger clay if you bump it up another 10-20 degrees. Interestingly enough, they had also tested the Fimo clays using both the old higher and new lower temperature recommendations. They said it was stronger at the higher temperatures.
  • Phthalates came up several times (surprise, surprise). All of Polyform's clays except Studio by Sculpey are now phthalate-free. (Interesting tidbit: they've already had to spend $50,000 this year testing and certifying their products.) The chemist said that phthalates have been used for a long time (100 years, I think), and were not a risk... that basically they were the latest victim of a witch-hunt. (See this older Polyform document for safety info on phthalates). She said we will start to see a reduction in the clay's shelf life now that the phthalates have been removed.
  • Another safety concern that people asked about: baking in your home oven. The chemist said that the residue you find in your oven is a plasticizer. While there are no "toxic fumes" unless you burn your clay, she recommended opening a window while curing, or using your oven vent. Try a turkey basting bag or covered pan if you're using your regular home oven.
  • They recommended curing TLS at a higher temperature for clarity. They also said that Bake and Bond is different that TLS: it's thicker, so it works more like a glue.
  • The "moonies" in translucent clay are caused by moisture and trapped air.
  • Clay colors aren't UV colorfast. If you want to use it outdoors, get a marine varnish.
  • Polyform has a designer endorsement program for published projects using their clays. They also have a program where guilds can receive clay for lessons. In both cases, you must use only their clays (no competing products).
  • They encouraged us to contact their customer service department for any product questions or problems. They try their best to answer any questions that come in.

I was very impressed with Polyform for doing this. They were the only clay company that came to the retreat (we thought Pardo was going to be there, but the "word on the street" is they decided there weren't enough attendees to make it worthwhile). Having a no-holds-barred Q&A session seems like a risky thing for a company to do, but I think most people came away with a new respect for them. And while we've heard some of these things (like the leaching recommendation) tossed around on message boards and forums before, it's nice to hear them officially from the experts.

July 17, 2009

Maureen Carlson: Making FacesWow! That's my one-word wrap-up of the 2009 International Polymer Clay Guild Retreat. I wasn't sure what to expect from my first retreat... but it turned out to be everything I'd hoped it would be.

These were a few of the highlights for me:

  • The attendee bags were filled with some really nice goodies. I'm looking forward to trying the Pardo clay and the Premo Frost (up til now, I've just used their regular translucent).
  • Suzanne Ivester (what a nice person!) shared lots of uses for Blu-Tack (what a handy material!). She's also posted this list of Blu-Tack uses online. My favorite tip: use a glob of Blu-Tack to keep liquid clay lids in place when you take the bottles to classes.
  • Christi Friesen's demos were (predictably) a lot of fun. She is as enjoyable in person as her books make her sound. She's also incredibly generous with her time and information. Even when she wasn't doing official demos, she was answering questions or doing informal classes at her workspace. (By the way, a little birdie said Christi's going to have a polymer clay steampunk book coming out soon!)
  • Lee Ann Armstrong did a very-cool demo showing a new super-easy glazing material she discovered. I'm not going to spill the beans here, though, since she has an article coming out about it in PolymerCAFÉ.
  • Maureen Carlson's talk on making faces was very educational. I asked for (& got) one of her new puzzle-style face molds last year for Christmas, but I still haven't tried it (shame on me!). Now that I've seen the demo, I'm eager to pull it out and play with it. It was neat to see some of Maureen's creations in person, too. What a talented artist and teacher!
  • We ate lots of yummy food. The conference meal package was good, but we also enjoyed getting to try Chicago-style deep-dish pizza, Culver's ButterBurgers & free pie Wednesday at Bakers Square.
  • The talk from the chemist at Polyform was very interesting. Since I took almost 3 pages of notes, I'm going to write that up as a separate post. I've felt in the past that Polyform didn't really listen to its customers, but this retreat changed my mind. I was very impressed with them.

On a personal level, I was really excited to meet with the really nice ladies from PolymerCAFÉ magazine, as well as the editor from Kalmbach books. It was also nice to meet some of the people I've followed on Twitter forever... I like putting faces with names. I made new friends too, even though I didn't get to socialize as much as I would have liked to (I'm still nursing our little guy, so I spent a lot of time rushing back to the hotel room).

Overall, it was well worth the expense to me. I'm so glad I got to go to this one (thanks to my supportive hubby for making it possible), and I'd definitely consider going to the next one.

If you're interested, there are a few retreat pics in this IPCA Retreat Flickr Pool.

July 12, 2009

I'm sitting in the amazingly nice hotel at the 2009 International Polymer Clay Guild Retreat in Chicago. Hubby and I arrived around 9 p.m., after spending most of the last two days in the car with our (thankfully) usually-happy 5-month-old.

I went down to the main retreat workroom last night long enough to check in and do some preliminary set up. Having never been to any claying event larger than a guild meeting, I was wowed by everything. I picked a table halfway between Christi Friesen and Lisa Pavelka, thinking how fortunate I am to get to see some of my clay "heroes" in action. The goody bags were awesome — filled with clay (Studio by Sculpey, Premo and Pardo), clay tools, and a few samplers I'm not even sure what to do with.

Our car was packed pretty full (how can a little baby require so much stuff!?), but I'm already wishing I'd brought a few more supplies to work with — especially my alcohol inks. I suppose I could use this as an excuse to buy more... but everything has to fit in that same car for the trip home!

The schedule's busy, but I'm planning on tweeting as I go (look for the #ipca09 hashtag).

Also, a question for you. Polyform (makers of Sculpey, Premo, etc) will be sending one of their chemists for a Q&A session tomorrow. Do you have anything you'd like to ask? Leave a comment, and I'll try to pass your questions along.

July 9, 2009

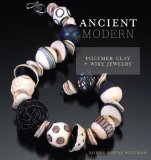
Ancient ModernEver heard of National Novel Writing Month (aka NaNoWriMo)? It's a yearly event where people sign up to write a 50,000-word novel in one month. It's exhilarating. It's crazy. And everybody should do it at least once. (When you do, read NanoWriMo founder Chris Baty's No Plot? No Problem! first to get in the right frame of mind.)

While I'm sure Ronna Sarvas Weltman didn't write Ancient Modern: Polymer Clay + Wire Jewelry in a month, there's still something about it that reminds me of NaNoWriMo. But more on that in a minute.

The Book

The title Ancient Modern seemed a little odd to me, especially for work that looked to me to be primarily organic. Elsewhere it described itself as "elegantly primitive," which made more sense. Regardless of what you call it, the style is not for everyone. I personally think it's beautiful — but then again, that organic look has been trending in polymer clay for a while, so I've probably acquired a taste for it. My mother, on the other hand, glanced through the book and said, "There's some really ugly stuff in there, huh?" So, yeah, not for everyone. :-)

The book starts with a lengthy (33 pages) intro section that covers jewelry design, wire techniques and polymer clay basics. The sections on wire and polymer clay are good. But for me, the section on jewelry was the best part of the book. She starts by talking about the 6 principles of design, the color wheel and where to find inspiration. She then jumps into jewelry mechanics, giving suggestions for weighting the elements so necklaces, bracelets and rings hang correctly. She includes really helpful charts, like the one showing the names and ranges for standard necklace sizes (I'd never seen that before). The section for jewelry by itself would make the book worthwhile to beginning and intermediate jewelry-makers.

The Projects

Following the intro, Sarvas Weltman jumps into the projects. There are 15 projects, including 6 necklaces, 4 bracelets, 2 earrings, 2 rings and 1 brooch. Each of the projects is then broken down into multiple parts. For example, the first necklace has instructions for making 12 different beads.

Which brings me to my first small gripe. Each chapter has two large museum-style beauty shots at the beginning. Later, each bead has a few step-by-step photos. But she doesn't show detailed photos of each completed bead. So I kept having to flip back and forth to the beginning of the chapter to see which bead we might be working on now (the names weren't always helpful), and how the bead should end up looking. And in some cases, the beauty shots obscured some of the beads, making it hard to tell anything about the end result. While the beauty shots really give this book a nice look, it's important for an instructional book to have clear photos in the appropriate places.

The step-by-step photos are pretty good. I like that they were large enough to show detail. I wish they had lined up better with the text they were illustrating. This caused me a little confusion a couple of times, but it wasn't a big deal.

The instructions were well-written overall, but two things bugged me. First, the NaNoWriMo thing I mentioned earlier. See, one year my husband was getting close to the end of the month, and was short on word count (the goal is 50,000). So he introduced a plot element where time was repeating itself for his main character, sorta like in the movie Groundhog Day. After a few cut-and-pastes, he magically passed the word count. And since it was part of the plot, it wasn't necessarily against the rules. But still...

In Ancient Modern, the instructions for the Zebra Cane are repeated — THREE times — word for word. The wire-ball bead instructions are also repeated. This was probably just something they overlooked in the editing process. But even though there's plenty of other information in the book to make it worthwhile, those repeats made me feel a little cheated, like they were padding the book.

The second thing that bugged me was the other extreme. Often, instead of writing out the steps again, the author instructs you to repeat certain steps. While this is great in small doses, sometimes it would work better to just spell things out again to prevent confusion. For example:


Step 13: Repeat Steps 1-5 (on p. 48) twice to create a Ring Bead but make the cane in Step 2 with leftover Marble Mix from Step 1 and cover it with a thin sheet of black clay. In Step 4, blend the slices into the bead by rolling the bead between your palms.

This is even more confusing when the numbering gets messed up. Like where step 17 says to repeat 19-21, step 23 says to repeat 24-27, and step 19 says to repeat 19. (I'm lucky I didn't try that project, or I still might be stuck on step 19!) ;-)

Still, the instructions were easy to follow. It helps that the polymer clay techniques in this book are mostly pretty basic. The organic, imperfect style is always enjoyable because there really are no mistakes. It's all about creativity. So while I enjoyed making the beads, I doubt there's anything in here that an average clayer couldn't figure out on her own.

The average clayer might not be as familiar with the wire techniques Sarvas Weltman includes. I've always been less than enthusiastic about working with wire, and I hoped this book might help me get over that. And it might have. Unfortunately, I didn't realize good wire (she recommends sterling silver or copper) isn't available at Michaels or Hobby Lobby. (Are there other local stores that might sell this?) I'm intrigued enough by her instructions that I want to give it a try, but I haven't ordered any yet.

My Results

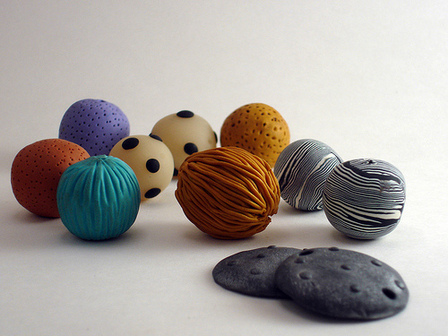
Since I couldn't find any wire — and pretty much all of the projects require wire — I just made some of the beads from the first necklace project. They were fun to make (no worries about perfection with this style), and they turned out pretty well. We'll see. I may get some wire and turn it into a necklace after all.

Ancient Modern beads

Summary

  • Cons:
    • The clay techniques are pretty basic. Intermediate clayers could get bored.
  • Who It's Good For:
    • The clay techniques are definitely easy enough for beginners.
    • Intermediate clayers may find the book worthwhile for its jewelry design tips, its wire-working tips, or just for inspiration.

July 2, 2009

Alcohol Ink Postcards

Last time I showed how to make recycled postcards using cereal boxes and crumpled tissue paper. Today I'm taking a cue from these plastic bag prints, using alcohol inks and a plastic bag in a postcard project.

Materials

  • Paperboard (like from a cereal box), heavy poster board, or card stock.
  • Plastic bag. Thicker, more opaque bags are better for hiding the pictures and writing on the packaging underneath. If you don't have plastic bags around because you only use shopping totes (good for you!), then you could also use the slick side of a cheap shower curtain. (Thanks to Filth Wizardry's shower curtain play mat for the shower curtain idea.)
  • Adhesive. A Xyron works great for this project.
  • Alcohol inks and applicator.

Instructions

  1. Paperboard and Plastic BagCut paperboard to size. (See my previous post for postcard size guidelines.)
  2. Xyron with Paperboard

    Apply adhesive to printed side of paperboard, then adhere it to the bag. If you're using a Xyron, feed it into the machine with the unprinted side up (you want the adhesive on the printed side).

  3. Trimming Plastic BagTrim away excess plastic.
  4. Spreading Alcohol InksApply alcohol inks to the plastic bag side of the postcard. Use your own favorite alcohol ink method here, combining colors any way you like. The metallic inks can be nice for masking particularly visible parts of the paperboard design.

Variations

Matte Alcohol Ink Postcards

You can skip the plastic bag layer. The shiny side of the paperboard will work, though it's not slick enough to be ideal for alcohol inks. Some of the inks will sink in, meaning you won't have as long to work with them before they're set. The effect is also a little more muted. Still, it's something to play with.

About this Site

CraftyGoat's Notes is all about sharing polymer clay tips & tricks that have worked for me. (And even a few that haven't!)

Read more about CraftyGoat's Notes...

Buy My Book

Archives

Enter your address to get CraftyGoat's Notes by email:

Delivered by FeedBurner