" /> CraftyGoat's Notes: October 2006 Archives

« September 2006 | Main | November 2006 »

October 31, 2006

fall-atc.jpgWhen I signed up for my first polymer clay Artist Trading Card (ATC) swap last month, I thought to myself, This won't be like all the other things I sign up for... I won't wait til the last minute this time.

Ever the optimist.

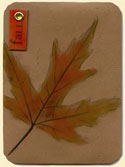
This morning -- with whole hours to spare before the mailing deadline -- I put the finishing touches on my 4 fall-themed ATCs. For the most part, I was pretty happy with the results. I used a leaf to make the impression, then filled the veins with undiluted Ranger alcohol inks for a dark outline. I used Kato PolyClay Clear Medium mixed with the alcohol inks to paint some glossy autumn colors on the leaf. I transferred "fall" (MigraineSerif font) onto a beige clay plaque, then painted it with more Kato medium/alcohol ink mixture. Then I punched a hole and added the eyelet.

Two notes:

  • Don't try to set eyelets in cured polymer clay. Sure, that may sound like common sense now... but my excitement at a chance use my practically-new Crop-a-Dial overwhelmed my better judgment. Not that it caused any immediate problems. It was only when I tried to bake it with the eyelet in place that I started seeing some cracking on some of the pieces. I'm guessing the heat caused the metal to expand just enough to cause problems. Fortunately a little TLS/clay grout seemed to take care of the problem sufficiently. Still, just gluing the eyelet in place would have saved me a lot of trouble.
  • Scrapbook Chipboard PlaquesI'm really liking the alcohol ink mixed with Kato's clear medium. I especially like the plaque since it's similar to a chipboard effect I'd been wanting to try with polymer clay transfers. I like the glossy, colorful finish, with un-colored edges barely peeking out. I haven't tried sanding this yet -- I might be able to distress the edges a little more if Kato's clear medium is easier to sand than TLS.

The swap was organized by Nina, a fellow member of the excellent Polymer Clay People Yahoo! group. I'm looking forward to the ATCs I'll be receiving in return -- I wonder if the other folks sent theirs at the last minute too? Or is it just me, holding up the whole group...?

Oh, well. I'm sure I'll do better next time!

October 23, 2006

Read on for the October 2006 Crafty Goat newsletter, which announces our latest contest winner and features some great autumn products…

SEPTEMBER WINNER ANNOUNCED

Sarah D. of Roselle, New Jersey, was the winner of September’s monthly drawing at CraftyGoat.com. Sarah won a Black Framed Bead Necklace. Congratulations, Sarah!

Don’t forget to enter our October drawing for a $25 Gift Certificate. Entry deadline is October 31st. Visit http://www.craftygoat.com/entry.php.

AUTUMN SPLENDOR

The leaves have just started to turn in my little corner of the world — how about your corner? Come celebrate the changing colors with CraftyGoat.com:

  • Pumpkin Pin Autumn Card: Our newest product uses gorgeous fall colors and sports a removable pumpkin pin. Great for Halloween, Thanksgiving, or any fall greeting.
  • Halloween Goodies: It’s not too late to get a pair of Candy Corn Earrings or any of our other Halloween-inspired products.

NEW ON CRAFTY GOAT’S NOTES

If you’re into crafts and crafting, you might be interested in our blog, Crafty Goat’s Notes. Here are some of the topics we’ve covered in the past month:

  • Creative Inspiration for Paper Crafters
  • Oklahomans Interested in a Polymer Clay Guild?
  • How to Make a Pearl Ex Color Strip

The blog address is: http://blog.craftygoat.com

CLOSE-OUT SALE - 60% OFF!

Our discontinued items are now 60% off. See all our sale items at http://www.craftygoat.com/specials.php

October 18, 2006

Ooops -- sorry about that! Please let me know if you come across any more buggy stuff...

October 17, 2006

CK Layout Challenge SketchWhile I'm not much of a scrapbooker, I love this free random layout challenge generator from Creating Keepsakes. You specify the categories (e.g., color combinations, shapes, embellishments, layout sketches, etc.) you want included in your layout challenge -- and they'll generate a random challenge for you. Most of the categories work just as well for cards, ATCs, or other paper crafts.

I like the way tools like this give me a set of guidelines to create within. Maybe it just helps get the creative juices flowing -- no starting with a scary blank page. Or maybe it gives me a challenge -- I start wondering what I can make that's creative and unique, starting with these set guidelines. Whatever the reason is, it's something I definitely enjoy. Here are a couple of my favorite products for sparking creativity:

  • The Joy of Card Making [aff] has sketches -- they call them "recipes" -- for card layouts in several standard card sizes. Each recipe includes various examples of finished products for more inspiration. (There's also a Joy of Card Making: A Second Helping [aff] that I haven't tried yet -- it's on my Christmas list, though!)
  • Deluxe Cuts Card Templates are fun little plastic templates for various card layouts. The templates make it a little easier to trace and cut out the paper shapes.

Do you have anything special that inspires your creativity? Leave me a comment -- I'd love to hear about it!

October 13, 2006

I live in the Oklahoma City area, and I've often wondered if I am the only polymer clay addict around here. Until recently, I hadn't heard of any polymer clay classes in the area. I haven't seen polymer clay artists at the (admittedly few) craft shows I've been to. And there's not a polymer clay guild in Oklahoma. Still, I figured there must be at least a few other clayers in the state of Oklahoma. And since it would be cool to meet with folks to learn and share ideas, I started toying with the idea of starting a polymer clay guild.

Turns out I wasn't the only one toying with that idea. Last night, Mary posted to the clay-polymer Yahoo! group (an excellent group, by the way) that she was looking for Oklahomans interested in a Tulsa-area guild. She's already had a couple of positive responses -- but there were also a couple of people (including me) that responded they'd rather not drive all the way to Tulsa for meetings.

I've been looking at the National Polymer Clay Guild's tips on starting a new group... and it really sounds exciting. I would be happy to volunteer my house for meetings -- or if there are too many people for that, I'm sure we could find a community center or library with reasonable meeting fees. So I'm curious -- is there anyone else in the central Oklahoma area who would be interested in meeting to play with clay?

Leave a comment or contact me privately if you're interested...

Update 11/12/06: I've posted meeting info on the Oklahoma Polymer Clay Guild web site.

October 8, 2006

Pearl Ex Color Strip I love using Pearl Ex powders with my polymer clay projects, and I have several of the Pearl Ex color variety packs. But more than once, I've gotten stuck on a project, staring at all the little bottles and trying to figure out which color would work best.

To fix that problem, I started making color strips for each box of Pearl Ex colors. It's quick to do, and it makes it a little easier to pick the best Pearl Ex color for the job. Here's how to make your own:

  1. Use a pasta machine to roll out a thin strip of white and a thin strip of black clay. It's important to do at least black & white, since some Pearl Ex powders (like "Duo" and "Interference") react differently to different clay colors.
  2. Use a ruler to mark lines in the clay, creating 12 equal sections.
  3. Making the Color StripCover sections 2-12 with a piece of paper to avoid accidentally spreading any pigments in those areas. Use a paintbrush to generously cover section 1 of the black and white clay with the first color in the Pearl Ex set.
  4. Once you're done with the 1st color, move the paper over to hide sections 3-12. No mask is needed for the section you've already done since Pearl Ex acts as a resist (it keeps other colors from adhering where there's already one Pearl Ex color).
  5. Repeat steps until all 12 powders have been applied. Bake.

I make a color strip for each box and keep the strip with the original box. Since I always try to keep my powders in numerical order, I really don't need the sample's name or number on the color strip... But if you wanted them, it'd be easy enough just to print those on a card and affix the color strip to it.

Good luck & happy claying!

October 3, 2006

tiles-1.jpgHow do you design a crafty blog? Well, with Photoshop, a little imagination... and of course, some polymer clay! At least that's how we did the recent design here at CraftyGoat's Notes.

The site design has been a work in progress, and there's still a few tweaks to make. But now that it's mostly complete, I thought I'd share a little about how we did it.

My inspiration came from a piece of We R Memory Keepers scrapbook paper. I liked the mosaic look, so I decided I wanted to use polymer clay to create a mosaic tile background for my web site header.

Step 1: Make the Tiles

I made a total of 14 tiles -- 2 each of 7 colors (light and dark blue, light and dark brown, black, gold and dark red). I probably could have gotten away with making just 1 of each color, but this gave me a little more variety. Here are the steps to follow if you want to make your own tiles.
  1. Choose the colors for the tiles. Roll out the polymer clay sheet to a medium thickness (#3 on an Atlas pasta machine).
  2. tile-stamp.jpgCreate a stamp. Anytime you're making several of the same design in polymer clay, it's helpful to make a stamp or mold. In this case, I used scrap clay to create my stamp -- adding a thin raised outline of a square to a flat square. When you're done, bake the stamp and let it cool. Note: At first I just placed the raised pieces straight onto the clay square -- a move I regretted when a piece fell off while I was stamping. For best results, use Translucent Sculpey (TLS) to adhere the clay pieces.
  3. Next, decide how wide you want the clay tiles, and cut a strip of clay to this width. Dust the sheet with baking soda or corn starch (or a mixture of the two) to prevent it from sticking, then use the stamp to make impressions, spacing them appropriately. Cut out the individual tiles, but don't worry too much about making the squares perfect (the variance is what makes these look handmade). Bake all the tiles and let them cool.
  4. To create the contrasting color on the stamped line, use a mixture of Sculpey and TLS to create a grout of sorts. Press this into the indentions, then scrape off the extra with a clay knife. If you've got a film left after scraping off the extra, it may help to clean the ungrouted areas with a Q-tip soaked with rubbing alcohol. Bake again.

Step 2: Create the Mosaic

I could have made an actual mosaic -- with grout between the tiles and everything -- but that would have required making a lot more little tiles. Instead I used Photoshop CS to create the mosaic. While these instructions refer to Photoshop, other image programs offer similar features.
  1. Scan in the tiles. Crop out the background, leaving just the image. When you're done editing each image, save each one to the same size (mine were all 50 pixels square).
  2. Create a new Photoshop image large enough to hold your finished mosaic. Now figure out how much space (how many pixels) you want between your mosaic pieces. You may want to play with this a little, moving things around on the screen until it looks right.
  3. Add guides to Photoshop to show you where to place your tiles. If you want 4 pixels in between your 50-pixel tiles, and you want your mosaic to be 4 tiles high, you'll create horizontal guides at 4, 54, 58, 104, 108, 158, 162, 212. And the same method applies to creating the vertical guides. You may want to turn on "Snap to Guides" to make working with guides easier.
  4. With all your tile images still open in Photoshop, start cutting and pasting tiles into the little guide "squares" you've created on your mosaic "canvas." You could use some pattern to decide where to place each color, or you can do it randomly. I assigned each tile a number, then used random.org to come up with a random image pattern to follow.
This process did end up being a little time consuming -- and my eyes were killing me after staring at the monitor a few hours doing all this detail work. So if you're more comfortable with clay than with your image editing software, you might want to make a few more tiles and create the mosaic manually, using the TLS/Sculpey mixture to grout it all together.

Step 3: Add the Finishing Touches

The tiles and mosaic were a big chunk of the design, but there were quite a few finishing touches needed. Here are just a few:
  • I picked a color from one of my tiles, then used that to create a matching background using Photoshop's "Coarse Weave" pattern overlay.
  • I created the "CraftyGoat's Notes" header text using Exotc350 Lt BT font.
  • I created a tile image to use as a part of each blog post's header. This ties the body of the page in nicely with the header.

I'm pretty happy with how the site turned out. I like the idea of making something original -- creating a web site that reflects my craft. Anyone can use clip art or templates. But crafters can create something that's truly one-of-a-kind -- whether it's a unique header, a cool background, or custom-made navigation buttons.

Have you incorporated your craft into your web site design? I'd love to see it. Or if you'd like a web site that refects your craft -- but you aren't the technical type -- then you may want to consider Crafty Goat's sister company, Smart Goat Web Design. However you do it, make sure your site is as unique as you are!

About this Site

CraftyGoat's Notes is all about sharing polymer clay tips & tricks that have worked for me. (And even a few that haven't!)

Read more about CraftyGoat's Notes...

Buy My Book

Archives

Enter your address to get CraftyGoat's Notes by email:

Delivered by FeedBurner