
Make your Own Mobile Crafting Station
 Here's how to turn your boring-looking, utilitarian clipboard into something that's great to look at and totally useful. While I was specifically thinking about hemp projects when I altered my clipboard, there's no reason this wouldn't work just as well for paper crafts or anything else you want to take along with you.
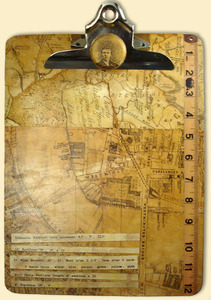
Step 1: Make it Pretty
ModPodge works great if you want to cover the clipboard with decorative papers. Just brush one layer of ModPodge onto the clipboard, trim the papers to size, then adhere the papers and brush another layer of ModPodge on top.Of course, decoupage isn't the only option for making it pretty. Paint it, stamp it, add photos -- whatever you like!
Step 2: Add a Thing-Holder
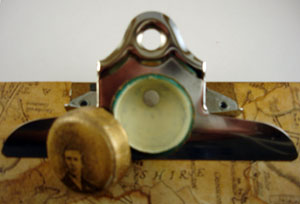 Pill boxes with screw-on lids work great for keeping beads, jewelry findings, or eyelets handy while you work. Don't want to permanently glue it on? Try using super-strong magnets. I have a magnet on the inside of my plastic pill box, and it still holds firmly to the clip.
Step 3: Add a Bag
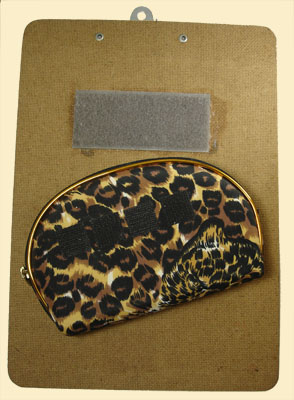 Need a place for slightly larger things like scissors, ink pads, or markers? Use velcro strips to add a makeup bag to the back of the clipboard. It gives you some nice extra storage -- but you can still have a flat surface if you want one. Just be sure to use the fuzzy side of the velcro on the clipboard so you don't scratch things (like your own legs!) when you're using the board without the bag.
Step 4: Make it Useful
Brainstorm what else you might need while you're crafting. Need to measure stuff? My friend Linda had the great idea to scan in a measuring tape for the edge. Or maybe you're always having to look up instructions or measurements for a particular project? Just print them and decoupage them to the board.Here are some other ideas for making it useful:
- Use multiple bags for multiple crafts. If you craft in multiple mediums, consider having one bag for each medium -- i.e., a bag with all your hemp stuff, a bag with all your paper crafting tools, etc. Add velcro to each one, so you're ready to swap 'em out and go. (It probably goes without saying that those of you who are handy with sewing machines can make all sorts of cool bags for this.)
- Hook it. Think about hardware that would make your project easier. Since I'm using this for hemp, I'm thinking about adding a hook under the clip for holding the cords a little more securely.
- Keep things clean. Clip a sheet of wax paper under anything potentially messy you're working on. Makes clean-up easy for stamping, gluing, or even polymer clay.
- Look for other cool add-ons. Maybe blackboard paint, corkboard, or sticky notes? Figure out what would be useful to you...
Making your own, portable crafting station is as easy as that... and of course, you could come up with endless variations. I'd love to hear from you if you have some ideas!

Comments
I love this idea! This would be a perfect idea for beaders who like to work in bed or on the couch (like me). Just clip or glue on a piece of foam bead mat, and no more beads between the couch cushions!
Posted by: courtneysueknits | March 29, 2007 3:47 PM
Oooh, I hate digging beads out from between couch cushions! Or even worse, trying to find them in the floorboard of my car -- never know what else I might find there! Thanks for the idea.
Posted by: Angela | March 29, 2007 3:56 PM
What a cute and fun video! If this was your "first attempt"...you did an excellent job.
Thanks!
Doni
Posted by: Donna B. | March 31, 2007 10:16 AM
Thanks, Donna -- I'm glad you liked the video. We certainly learned a lot from doing it, but it was fun. Will have to do another sometime!
Posted by: Penni Jo Couch | March 31, 2007 1:35 PM
WOW...WOW..and more WOW... i get pretty inventive... but this is amazing. I could take it to my crafting group, and we could all make one, and we do beading soo... YOU ROCK!! can't wait to see what else you have up your sleeve!!!!
Posted by: Jessica Gay | June 11, 2007 8:58 AM
Glad you like it Jessica -- I'd love to what you & your crafting group come up with!
Posted by: Angela | June 11, 2007 9:20 AM