" /> CraftyGoat's Notes: May 2007 Archives

« April 2007 | Main | June 2007 »

May 31, 2007

Here's another video that goes along with my basic pen covering instructions. The video is 4.5 minutes, and it shows how to cover a Bic Round Stic pen with polymer clay. Background "music" courtesy of my doggie. <g>

Here's a video that goes along with my basic pen covering instructions. The video is 4.5 minutes, and it shows how to cover a PaperMate FlexGrip Elite pen with polymer clay. Aside from the one I won't get to see til next year, this is my first "talkie" -- so suggestions are welcome!

May 29, 2007

With all the craziness, I forgot to mention it here -- but I taught this month’s lesson at Central Oklahoma's Polymer Clay Guild. Our topic was covering pens with polymer clay, and while I've put a few notes on the guild's site, I thought I'd go a little more in-depth here...

I really enjoy covering pens with polymer clay. It's fast, it's easy, and it's practical. It was one of the first polymer clay projects I did where I was actually happy with the results!

In this series of posts, I'd like to share some of the mechanics of covering pens. I'll start today with how to cover some basic pens with polymer clay -- including Papermate's Flexgrip Elite and Bic's Round Stic. Next, I'll discuss some of the more advanced options -- like using pen blanks and bamboo skewers. Even if you've never covered a pen before, I hope this series will show you that you too can cover a pen and be happy with your results!

Note: Since this tutorial's main goal is to talk about the mechanics of covering these pens, I've used a very simple one-color design. As with any polymer clay project, the possibilities for colors, textures, and design are practically limitless.

The Basics

Find An Oven-Safe Pen

The first step in covering a pen with polymer clay is to find a good pen. Not all pens are oven-safe, so here are a couple of options:
  • Papermate FlexGrip Elite pen
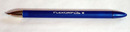
Papermate FlexGrip Elite. I get mine at Office Depot and they cost about $0.75 each. If you can find them, the Papermate Flexgrip Ultras work great, too.
  • Bic Round Stic penBic Round Stic -- white, not clear. These are cheap and easy to find.

These are a couple I've tried. More options are listed on Glass Attic's pen page. And you can always do your own home test to see if your favorite brand is oven-safe. BUT I'd recommend baking it without the polymer clay first, so you don't waste a lot of effort if the pen gets distorted. (And of course, you'll want to keep a close eye on it, be ready to open windows for any fumes, etc.)

Take the Pen Apart

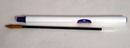
The outer parts of the pens I mentioned above are oven-safe, but that doesn't mean the inside parts are. You always want to remove the ink refill. (Imagine how messy it'd be if that melted in your oven!) Here's how:
  • FlexGrip pen, taken apart
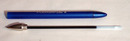
Papermate FlexGrip: Both ends of the Papermate FlexGrip pens can be unscrewed (and they're interchangeable, so it's no big deal if you put them back on the opposite end). Sometimes you have to use a little force (i.e., press as you turn) to get the silver pen tip off, but it will come off. After that's off, the pen refill should pull right out. I always leave the pen tip off, even though it's oven safe, because I think it's easier to work without it. It's your call on whether to remove the other end of the pen -- it's oven-safe, so you can cover it all as one piece. Or you can unscrew it, do something different to it & screw it back on later. It'll work either way.
  • Using pliers to take apart a Bic pen
    Bic pen, taken apart
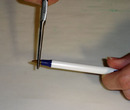
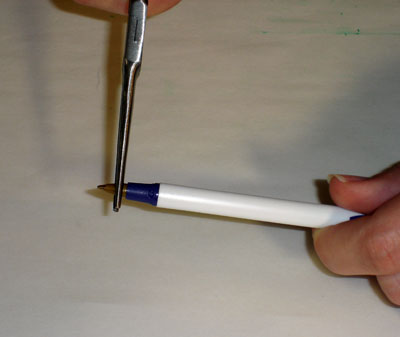
Bic Round Stic: The Bic pen is slightly trickier – you’ll need a pair of pliers to take it apart. You'll use the pliers to grasp the bronze neck of the pen tip -- not the tiny pen tip itself. Then pull it straight out. Everything else is oven-safe.

Cover The Pen

  1. Sheet of polymer clay
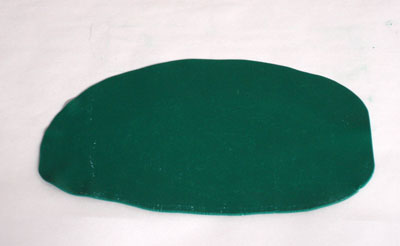
Roll your clay through your pasta machine til you have a sheet that's about 1.5" wide and the same length as the pen barrel. What thickness? Well, however thick you want your pen to be! I usually like a 4-5 setting for mine (where 1 is the thickest setting), but some people like their pens thick & chunky.
  2. Spreading TLS on pen
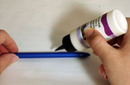
Spread a thin layer of Translucent Liquid Sculpey (TLS) on your pen barrel. While this isn't essential, I do it because it seems like it makes the clay stick to the pen better while I'm working.
  3. Trimming side edges
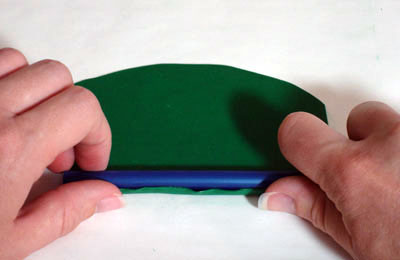
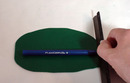
Lay the clay on your work surface, and lay the pen on top of it. First, use your clay blade to trim the sheet's edges -- that way they're the same length as the pen.
  4. Trimming bottom edge
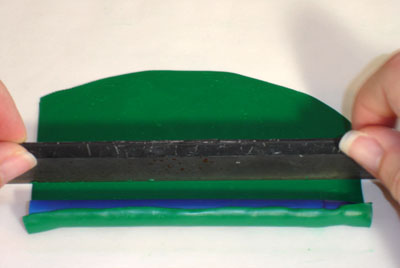
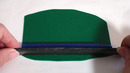
Next, use your clay blade to trim the bottom edge of the clay sheet. That way you’re starting with a straight edge.
  5. Pressing bottom edge of clay sheet onto penGently use your fingers to pull the bottom edge of the clay sheet up onto the pen. Once the whole length of the sheet is touching the pen, start to roll the pen, pulling the clay with it.
  6. Notice the faint white line where the clay touched
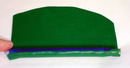
Here's the fun part -- once the starting clay edge meets the "ending" clay edge, pull back a little. You basically let the clay "kiss", then unroll it slightly. You should be able to see a very faint light line in the clay sheet where the edges touched. This is your cutting line.
  7. Cutting the clay to fitUse your clay blade to cut a straight edge along (or even slightly inside) this line. Slightly undercutting the edge (leaving yourself too little clay) is better than overcutting it (having extra clay) -- since you can always roll the pen til the clay covers the gap.
  8. Rolling the pen to smooth the seam
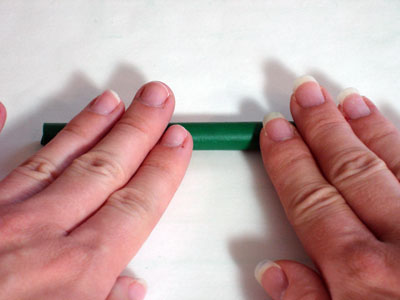
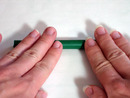
Now roll and smooth the seam edge. Roll it on your work surface, roll it between your hands, whatever.
  9. Trimming the pen tip opening
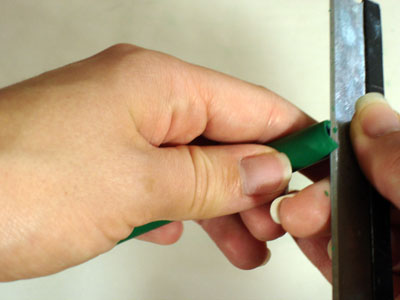
Use your clay blade to trim the top and bottom edge. I usually hold the blade at about a 45 degree angle to the pen edge, then go around the inside edge, cutting off the excess clay.
  10. An accordion baking sheet
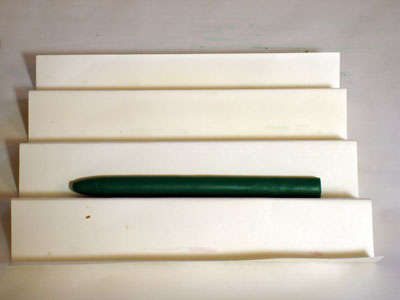
Bake the pen barrel. One handy way to keep the pens from rolling around is to fold card-stock into an accordion/fan shape, then rest the pens in the valleys. A bamboo stick or bead wire would also work for baking.
  11. Finished pens
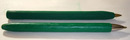
Re-assemble the pen and admire your handiwork.
That's the basics... In the next post, we'll talk about some more "advanced" pen options...

Congratulations to Jackie Young! My husband randomly selected her comment, so she won her choice of my "That's Clever" projects. Jackie selected the Mailbox Desk Set, so I'll send that her way.

Thanks again to all those who entered.

May 25, 2007

Read on for the May 2007 issue of the Crafty Goat newsletter, which includes new products, news & the latest contest announcement.

BLOG COMMENT CONTEST

As I mentioned in the previous newsletter, CraftyGoat.com has discontinued its monthly contest while we re-do our e-commerce site. Can’t stand to wait that long…? Don’t worry — we’ve got a contest for you!

Leave a relevant comment on any Crafty Goat’s Notes post before Monday, May 28th to win one of the two projects I recently demonstrated for “That’s Clever” (more on that below). See all the contest details here.

If you’re a fan of contests, by the way, you might be interested in our newly-launched sister site, SweepsGoat. It’s a free, community-based site for listing sweepstakes — everyone can list their favorite sweeps, & everyone can see all the sweeps. Check it out & let me know what you think…

“CLEVER” CRAFTS

Two CraftyGoat.com products were selected to be featured on HGTV’s “That’s Clever” show — our Mailbox Desk Set and our Poker Chip Coasters. It was very exciting — both being selected, and learning some of the behind-the-scenes things that go on during a TV shoot. Plus it was fun getting to be the “star” for a day! They recorded the segment last week, but we won’t know an air date until Spring 2008 (I’ll keep you posted). To read more about my That’s Clever shoot, see the That’s Clever page.

NEW PRODUCTS

We have several new products available on CraftyGoat.com:

Thanks for being wonderful customers — we really appreciate your business. Have a safe & wonderful Memorial Day!

May 23, 2007

My craft desk is always pretty crowded... but it's absolutely overflowing now that I've moved all my "That's Clever" stuff back in. I've got at least a dozen projects from the show -- in various stages of completion -- that I don't quite have room for.

So I thought I'd do a little giveaway here. The winner will receive their choice of either a Mailbox Desk Set or a Poker Chip Coaster Set. There are two ways to enter:

  • Leave a comment on this blog post, telling me what's on your craft desk.
  • Leave a relevant comment on any other post on this blog.

Leave your comments between now and Monday, May 28. Make sure to fill out the email address on the comment form, so I can contact you if you're the winner (don't worry, that field isn't published). I'll randomly select a commenter, then announce the winner on May 29th.

Good luck!

May 17, 2007

Yesterday was my shoot day for "That's Clever," -- and what a day it was! Here's a few of my thoughts on the experience:

The Crew

The crew of four (producer, director, camera guy and sound guy) arrived just after 3 p.m. Since they'd already done one shoot that morning & hadn't had a break yet, eating lunch was our first activity. And that worked out really well. It gave me a chance to get to know everyone on a casual basis before the actual filming started.

I was totally impressed with the whole crew. Everyone was very down-to-earth and friendly. And it was neat to watch other creative people in the midst of their process, as they came up with ideas for things to add to the video or photos. I love being around creative people!

I thought it was interesting that they use local folks for audio & video. It makes sense from an equipment standpoint, but it must be hard to have a new crew every couple of weeks.

And speaking of two weeks, I can't imagine how they do two segments per day, 14 days in a row. I mean, I was exhausted after just my portion (which ended around 11 p.m., btw) -- and that was just half of their day.

The Workspace

Since they'd told me on prep day to add more color to my workspace (examples of my work, tools, etc), we ransacked the house looking for stuff. We finally got things in place on the wall less than an hour before the crew arrived... and then the first thing they did was to get rid of the stuff we'd put up! Turns out our living/dining room paneling reflected light, causing video problems. They needed to cover as much of the paneling as possible, so they completely rearranged everything. And they did a good job -- the end result looked a lot like a studio. Just wish I hadn't stressed so much about putting stuff up!

The Taping

Audio: They were very concerned about background sounds. They unplugged all the noise-makers in the house -- buzzing lights, refrigerator, & even the air conditioner. That last one was kind of a biggie since I was sweltering under their huge lights. I'm hope it wasn't too obvious how terribly warm I was!

On a side note, I wasn't the only casualty of the heat. My clay got too warm & was really sticky. Between having really warm clay AND having to use my pasta machine left-handed on a rickety desk, I couldn't get a decent sheet of clay on any setting above 3. Fun!

The Project Instructions: Since they hadn't given me a script ahead of time, I was a little nervous about how I would say things. It turned out to be really simple, actually. As I worked through the project, they asked me (off-camera) what I was about to do. I told them. They then rephrased my words into a couple of concise sentences, and I'd repeat that back to them on camera til they were happy with it. Then I'd actually do whatever the next step on the project was. It was always "say, then do." That worked much better than how I'd practiced -- I had trouble trying to explain while I did things.

Something I thought was interesting: they insist that everything be said in the first person. So it's not, "Now you roll your clay on the pasta machine" -- it's, "Now I roll out my clay on the pasta machine." One reason they do this is to limit their liability: they're not telling the viewer how to do it. They're just filming a crafter explaining how they do it.

The Intro: We shot the intro on a side street near my house. We had to keep stopping & re-starting as cars passed by -- I don't think that street has ever had that much traffic! At some point during the intro shot, I managed to get a huge mosquito bite on my arm -- & had to cover it with makeup before we continued. Since they didn't use our front or back yard, all that prep work won't show up at all... Oh well!

Poker Chip Coasters Project: They shot the Act 4 segment (the little project they come back to at the end of the show) first. That worked for me since I'd gone through that one a few more times -- it was the one I presented in front of my Toastmasters group. I felt like this segment went well -- they didn't really have me do anything silly. I did feel like I was doing sloppy work on camera, though. Hopefully that won't come across too much. They loved that we had one of those poker table toppers they could use for the beauty shot at the end.

Mailbox Desk Set Project: They did have me do some silly stuff for this segment. I felt a little uncertain about it, but my husband (who was sitting behind the director, watching the video monitor) said it all looked good. Hopefully it'll come across okay.

Air Date

Apparently the show is going from airing 5 days/week to 2 days/week, so it looks like my segment won't air until Spring 2008. I'm supposed to call closer to that time to get a specific air date, which I'll post here.

Overall Impressions

I was totally impressed with the crew -- everyone was very professional and did a great job in a short time. Granted, their efficiency stressed me out at times, too. I like to have everything in its place, so I'd get frantic when I couldn't find something they'd moved out of their way. And horror of horrors -- people were touching my unbaked clay creations & putting unbaked clay on my wood furniture! Thankfully my husband was there to help me find things & just generally keep me settled.

The project instructions themselves went much better than I'd expected: the way they broke it down into small segments was really very helpful. I was a lot less nervous than I'd expected.

Of course, I'm glad it's over. My back's complaining about all the extra hours of work. And after weeks of prep work, I can honestly say I'm looking forward to a little break from crafting!

Overall, I had a good time, and I found all the behind-the-scenes stuff very interesting. Regardless of how it turns out, I'm really glad I did it.

May 15, 2007

Step-Outs for Mailbox Desk SetTomorrow's the big day -- That's Clever will be taping my segment! The field producer and director came today to look over my step-outs (incremental steps already completed on the project) and my workspace (spot where they'll be taping). Said the workspace needs lots more samples of my artwork, so I'm working on adding some things.

It's a little crazy here, so I'll post more once it's over... But I have put together a Flickr photo set with some pictures & notes from our adventures so far.

Wish me luck!

May 11, 2007

In the spirit of Lisa's comment on my "faux ceramic monkey" burned bead, I thought I'd share these recent quotes from Yahoo's Polymer Clay People group:

  • "There are no mistakes in art, just unexpected changes."
  • "There are no mistakes, only happy accidents."
  • "There are no mistakes, only opportunities for creativity."
  • "There are no mistakes, only design elements."

Have any to add? Here's to a happy weekend of mistake-making!

May 7, 2007

Butterfly Wings 35mmLooking for a way to challenge yourself? Polymer Clay Central has announced their May 2007 Challenge theme: Things with Wings. Polymer clay artists have done some wonderfully inspiring work with wings. Here's a few links to jump-start your creativity:

Course, fairies and butterflies aren't the only things with wings. Think bi-planes, birds, bees, bugs... plenty of creative options.

Mail your entries in by May 15, 2007, for a chance to win one of three prizes. Good luck!

May 6, 2007

Back on January 1st, I decided that this year I would finally enter some of Polymer Clay Central's challenges. Last month I sent in my second entry. And while I didn't win -- and I almost didn't have an entry at all -- I'm still glad I entered.

In typical fashion, I waited til the last minute to start on my entry. Then I burned my first beads (I'm still learning the ups & downs of my new convection oven). And would you believe my dog ate my second bead? No, really! Once I finally got enough beads to make my necklace, I struggled with whether or not to send it, since I didn't feel like it was good enough. I decided I'd put in too much effort to just keep it, so I sent it -- only to see a few days later that they'd cancelled the contest (though they later re-instated it). What a mess! And while my name wasn't on the winner's list they posted today, I wanted to share a few thoughts on the good, the bad & the ugly of entering challenges. I'll go in reverse order:

The Ugly

The Ugly: My Burned BeadChallenges are good at getting you out of your rut -- trying something different. Sometimes that works out beautifully. But sometimes it's just plain ugly. Witness my burned bead...

The Bad:

The Bad: My Dog-Chewed BeadTime is precious. I could be making crafts to sell, writing a post for my blog, working on a killer web app, all sorts of things. So how can I justify spending time on something that has no guaranteed gain? (Especially if I have to do it all again because of that darn dog!) So I struggle with doubts -- should I be doing this or something else? And of course, I struggle with insecurity. My work's going up against the best work of some really good artists -- there's no way I can win! Doubts, fears, worries that no one will vote for me... those are some pretty bad emotions.

The Good:

The Good: My Finished EntryBut there's also some good stuff:
  • Feeling Proud: I always feel good when I take a chance & do something I wouldn't normally do. We learn and grow by doing things that scare us. "Anything I've ever done that ultimately was worthwhile initially scared me to death." -- Betty Bender
  • Trying New Things: If we always do what we're good at, we'll never grow. So if the challenge topics aren't something I'd normally do, great! It's more of an opportunity to learn! "Trust that still, small voice that says, "This might work and I'll try it." -- Diane Mariechild
  • Getting Great Photos: Those folks at PCC do a fantastic job with their pictures. If nothing else, it's almost worth the cost of postage just to have such high-quality, professional looking photos taken of my work!

What challenges you? Maybe you're inspired by a swap, or making a new style of Artist Trading Card, or sending query letters to magazine. I hope you'll take time this week to do something that stretches your limits. And I hope you'll be satisfied with the results -- no matter how good, bad or ugly they might be.

May 3, 2007

Alcohol InksI admit it: I'm a tad compulsive. I like to have things just right. You know the little holder for whiteboard markers? I always have to have all the markers facing the same way, all the logos lined up, with the colors in a certain order (ROYGBIV, of course). I can always tell if someone's been using my markers. My husband occasionally calls me Mr. Monk (love that show, BTW).

Alcohol inks work great with polymer clay, and they're a lot of fun. One of the best things about alcohol inks is that if you don't like the results, you can wipe it off or add another color for a completely differently look. Of course, if you're compulsive like me, that's also one of the bad things about alcohol inks -- it's sometimes hard to stop tweaking and re-trying!

What You Need

You just need a few basics for working with alcohol inks:
  • alcohol inks
  • felt or applicator tool
  • alcohol blending solution
  • gloves

Note: I hate gloves -- but to me, this is one time when they're worth the trouble. Alcohol inks can really stain your fingers! The alcohol blending solution isn't totally essential, but it gives you a lot more options with the inks. Plus it's good for cleaning the stray inks off your fingers (or carpet -- oops!).

How To Do It

While alcohol inks can be used on either unbaked or baked polymer clay, I prefer working with it on baked clay so I'm less likely to mess up my clay piece.
  1. Put a drop of alcohol ink on a felt applicator, or directly on your clay piece. You have about a minute before it dries to spread it around, mix it with other colors, etc.
  2. If the ink dries before you're ready, add a drop of blending solution. This allows you to continue spreading and blending colors. The blending solution's also useful if you get one color too strong and want to lighten or remove it.
  3. Repeat steps 1-2 to add as many different colors as you want.

The basics are really that easy! But as you start to play, you'll see just how versatile the inks can be.

Variations

Here's a few variations you might want to try:
  • Single Color Ink heartSingle Ink Color: Try using just one color of alcohol ink. I think it's beautiful with the mottled shades it naturally creates -- but you could add more drops for a more even coverage.
  • Multi Color Un-blended HeartMultiple Ink Colors without Blending: You can spread and mix the colors without blending solution to retain more vibrant, unique colors.
  • Multi Color Blended HeartMultiple Ink Colors with Blending: I often spread blending solution on the clay before I add the first drop of color. This allows the colors to bleed and blend from the start -- preventing spots of too-concentrated color.
  • Painted HeartPainting with Inks: Can you tell that the heart is a little more red than the surrounding areas on this sample? (Don't worry if you can't -- this technique works better & is much more obvious with a larger design.) You can cut small pieces of felt to add specific colors to specific areas. Would be great for "painting" a larger stamp or image transfer.
  • Liquid Clay Heart with Random InksKato Liquid Polyclay Base with Random Inks: Kato Liquid Polyclay works great with alcohol inks. In this case, I spread a thin coat of liquid clay then dropped the ink colors on top and let them bleed and blend on their own. While I wasn't crazy about the dark pool of colors in the middle, I totally love the tie-dye effect on the edges. An idea to play with...
  • Liquid Clay Heart with Pre-Mixed InkInks Pre-Mixed with Kato Liquid Polyclay: You can pre-mix your liquid clay and alcohol inks for more predictable results. I keep my color mixtures in a little plastic paint holder with snapping lids (ya know, like they used to include with Paint by Numbers kits).
  • Glazed HeartGlazed: I used Glossy Accents dimensional glaze to add a coat of shine -- it really seems to add depth to the finished piece.

I hope you'll give alcohol inks a try. They really are a lot of fun, and these examples are just the beginning of the various effects you can achieve.

Course, if you're compulsive like me, be very careful. You may be tweaking forever!

Testing Reward from PolyformI got a package this week from Polyform, the nice people who sent me clay to test a couple of months ago. Judging from Dystini's post, it looks like we all got just about the same reward pack:

  • 2 push molds: Snuggle Buddies and Cameos & Hearts Jewelry
  • 1 package of Ultralight Sculpey
  • 1 package of translucent Premo!

I'm thrilled about the Ultralight Sculpey -- that's been my new favorite product, so more to play with is wonderful. And I can always use another block of translucent clay.

I was initially less thrilled about getting the molds. My problem with molds is that so many of them are too recognizable -- a molded character (like the rabbit or teddy bear in the Snuggle Buddies set) is gonna look like someone else's work, unless I tweak it so heavily that I may as well have started from scratch. BUT after looking at the jewelry mold, I think it may be good for doing basics -- things I can build on and make my own. So I'm eager to give it a try.

Anyone else do the Polyform test & get a different set of molds? Anyone interested in swapping the Snuggle Buddies set for a different (new OR used) mold...?

Update: The Snuggle Buddies mold has been spoken for -- thanks Janice!

About this Site

CraftyGoat's Notes is all about sharing polymer clay tips & tricks that have worked for me. (And even a few that haven't!)

Read more about CraftyGoat's Notes...

Buy My Book

Archives

Enter your address to get CraftyGoat's Notes by email:

Delivered by FeedBurner