" /> CraftyGoat's Notes: October 2008 Archives

« September 2008 | Main | November 2008 »

October 31, 2008

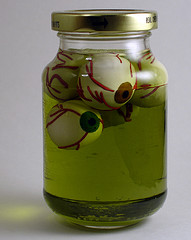
Jar of Polymer Clay EyeballsNeed one more thing to make your Halloween decor complete? Try this quick and easy project! Polymer clay eyeballs float in a jar of colored water to make a delightfully weird conversation piece for your home or office.

Materials

  • Polymer Clay: White Ultralight Sculpey plus tiny amounts of black. red. and any color of your choice
  • Jar
  • Food Coloring
  • Water
  • Optional: Alcohol Inks, Pasta Machine, Clay Extruder, Small Round Cookie Cutter, Kato Clear Liquid Medium

Instructions

  1. Step 1Form clay eyeballs. Use white Ultralight Sculpey to make two matching balls for the eyeballs. The advantage of using Ultralight Sculpey over other brands is that it's lightweight enough to float after baking. However, it's also very soft and can be tricky to work with. I made one eyeball with half Premo, half Ultralight, and it floated just fine — so try experimenting with different mixtures.

    A note on floating: My first batch of eyeballs floated iris-side up — which is not ideal for viewing from the jar's side. After some further test, I found that whichever way I baked them is how they tended to float. So you should be fine if you bake yours as shown in the photos. If not, another trick is to add a weight (such as a core made from a heavier clay) towards to bottom to help it float right.

  2. Step 2Cut out irises. Use a pasta machine to roll out a very thin sheet of whatever color clay you want your irises to be, then cut two matching circles using a small round cookie cutter. If you don't have a pasta machine, use an acrylic brayer, jar, or clay-dedicated rolling pin. A small circle template will work in place of the cookie cutter.

    Optional: Irises are rarely a solid color. If you're going for a more realistic look, try adding gradiations and specks of color. One way to do this is to dab the piece with alcohol inks before baking. A Skinner blend would also work.

  3. Step 3Make pupils. Measure out two very small balls of black. I rolled mine out on a pasta machine, then used a small cookie cutter to ensure I got the same amount for each pupil. Now roll these into a ball and smash them slightly into a disk. Press them into the center of the irises.
  4. Step 4Assemble eyeballs. Add the pupil/iris to the eyeball, gently reshaping the eyeball if necessary.
  5. Step 5Add blood-shot lines. I used my clay extruder's smallest disk to create the red "blood-shot" strands on the eyeball. I first traced the veins I planned to follow with a needle tool, then pressed pieces of the long red strand into the indentions, using my thumbnail to snip off strands once they were long enough. If you're going for a more subtle look, you could just trace the lines before baking, then come back with acrylic paint and antique it after baking. (Of course, if you're going for subtle, this project may not be for you!) You'll probably want to seal it with something like Kato Clear Medium afterwards, though — just in case the acrylic paint you're using doesn't hold up well to its new watery home.
  6. Step 6Bake. Bake the eyeballs on a layer of polyfill to prevent flat and shiny spots.
  7. Step 7Assemble jar. Place water in the jar until it's as full as you like. Add a couple of drops of food coloring (I used green, but brown or yellow would also look cool). Drop in your eyeballs and you're done!

Variations & Links

Here's hoping you have a fun and safe Halloween!

October 24, 2008

Polymer Clay Candy CornsHalloween's just a week away, and you know what that means... All the stores are filled with a bountiful harvest of this year's candy corns. (My husband swears this is an actual crop!) Here are a few ideas for using this colorful candy of the season for some crafty decor:

Here's hoping you have a crafty weekend full of yummy-looking goodies. I should warn you, though. Polymer clay candy corns may seem like a low-calorie way to keep these festive candies around. And it could just be me. But it seems like the longer I work with the faux candies, the more likely I am to break open a bag of the real thing!

October 4, 2008

Finished Thank You Card 1 I always like to keep a few "Thank You" cards on hand, and seasonal ones are especially nice. In honor of World Making Card Day today, I thought I'd share instructions for this stamped autumn-themed Thank You card.

You won't need to buy special scrapbooking papers for this one. Just use your ink pad with plain card stock to create a beautifully coordinated look. And while this quick-and-easy project is all paper, I've included a polymer clay variation at the end just in case you want to spruce it up a bit.

Materials

Finished Card with Supplies
  • Card Stock: 1/2 sheet (8.5" × 5.5") each of cream and tan
  • Ink Pad: I used Brushed Corduroy Distress Ink
  • Stamps: I used PrintWorks Thanksgiving Blessings and D.O.T.S. Seasons of the Heart Set
  • Tools: Paper trimmer, adhesive, stamp cleaner

Instructions

  1. Cut the Background Paper. Cut a piece of tan card stock measuring 4" × 5.25" for the background.
  2. Pressing Ink Pad onto Card StockApply the Ink Pad to the Paper. Use a piece of scrap paper behind the card stock to protect your work surface. Hold the ink pad upside down and press it directly onto the card stock. Apply it in a random pattern with some of the ink-prints going off the edge of the paper. Overlapping the prints will create darker portions, as will varying how long and how hard you press down on the pad.
  3. Stamp the Image. Apply ink to your leaf stamp, then stamp the image on the tan card stock.
  4. Trim. Cut a 1.5" square around the stamped image.
  5. Inking EdgesInk the Edges. Hold the ink pad in one hand and the card stock in the other hand. Run the very edge of the card stock against the ink pad, turning it until you've inked each side.
  6. Cut the Mat and Edge Pieces. You'll need a 2" square piece of tan card stock for the mat, and a 1" × 4" piece of tan card stock for the bottom edge.
  7. Inking MatUse Ink Pad to Color Paper. Using steady pressure, drag the cut pieces of card stock against the ink pad to dye them. Dab the ink onto any spots you missed. The color doesn't need to be completely uniform -- having uneven colors creates a rich, leather-like finish.
  8. Stamping GreetingStamp the Greeting. Stamp your "thanks" greeting onto the tan card stock.
  9. Trim. This piece should be approximately 3/8" × 4". My stamped greeting said "thanks to you," so I trimmed off the extra words.
  10. Ink the Edges.
  11. Fold Card. Fold the cream card stock in half and use a bone folder to crease the fold.
  12. Finished CardAttach Layers. Use tape or glue to attach the stamped layers to the card. For extra dimension, use a Pop Dot behind the leaf.

Variation

The stamped leaf portion of the card could easily be made from polymer clay instead of card stock. Consider turning it into a magnet or pin so the card recipient gets a little gift with their card.

October 1, 2008

After reviewing Laurie Mika's Mixed-Media Mosaics, I decided to look into what other polymer clay mosaic books were out there. Turns out there are two good ones with the same name: Polymer Clay Mosaics by Krista Wells and, well, Polymer Clay Mosaics by Sue Heaser. While both books are out of print, they're easy to find used. I got my hands on them and wanted to let you know my thoughts.

Polymer Clay Mosaics by Krista Wells

514YFJK76SL._SL160_.jpg Published in 2004, Krista Wells' Polymer Clay Mosaics focuses primarily on a traditional mosaic type with tiles, traced patterns, and grout. The 21 mosaic projects cover a range of difficulty levels: from basic magnets with just a few tiles, to a large-scale tiled backsplash project. This is nice since it helps highlight how many possibilities there are.

Wells has a good grasp on polymer clay. Unlike Mika's book, which didn't adequately cover some polymer clay basics, I think this book would work fine for polymer clay beginners. This one has a nice amount of detail on all the basic techniques. It also includes some mosaic techniques that aren't just the same old ideas. I loved her tip for cardboard strips, and used it liberally for my latest batch of mosaic ATCs.

Wells includes the patterns for her projects, which she allows you to photocopy for your own non-commercial projects. Unfortunately, though, this leads me to one of the weaknesses of the book. She doesn't really go into the next steps — things like what would make a good design for a mosaic, or how to choose and modify a pattern to use for your own projects. I prefer books that help you think past the projects themselves, and this one didn't really do it for me.

My other complaint is that the book was lacking in step-by-step photos. Only one sample project had individual steps pictured. The other projects showed only the finished project. In some cases, it was difficult for me to understand the written steps without more visual clues. I would have preferred the book have fewer projects and more depth on the remaining projects.

Still, it was an enjoyable book. The projects were creative, and there were several that I really liked (faves include the CD Clock, Byzantime Clock, Thoroughly Modern Mondrian Mirror, & Klimt-Inspired Backsplash). I loved the quotes on creativity that were sprinkled throughout the book — a fun touch! Overall, this is a good (but not great) book if you're looking for lots of traditional mosaic projects.

Summary

  • Title: Polymer Clay Mosaics by Krista Wells
  • Pros:
    • Good descriptions of clay techniques
    • A wide range of traditional mosaic projects
  • Cons:
    • Not enough step-by-step photos
    • Doesn't include information on creating your own projects
  • Who It's Good For: Polymer clay beginners will find good clay information here. Intermediate clayers will enjoy the wide range of fun projects. This book is ideal for folks who like to create projects just like they are in the book.

Polymer Clay Mosaics by Sue Heaser

51C9VJ3R23L._SL160_.jpgWritten in 2003, Sue Heaser's Polymer Clay Mosaics book includes 15 projects in 4 different mosaic techniques: classical, tile, micromosaic and pietre dure. Heaser is uniquely qualified to write this book — not only is she a clay expert, but she also has a background in art history. She includes origins and names of various techniques, along with photos of ancient artwork. It ends up being a nice educational experience that doesn't feel too scholarly.

The section on clay basics is well-done. It includes clear instructions on all the techniques a beginner would need (like Skinner blends), but it also has some more advanced techniques (such as other blends and applique) that might interest intermediate clayers. Her graph paper technique for cutting tiles is a nice solution.

Heaser covers four types of clay mosaics in this book:
  • Classical Mosaics: These are typical tile mosaics with grout. I like that she gives advice on how much grout to mix up for an area. She also has good tips on layout, such as how best to cut pieces to fit around other pieces.
  • Micro Mosaics: These mosaics use tiny soft-on-soft clay pieces, cut to form an image. This is very delicate-looking work, but I love the idea and am eager to try it.
  • Pietre Dure Mosaics: This is a type of inlay technique. While she cautions that this is a difficult technique, I like that she has the projects in order of increasing difficulty so you can ease into the technique.
  • Tile Mosaics: These are tiled mosaics without the grout. These projects use transfers, stamping, and cutters to make them look great without a lot of effort. This section includes one of my favorite projects in the whole book, the Herb Fossil Picture Frame.

I really like how Heaser gives tips on taking the next step creatively. For example,
she tells us which types of images make good mosaic patterns. And almost every project has ideas for other variations.

Another plus for this book is that it has lots of step-by-step photos. You won't get lost with these instructions!

If you only buy one mosaic book, this is the one I recommend. The fact that it includes several different mosaic types makes it more of a toolbox than the other books — a place you can learn techniques that will serve you in a variety of projects.

Summary

  • Title: Polymer Clay Mosaics by Sue Heaser
  • Pros:
    • Great instructions for four mosaic techniques and a wide variety of projects. All projects include step-by-step photos.
    • Pointers for taking the next step in creating your own designs
  • Cons:
    • The book is out of print. Amazon has good prices on used versions, though, and I get the impression Heaser's new Encyclopedia of Polymer Clay Techniques includes at least some of this information.
  • Who It's Good For: Beginner clayers will find a good foundation here. Intermediate clayers will likely find techniques, projects, and ideas to inspire them. And anyone interested in mosaics will enjoy learning about the different types.

About this Site

CraftyGoat's Notes is all about sharing polymer clay tips & tricks that have worked for me. (And even a few that haven't!)

Read more about CraftyGoat's Notes...

Buy My Book

Archives

Enter your address to get CraftyGoat's Notes by email:

Delivered by FeedBurner