
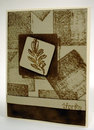
Autumn-Themed Thank You Card
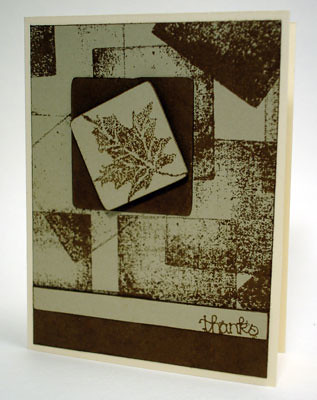 I always like to keep a few "Thank You" cards on hand, and seasonal ones are especially nice. In honor of World Making Card Day today, I thought I'd share instructions for this stamped autumn-themed Thank You card.
You won't need to buy special scrapbooking papers for this one. Just use your ink pad with plain card stock to create a beautifully coordinated look. And while this quick-and-easy project is all paper, I've included a polymer clay variation at the end just in case you want to spruce it up a bit.
Materials
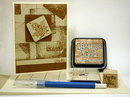
- Card Stock: 1/2 sheet (8.5" × 5.5") each of cream and tan
- Ink Pad: I used Brushed Corduroy Distress Ink
- Stamps: I used PrintWorks Thanksgiving Blessings and D.O.T.S. Seasons of the Heart Set
- Tools: Paper trimmer, adhesive, stamp cleaner
Instructions
- Cut the Background Paper. Cut a piece of tan card stock measuring 4" × 5.25" for the background.
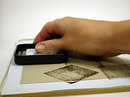 Apply the Ink Pad to the Paper. Use a piece of scrap paper behind the card stock to protect your work surface. Hold the ink pad upside down and press it directly onto the card stock. Apply it in a random pattern with some of the ink-prints going off the edge of the paper. Overlapping the prints will create darker portions, as will varying how long and how hard you press down on the pad.
- Stamp the Image. Apply ink to your leaf stamp, then stamp the image on the tan card stock.
- Trim. Cut a 1.5" square around the stamped image.
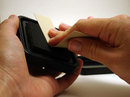
 Ink the Edges. Hold the ink pad in one hand and the card stock in the other hand. Run the very edge of the card stock against the ink pad, turning it until you've inked each side.
- Cut the Mat and Edge Pieces. You'll need a 2" square piece of tan card stock for the mat, and a 1" × 4" piece of tan card stock for the bottom edge.
 Use Ink Pad to Color Paper. Using steady pressure, drag the cut pieces of card stock against the ink pad to dye them. Dab the ink onto any spots you missed. The color doesn't need to be completely uniform -- having uneven colors creates a rich, leather-like finish.
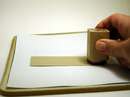 Stamp the Greeting. Stamp your "thanks" greeting onto the tan card stock.
- Trim. This piece should be approximately 3/8" × 4". My stamped greeting said "thanks to you," so I trimmed off the extra words.
- Ink the Edges.
- Fold Card. Fold the cream card stock in half and use a bone folder to crease the fold.
 Attach Layers. Use tape or glue to attach the stamped layers to the card. For extra dimension, use a Pop Dot behind the leaf.
Variation
The stamped leaf portion of the card could easily be made from polymer clay instead of card stock. Consider turning it into a magnet or pin so the card recipient gets a little gift with their card.

Comments
THANK YOU for visiting my blog and posting your link.
GREAT CARD!!!
Posted by: Dale Anne | October 4, 2008 10:28 AM