
Creating a Rust Effect on Polymer Clay
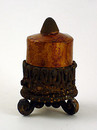 Shiny metallic and glasslike finishes all have their place. But sometimes you want an older, more weathered look. I recently experimented with using the Rust Antiquing Set by Sophisticated Finishes on polymer clay, and I wanted to share my experiences.
About the Rust Antiquing Set
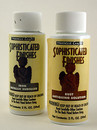 The Rust Antiquing Set doesn't just create the illusion of a rusted finish — it actually creates a metallic, rusted top layer on whatever surface you paint it on. The set comes with two bottles. The Iron Metallic Surfacer paint includes real metallic bits. You paint this on first to create a rust-able surface. Then you use the Rust Antiquing Solution to rust those metallic bits.
How To Use It
-
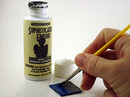 Paint the Iron Metallic Surfacer. Be sure to shake this bottle well before you start. You need all those metal bits to be mixed into the paint. I also found it helpful to run my paintbrush against the inside wall of the bottle, where the gritty stuff seemed to be more plentiful. Remember, as you paint, that you don't want it smooth. You want a sandy, gritty texture. (This was a little hard for me to get used to!)
 - Wait. The package instruction say, "Allow the [iron metallic surfacer] coat to fully dry overnight before applying the Antiquing Solution." To me, that meant at least overnight. And so I let it sit there til whenever I got around to the next step. Their website clarifies, though, that it's best to do the next step 8-10 hours afterwards. Waiting more or less time can cause the finish not to rust.
-
 Paint the Rust Antiquing Solution. The rust antiquing solution is a clear, glaze-like liquid. Use a light touch so you don't drown the surface (the instructions say "several light coats will product better results than one heavy coat" and I found this to be true).
 - Wait. Paint. Repeat. Be prepared to do several coats of the rust antiquing solution. Since they want you to apply coats 24 hours apart, this can be a little time consuming. In fact, by the time I got to my third coat, my hubby asked whether I might have had faster results by just allowing the stuff to rust naturally!
Potential Problems
The first time I used the rust antiquing set, I used it on metal, and it worked perfectly. I was really excited! But metal's metal. It doesn't need all that much convincing to rust. After I tried it on polymer clay, I realized there are quite a few variables that go into getting "good" results. Not only that, but this is a product (not unlike alcohol inks) where you'll be happier if you're able to let go of the results. You're probably not going to get two items to rust exactly the same. Still, here are some tips to improve your chances of getting a nice rusted finish:- Experiment. Temperature, humidity, and amount of paint are just a few of the variables that affect how it turns out. Experiment with these to see how you get the best results. And check the Sophisticated Finishes FAQ section for more variables and suggestions on avoiding common problems.
- No rust? Start again. If it doesn't rust at all the first time around, you can start the process over again. Just paint another round of both the iron surfacer and the antiquing solution right on top of your failed coat.
My Results with Polymer Clay
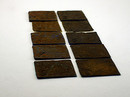 I wondered if certain brands of clay would rust better than others, so I made two tiles each from five brands of clay (Premo, UL Sculpey, Fimo Soft, Kato, & Studio by Sculpey). I coated one tile of each brand with just one coat of the iron surfacer, and the other tile with two coats. I expected UL Sculpey to behave the best, since it's specifically designed to be paintable. But really, all of the clays behaved just about the same.
I personally had slightly better luck on the tiles where I just used one coat. For one thing, the one-coat version seemed to rust prettier — but that likely had more to do with the variables mentioned above (primarily temperature and humidity) than with the number of coats. But I also wanted to leave rusted bits in the stamped grooves, then sand off the upper layer. (You can compare the sanded one-coat and two-coat versions here.) When I added the second coat, it completely covered too much of the stamped image, preventing the impressed areas from reacting with the rust solution. Of course, this all depends on your project — if you're not using stamped images or if you want more complete coverage, more coats may be better.
Overall Impressions
I have mixed feelings about the rust set. It's definitely a trial and error product: you need to understand some of the variables and figure out how to make it work for you. And even then, you won't be happy with it if you're expecting complete control over the outcome. It's a lot like the normal rusting process in that way — you don't have a lot of say in where something rusts, what color that rust is, etc. Finally, it's kind of a slow process. It may take several days to get the results you want.Still, the fact that the rust set works on so many surfaces ("wood, plaster, glass, ceramic, canvas, cardboard, plastic, and metal," according to the packaging) makes it a handy tool, especially for mixed media artists. And it can be kind of fun figuring out how to get good results, and allowing for happy accidents when the results aren't necessarily what you expected. For those reasons, it gets a "thumbs up" in my book. In fact, I've added their similar Patina Green Antiquing Set to my Christmas list (that's a hint, in case any family members are reading this!)
Have you tried any Sophisticated Finishes antiquing products? If so, what do you think? I'd love to hear about your experiences, or any tricks you've figured out for getting good results...
