" /> CraftyGoat's Notes: August 2009 Archives

« July 2009 | Main | September 2009 »

August 31, 2009

This is just a heads-up for my fellow Okies about the classes I'll be teaching in the next couple of months:

  • Mold-Making Basics: I'll be showing how to make molds using several different materials. We'll then use our molds to decorate custom polymer clay nametags.
  • Keeping Time with Polymer Clay: Use polymer clay and a recycled CD to make a beautiful clock, perfect for gift giving or to decorate your own wall. We'll discuss basic tools and techniques with a focus on texture and surface effects. No previous polymer clay experience is necessary. All necessary supplies and materials will be provided, but feel free to bring along any polymer clay tools you already have.
    • Date: 6-9 p.m., Sunday, September 27th, 2009
    • Cost & Registration: Fee is $30. Sign up here.
  • Glowing Skulls: Create glowing "sugar skulls" from polymer clay. We'll learn about glow-in-the-dark clay and discuss the Dios de los Muertos tradition. These skulls will make perfect decorations for your Halloween or Dios de los Muertos festivities.
    • Date: Saturday, October 24th, 2009
    • Cost & Registration: Details TBA. If you're interested, contact me and I'll let you know when the registration form is online.

I'll be posting more about these soon, including photos of the projects. I would love to have you there!

August 18, 2009

Cleaning Ceramic TileIf you've used ceramic tiles as a working or baking surface for very long, then you've probably had to clean them. It's easy enough to use an alcohol-soaked paper towel to wipe off surface dust, and even baked-on clay remnants can usually be scraped off with a fingernail. But if you've ever tried to clean up baked-on liquid clay or embossing powders, you know it can be a bit of a challenge.

Here's a quick tip: Use a scraper made for ceramic oven tops to clean those tiles. Any sharp blade will work, actually, though you don't want to mess up your good clay blade for a cleaning job.The nice thing about the oven scrapers is they're inexpensive and safe to use. It just takes a minute to scrape off the cooked-on stuff, which you can then wipe away with a damp paper towel. Easy as that!

August 14, 2009

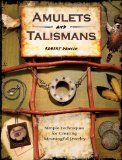
61nM1pPi47L._SL160_.jpgOccasionally (usually by accident) I'll read a craft book that focuses on the artist's process. These books are always full of beautiful photos of the artist's work, with the artist sharing what inspired them and why they made the choices they did. While it can be worthwhile to read about another artist's process, I'm usually disappointed with these books... often because of a misleading title. For example, I read Secrets of Rusty Things: Transforming Found Objects into Art a couple of months ago. I went into the book thinking I was going to learn how to make art with rusty old found objects. It made me sad when I found out it was just about one particular artist and a few of the specific art pieces he made.

So when I heard about Robert Dancik's new book, Amulets and Talismans: Simple Techniques for Creating Meaningful Jewelry, I was cautiously excited. I worried this was going to be another misleading title, that I really wouldn't learn about making meaningful jewelry.

Happily I was wrong. This book's step-by-step instructions are used alongside the author's artwork and stories to help capture both the techniques and the spirit behind the art.

The Book

Amulets and talismans have been made and worn throughout history, with the idea that objects can have power to protect the wearer. Dancik's book mixes stories about ancient amulets with instructions on how to make modern versions. While I'm not sure I believe amulets and talismans can hold any special larger power, Dancik points out this power could just take the form of protecting a memory of special people, places, and events. I like the idea that scrapbooking isn't the only way to preserve things like ticket stubs... those memorabilia can be incorporated into jewelry and carried every day.

Dancik starts the book by introducing us to the techniques and tools he uses. While this book caught my attention because of its polymer clay projects, it's actually got quite a range of other materials, including: metal, Faux Bone, concrete, paper pulp mache, resin, micro-fasteners, and found objects.

There were a couple of things I really liked about Dancik's approach to materials and art:

  • His encouragement to get familiar with a variety of things so you'll know how to use them when they're perfect for a piece. Don't limit yourself just because you don't know how to use a material. "Choice equals freedom."
  • His emphasis on the associations that different materials, different surface textures, and different finishes can bring to a piece. By thinking about what you want to convey — and which materials best convey that feeling — you can make your jewelry more meaningful and more personal.
  • His suggestion that you let your desired outcome guide you. If you're thinking about the piece's meaning as you work, then "it is the idea that steers the work, not the fascination with a material or showing off a technique."

This book made me re-think my reliance on polymer clay. It's kinda like that old saying, "If all you've got is a hammer, everything looks like a nail." Polymer clay is a versatile medium that I enjoy working with, but it may not be the best tool for every job. Learning about other materials gives me more options.

Dancik's introduction section is good — it's not just the same ol', same ol'. My only complaint is that several of his recommended tools and materials were new to me, so I really would have liked more pictures. It's much easier to search the shelves at the hardware store (or raid my hubby's toolbox!) if I have some idea what I'm looking for. That's an important thing to note about this book, by the way. It's pretty tool-intensive. Most projects use sheet metal, pliers, files, a jewelry saw and a drill. If you don't already have these things, you may be in for a hunt. Various online retailers (including the author's site) carry these items, but I struck out on finding various sheet metals, a checkering file or a jewelry saw anyplace locally.

The Projects

The book has 20 projects. Only 3 of the projects use polymer clay. Six of the projects use Faux Bone. If you're not familiar with Faux Bone, that's because it's a fairly new material, created (surprise, surprise) by the author. Once I realized that, I was afraid the book would be one big sales pitch for the new product... but again, I think it did a good balancing act. I do think that most, if not all, of the Faux Bone projects (along with one or two of the book's other projects) could easily be made with clay... though that mindset might kinda be at odds with the whole getting-familiar-with-other-materials thing (see above).

The projects are laid out very stylishly. I like that each chapter starts with a story, either about the history of a particular type of amulet, or about the specific goals he had in creating his particular amulet. What strikes me about the projects is that they all seem pretty short and doable, each one just 4-5 pages long. Every step has a large photo, and the photos do a good job of communicating the information.

Dancik has taught extensively, and I suspect that experience really helped him write clear, helpful instructions. One small thing I appreciated is that he gave instructions for both lefties and righties when it made a difference for a particular technique.

The projects in the book include:

  • Karma Bracelet (charm bracelet)
  • Minkisi (beaded tea infuser necklace)
  • Abracadabracus (beaded abacus necklace)
  • Prayer Holder Bracelet (pvc pipe inro bracelet)
  • Bound Heart Pendant (wire-wrapped Faux Bone pendant)
  • Rune Necklace (inlaid polymer clay beads carved with symbols)
  • Protection for the Traveller (copper sheet pendant with Faux Bone accents)
  • Laibon Ax Pendant (wire and Faux Bone necklace)
  • The Protective Eye (polymer clay transfer on sheet metal background)
  • Story Bracelet (Faux Bone charm bracelet)
  • Medal for Unknown Good Deed (tin can medal on Faux Bone background)
  • Finding your Way (compass and wire necklace)
  • Split Rock Power Object (paper pulp mache and resin pendant)
  • U + Eye (bottle cap and resin pendant)
  • Power is Safe in the Void (jar lid and concrete pendant)
  • Magnifying Your Path (jar lid, polymer clay and magnifying glass pendant)
  • Never Far (copper sheet pendant)
  • Closure for a Memory (mica, sheet metal, and photo pendant)
  • Looking Back Bead (plexiglas with Faux Bone topper)
  • Seeing Through (pendant with a copper sheet box and concrete)

I found several new-to-me techniques in this book, both for polymer clay (used as a mold for concrete or dapping die for plexiglas) and for other materials (making your own textured hammers, folding sheet metal to make a box). I like that he used lots of found object: jar lids, bottle caps, tin cans, and more.

Gallery items are included at the end of each chapter, instead of presented separately at the end of the book. This made sense in some places, when the theme fit with the current chapter. Other times it seemed out of place. I really enjoyed the gallery items, though. Most of the pieces included a back story, which made them even more interesting. I like that there were many different styles of polymer clay in the book, both in the projects and in the gallery. In some cases, I didn't recognize that it was polymer clay until I read the descriptions, which is probably ideal. One thing I came away from the IPCA Retreat with was this piece of Christi Friesen wisdom: "If you look at the piece and immediately notice how it's made, then it needs more work. You should see the piece first, then notice its construction." The gallery items were definitely see-the-piece-first kinda work.

Overall, I think this book is a good read even for those who aren't into the whole amulet thing and don't plan to make any of these specific projects. It really helped me think through how the materials I use and the choices I make can give my art meaning. Its lessons on artistry and craftsmanship definitely made it worthwhile for me.

My Results

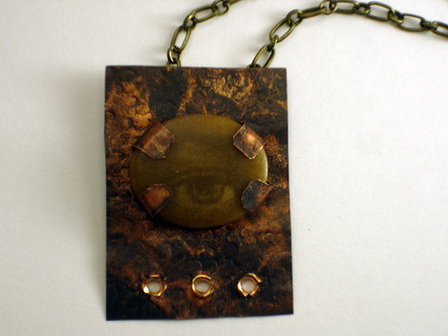
While I had trouble finding the right gauge of sheet metal locally, I did have some embossing copper on hand that I used to make the book's "Protective Eye" project. It would probably be too thin for a piece of jewelry, but that's okay since I'm planning to use mine as a charm to hang in my craft room. I used an "O" letter punch to texture the piece, with the O and the open eye image representing an openness to the right opportunities. I hope this amulet will remind me to be watchful for those good opportunities while avoiding time-wasters.

I particularly liked using eyelets to assemble the pendant. There's something about the strength of metal that makes me feel more proud of the piece and its craftsmanship.

Open Eye Amulet, by CraftyGoat

Summary

  • Pros:
    • Good intro to a variety of tools and techniques: using jeweler's saw, cutting metal, using a butane torch to create a patina, and lots more.
    • Thought-provoking information on how the materials you use give meaning to your finished work.
  • Cons:
    • If you're primarily looking for polymer clay projects, this book only has three.
    • The projects can be expensive if you don't already have his recommended tools.
  • Who It's Good For:
    • Jewelry and mixed media artists looking to add a personal touch to their artwork.

August 10, 2009

Sculpey Pasta MachineI have a long checklist of things that I take with me when I'm crafting away from home, including, among other things, clay, clay tools, TLS, rubbing alcohol, baby wipes, and the big one... the pasta machine. Most of the stuff can be grabbed and tossed into my bag fairly easily. But the pasta machine requires unclamping and disassembling, and then getting it back just right whenever I get home.

When I was just going to my monthly polymer clay guild meetings, it wasn't a big deal. I'd allow myself an extra half an hour to pack up my stuff, and it worked fine. Then some friends of mine started a monthly Downtown DIY craft night. Add on the occasional class, and it started to feel like I was spending more time packing and unpacking my pasta machine than actually using it. And for some reason, it's a little harder to get out the door nowadays than it was, say, 6 months ago.

So I decided I wanted a second set-up: a basic set of tools I could leave packed up and ready to take. I had duplicates of some tools, and a few older tools I didn't use often at home but would be happy enough with at a meeting. But a second pasta machine seemed like a real splurge.

I've been using my Atlas 150 for almost 10 years now, and it's served me well. But I got it back when the good ones were cheap on eBay... there weren't nearly as many polymer clayers to compete with on the bidding. And since some of the newer Atlas machines have scraper problems, I don't feel entirely comfortable buying one online anyway. I'd want to inspect it.

I learned at the IPCA Retreat that there's a new Sculpey pasta machine, er rather a "Clay Conditioning Machine" (it's about impossible for me to call it anything but a pasta machine!). It's cheaper new than I'd pay for a used Atlas on eBay, so I decided I'd give it a try. After all, it seems like a machine made for clay stands a fair shot at working just as well with clay (or better) than a machine made for pasta.

The Settings

Sculpey Clay Machine DialThe machine starts with 1 as its largest setting, which is nice. I didn't want to have to get used to a "backwards" machine. There are 9 settings, which is 3 more than my Atlas has. And the best part is, I can actually use all of those settings. My Atlas's 6th (thinnest) setting always shreds my clay, so I avoid it. The clay goes easily through all 9 settings on the Sculpey machine.

I don't like the dial on the Sculpey machine, though. The numbers are on the outside of the dial, away from the machine. This, plus the fact that the indicator arrow is the tiniest of bumps, makes it hard to tell which number it's lined up next to, or whether it's even lined up to a number at all. The dial also seems a little less solid than my Atlas's dial. I don't get that satisfying click that tells me it's locked into a gear.

While I don't have an accurate measuring device to determine the thickness of the pieces, I did make a cheat sheet to compare its settings to my Atlas. I found that the settings were more or less the same on settings #1-4 (the Sculpey may be ever-so-slightly thicker). The 5th setting on my Atlas seemed the same as the 6th setting on the Sculpey machine. And the 6th (thinnest) setting on the Atlas seemed the same as the 9th (thinnest) setting on the Sculpey machine. So while the Sculpey machine has three extra settings, that doesn't necessarily mean it gets thinner sheets.

The Clamp

Pasta Machine "C" ClampsI'm not crazy about the top portion of the C-clamp (the part that fits in the pasta machine slot). It's rounded, so it's harder to get in place than my Atlas's notched clamp. Still, it's plenty steady once it's clamped down.

My other gripe is really about clamps in general. Why don't the clamps close down further than they do? I guess they were originally designed to fit on kitchen cabinets (back when they were, ya know, used for pasta). But they tend not to fit on thinner work desks or tables — most people have to use a wooden block or some other spacer to get their machine clamped securely. One of the clay machine manufacturers should recognize that as an opportunity and include a clamp that can clamp down to fit thinner tables.

The Handle

Sculpey Clay Machine Handle and ClampThe most visible difference between this pasta machine and any other is the removable foam comfort grip on the handle. I didn't have strong feelings about the comfort grip one way or the other — I've never really noticed my old handle being uncomfortable to use. BUT I took the Sculpey machine to guild, and one of my fellow members loved it. She has arthritis in her hands and said the comfort grip made all the difference to her. Definitely something to keep in mind if the plastic handles are usually uncomfortable for you.

The handle itself seems to stay in place better than other machines' handles. I haven't had it fall off once. Of course that may be the case with all newer machines — perhaps they get looser as they age.

Packaging

The box has nice pictures showing what a pasta machine can do. I also liked that it has clay-specific instructions (vs. instructions for pasta use). I often forget that these things aren't intuitive to a newbie — for example, that you have to start with the thickest setting then make your way to the desired thickness. These instructions cover that, plus some basic cleaning instructions. Still, I think the instructions could be improved on. Why not include a booklet with Skinner blend instructions, or a couple of projects that rely on the pasta machine?

The Verdict

I like the Sculpey machine. It handles the clay nicely, even on the thinnest settings. The comfort grip on the handle makes it more comfortable to use for people with arthritis or hand pain. I'm not crazy about the gears — I like the certainty I get when I snap my Atlas gears into place. But that's a minor thing that I think I can get used to.

I was originally concerned that I needed another (comparatively expensive) Atlas. Atlas is supposed to be one of the best brands, so I worried anything else would feel flimsy by comparison. But the Sculpey machine has changed my mind. As it stands right now, I plan to make the Sculpey my main pasta machine, and I'll relegate my Atlas to the travelling bag. The primary reason is that I can make use of all of its settings, where my Atlas shreds clay on its thinnest setting. Granted, a good take-apart cleaning might fix my Atlas (I'm not the best about keeping it clean)... not to mention that I got it used, so who knows what kind of abuse it went through before me. So other folks may find the Atlas vastly superior to the Sculpey machine. But for me, the Sculpey machine will work just fine.

Just don't make me call it a clay conditioning machine. :-)

Available for $20-25 at various online retailers (including Create for Less and Amazon). Should be available in your local JoAnn's store soon.

August 7, 2009

Michael's Craft Smart ClayI happened down the clay aisle at Michael's yesterday and noticed they were in the process of stocking the shelves with a new Craft Smart brand clay. Judging from the fact that the package says "Distributed by Michael's Stores" — and the fact that I also saw Craft Smart glue, paint, paintbrushes, and more — I'm guessing this is the Michael's store brand.

The price stickers were up ($1.29/package), but the shelves were empty. So while the employee was on another aisle, I sneaked a package off of his stocking basket (shhh — don't tell!).

Store brands tend to be products that have been manufactured by someone else, then private labeled with the store's brand name. With that in mind, I started trying to figure out who might have manufactured this clay. I originally thought it might be Sculpey III repackaged, based on that clay's popularity. But once I got my packet home and opened it up, it felt softer than Sculpey III. As I played with it a little more, I realized it felt familiar... a lot like that Bake Shop Clay I reviewed a couple of months ago. I investigated a little more and noticed the package directions are the same on the two clays: "Knead clay 2 minutes. Bake at 275 ° for 15 minutes per 1/4" thickness..." The Bake Shop clay was the first clay I'd seen with a specific time in their conditioning instructions, and I doubt it's a coincidence that this new clay's instructions match it. So I feel pretty confident that Michael's new clay is a private label of the Bake Shop clay.

There are 15 colors: Black, Brown, Tan, Bright Green, Green, Light Blue, Blue, Purple, Light Purple, Pink, Red, Orange, Yellow, Beige, and White.

Like any clay, it may have its uses in the serious clayer's workshop, but overall this is a very soft clay intended for kids.

August 5, 2009

Finished Disks

If you've ever tried to give someone directions for how you made a polymer clay project, you probably ran into that question: "What pasta machine setting did you use?"

It's not an easy question to answer. First of all, various pasta machine brands have different settings.

  • Some have #1 as the thickest setting.
  • Some have #1 as the thinnest setting.
  • Some have 9 settings.
  • Some only have 6. (Is my Atlas 150 the only one that just has 6, by the way? Is it just a really old model?)

Aside from all that, it can just be darn hard to remember what setting you used. Oftentimes for me, I kept going til my sheet was big enough for whatever it was I was covering, without regard to how thin it ended up.

Just in case you ever find yourself in the same boat, here's a quick project that may help you tell (after the fact) what setting you used. It can also be useful for comparing two different machines &mash; for example, to help tell your friend with a Makins machine what setting she should use to match your Atlas's #2 setting. Or if you're trying to plan a project that requires a specific thickness, you can use these disks to find the perfect one.

Materials

  • polymer clay
  • pasta machine
  • cookie cutter
  • number rubber stamps or needle tool
  • drinking straw for poking hole (optional)

Instructions

  1. Step 1: Rolling Out ClayCondition clay. Roll it out to the thickest setting of your pasta machine.
  2. Step 2: Cutting Out ClayUse a cookie cutter to cut out a disk from this setting.
  3. Step 3: Stamping ClayUse a number stamp to mark it with the number of the pasta machine setting this disk matches up to. (If you don't have number stamps, you could carve the number with a needle tool.)
  4. Step 4: Punching Hole in Clay DiskRepeat for each setting on your pasta machine. If you want, you can poke a hole in the corner of each disk before baking. After baking, thread book rings or yarn through the holes to keep the disks together.

Extra Tips

  • If you're making several cheat sheets, use a different color of clay for each pasta machine to avoid any mix-ups. Use a Prismacolor marker to write the brand of the pasta machine on the back of the thickest disk.
  • If you need to have accurate measurements, you could write the actual thickness of each disk on the back with a marker.

Now when someone asks you what pasta machine setting you used, you can just compare your project's thickness to each disk til you find the right one.

About this Site

CraftyGoat's Notes is all about sharing polymer clay tips & tricks that have worked for me. (And even a few that haven't!)

Read more about CraftyGoat's Notes...

Buy My Book

Archives

Enter your address to get CraftyGoat's Notes by email:

Delivered by FeedBurner