Taking Better Photos (Updated)
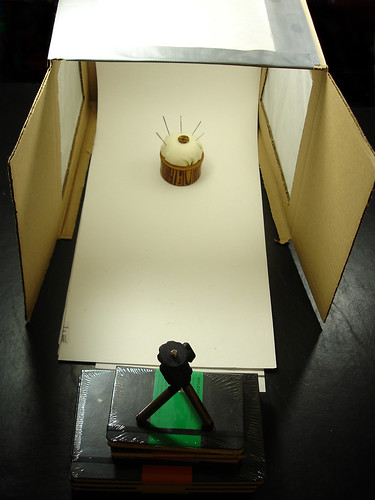
The last time I talked about taking better photos, I was using a point-and-shoot camera with a homemade cardboard light box. I really liked that set-up, and it worked well for me for a long time. But when it came time to write and photograph my book, I realized I needed to upgrade. In the process, I learned a lot of things (mostly by doing them wrong!), and I wanted to share some of those lessons here.
1. Buying a Light Box: Bigger isn't (Necessarily) Better
While I initially thought "huge" was a good thing, I quickly came to realize that bigger-than-you-need isn't actually better. The wonderful thing about light boxes is that they create a contained space where you can control the lighting. As that space gets larger, it gets harder to create good lighting throughout the tent. The pictures I took in that large light tent were full of shadows. And while I'm sure I could have eventually gotten the right combination of lighting power and placement to improve the photos, I chose to downsize to a 24" box. It was still big enough, but the smaller size made it easier to control the lighting. So the lesson here? Use the smallest light box you can get away with.
2. Using a Light Box: Ditch the Fabric Backdrops
I don't like ironing. Not one bit. And those fabric backdrops that come with the light tent kits seem to be pre-installed with deeply-ingrained wrinkles. A better (or at least more patient) person than I may find that the effort to iron those wrinkles out is worthwhile. But I've opted to just ditch the fabric.
The alternative? Cheap 'ol poster board cut to the size of your light box. Buy 'em at school supply time and you'll have many months' supply for less than a dollar. I generally use plain white and I specifically look for the type that's not double-sided. (I prefer to use the non-glossy side so there's no reflection.)
While I started doing this because of the whole ironing thing, I've found it has one big advantage. Poster board is easily replaceable. Since I'm generally taking step-by-step photos of the crafting process, I tend to be messy. Paint, embossing powder, clay... you name it, and it's spilled as I've tried to take a photo of it. With a cloth backdrop, that's kind of a big deal. Stopping to clean can really slow down your photo session. And stains? Well, you might be Photoshopping those out for a long, long time! Poster boards, on the other hand, are simple and cheap to replace anytime there's a mishap.
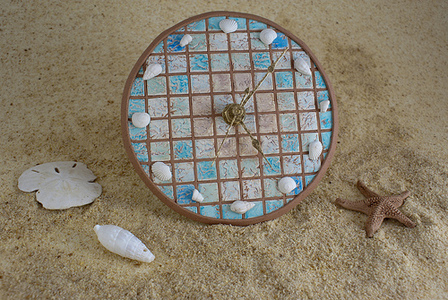
Poster boards also give you some other options. There's a wide variety of colors available, so you can easily change up the photo background. You can glue on scrapbook paper for an interesting and reusable look. Or you can get more elaborate, as I did with this shot for a PolymerCAFÉ article. I sprayed adhesive on my poster board and sprinkled it with a bread crumb mixture to create a beach background. Not something you could do with fabric backdrops!
Special note for clayers: If you're taking photos of unbaked clay on a poster board background, keep in mind that the clay can leach out and leave a oily spot. Sometimes I just work quickly to avoid this. But if I'm doing time-consuming step-by-step photos, I generally opt for a flexible white plastic cutting mat. (I got mine at Wal-Mart, but these are the same idea.) Since they're pretty small, they don't work as a general use replacement for the poster board. But the clay won't leach into them... plus they're very easy to clean between shots and they're durable enough for those times when you need to demonstrate cutting with your clay blade.
3. Hands-Free Photos: Fast & Steady!
This part is primarily for those of you taking step-by-step photos. Sometimes you just have to have both hands in the shot to show exactly how to do a technique. While I occasionally had to have my husband come in and press the shutter button, I got pretty good at using the camera's timer function to handle it on my own.
The trickiest part was keeping everything in focus, since I had to quickly move into final position after pressing the shutter. I found that I needed to put the hand I wanted to focus on (the "action" hand) in its correct position while I focused the camera, then press the button with the other hand. This was slightly harder because my action hand tended to be my dominant right hand, meaning I had to press the shutter with my (somewhat shakier) left hand. And all this movement had to be arranged around a camera, a tripod, and a light box. I sometimes felt like a human pretzel, and I discarded many photos when the angles of my hands looked too unnatural. One thing that helped was finding the right height of stool. That kept me steady and in-focus... and it probably saved me some back pain, too!
4. Get it Right: Don't Count on Post-Production
A good photo editing software is worth its weight in gold. But strive for perfection while you're actually taking the photos. It's easy to think in the back of your mind that you can crop it and adjust the brightness and contrast later. But you'll be limited by what you have to work with. If you plan to crop some background thing out later, you may find that it's next-to-impossible to do without sacrificing some other important part of the photo. Not only that, but making better photos in the first place will save you a LOT of time tweaking the same little things afterwards in each photo.
Photography still isn't second nature to me. Doing it more has just made me realize how much more I need to learn. But hopefully these tips will help you in your own quest to take better photos.
Have your own tips? I'd love to hear them!


