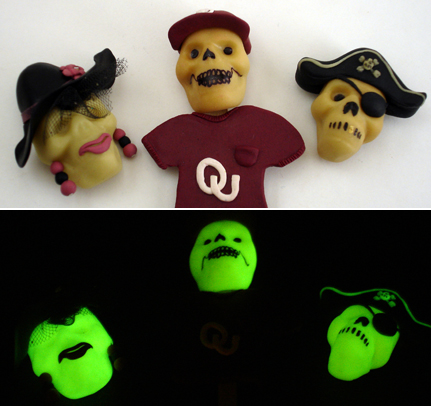
How to Photograph Your Glow-in-the-Dark Creations
Glow-in-the-dark polymer clay can be a lot of fun to use, especially this time of year. But it can be difficult to show off the cool results online. Whether you want to sell your creations on Etsy or just show them off to your Flickr contacts, here are some general guidelines for getting good photos of your glow-in-the-dark creations:
- Use a tripod and your camera’s timer function (if it has one). A little shakiness can really affect photo quality in low-light, long exposure photos.
- Turn off your flash. (Seems obvious til you forget to do it! <g>)
- “Charge up” your glow-in-the-dark creation by keeping it in a bright place for a few minutes before the photo. This will ensure it’s glowing brightly.
- Find a very dark place for your photo. This is easiest to do if you can shut off all the lights except one lamp beside you. Put the object to photograph in place (preferably against a dark background such as a black posterboard), focus your camera, and get ready to press the button as soon as you turn off the light.
- Want to take matching daytime and nighttime shots? Since the nighttime shot will be the trickier of the two, take it first. Once you have a shot you like, leave the object in the same position and turn on the lights for your daytime photo. (I didn't do this for my photo above, thus the differences in angle and position.)
Tips for Camera Settings
Let me start this part by saying I'm not a photography expert. These are some of the things I've tried that seemed to give me good results. Any of you who actually know what you're talking about, feel free to correct my mistakes in the comments.
Now that that's out of the way...
Specific options for your camera will vary. Read the manual and experiment to see what gives you the best results. Here are some of the things I recommend changing:
- If your camera has the option, increase the contrast of the image by selecting Contrast +.
- Change your ISO sensitivity. A larger number (such as 400) is good for shooting in dark locations.
- If your camera has setting selections for white balance, try the daylight setting. This is (somewhat ironically) a good setting for nighttime photos.
- Select a slower shutter speed. A setting of 10-15 seconds will usually work. Your camera may indicate seconds with a ” mark, as in 10” or 15”.
- Open the aperture wider. The aperture is indicated by F numbers (i.e., F2.8 or F5.6). The smaller the F number, the larger the lens opening. And the larger the lens opening, the more light reaches the image capturing device, resulting in a brighter image of the glowing objects.
- You may also be able to manually adjust your camera’s exposure by changing the EV settings. I selected +2.0EV for the brightest photo.
Good luck — I'd love to see what glowing things you're creating!


Comments
Thanks for the tips. When my grandson and I made his switchplate cover for his room we tried photographing it while glowing in the dark but we weren't too successful with that part. I think I will try again....
Posted by: Carolyn Good | October 28, 2009 8:02 AM
Thanks for the comment, Carolyn. I would love to see a pic of your glowing switchplate cover!
Posted by: Angela Mabray | November 18, 2009 7:41 AM