
How to Make Easy Bottle Cap Jewelry
 Our library system has some of the best classes! Last night I went to a Bottle Cap Creations class taught by local artist Kiona Millirons, where the library provided us not only with free instruction — but also free bottle caps and all the free supplies we needed to make a belt, bracelet, pin, pair of earrings — or whatever. How cool is that?
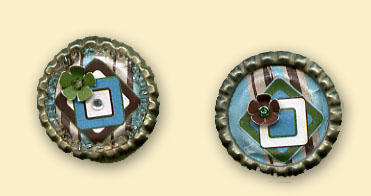
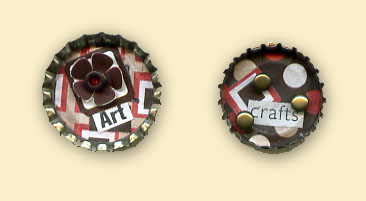
I decided to make a couple of magnets (the blue ones in the picture) and a couple of pins (the "Art" and "Crafts" collages). They were fun and very easy to make. Here are the basics:
- Get a bottle cap. Used caps works for many projects, or you can get new ones from bottling shops, eBay, Hobby Lobby, etc.
- Use a hammer and nail to (carefully) punch any holes necessary for your project. For necklaces and earrings, you'll want a tiny hole for a jump ring near the top. For belts or bracelets, you'll want a larger rivet-sized hole in the middle.
- If you want a flattened, framed look (like my blue ones), you'll need to hammer the edges flat. It's easiest to start with a cap where the edges are already flared out. Put the bottle cap, open side down, on a flat surface and use a hammer to pound around the top. Once you've sufficiently smashed the cap, you'll end up with a cool framed edge. Update: See comments for cap-flattening clarification.
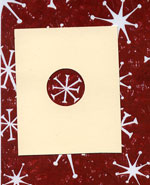 Use scrapbook paper or some old magazines for images. A great tip Kiona shared with us is to use a template (see picture) to figure out exactly how much of an image will fit in your bottle cap. Make your own template with card stock, making the circle hole just a little larger than the bottom of the bottle cap (my bottle caps were approximately 1"). Then hold the template up against various parts of the image as you decide what will look best. You might be surprised! You can also use the card-stock template to trace your images for cutting — or if you've got one of those handy-dandy circle punches, they work great too. Just cut the paper a little larger than the bottom of the cap, so that the paper comes up around the edges a bit.
- Using Mod Podge (or another decoupage glue) and a paintbrush, spread a layer of glue in the open area of the bottle cap. Add the paper and decoupage that down too.
- Now get creative. Make a mini-collage. Add some embellishments. Come up with something strange and interesting.
- When you're finished adding everything, you can put another layer of Mod Podge on top. Or you can use a dimensional adhesive like Ranger's Glossy Accents if you've added bulkier items to your collage. Just be sure to use a glue that dries clear.
- Hot glue a magnet or pin finding to the back, or attach a jump ring to your pre-drilled hole if you're making a necklace or earrings. Wear with pride!

My collages use scrapbook paper (the little cut-out flowers were a design on the paper), beads, and eyelets. I tried rubber-stamping the letter "A" onto the "Art" bottle cap collage before I added the matted flower. But the cap bottom isn't a flat enough surface for stamping, so I couldn't get an even impression. Maybe stamping the paper before putting it in the bottle cap would have worked — though I'm not sure which ink to use to make sure the glue doesn't cause smearing.
I had a lot of fun making these... but the wheels in my mind started turning. I wonder what I could do with bottle caps and polymer clay.
Well, stay tuned & I'll tell you!

Comments
What a fantastic idea. I look forward to gathering supplies and working on another crafty project with my son (he's 2) for his Grandmas.
Posted by: Jennifer | November 18, 2006 11:47 AM
Thanks, Jennifer. I'm sure it'll be a great project for kids -- letting them go through magazines to find some fun images... or maybe even recycling old Christmas cards to make Christmas themed bottle cap ornaments...? Have fun & good luck!
Posted by: Penni Jo Couch | November 18, 2006 5:09 PM
I've been using bottle-tops in my artistic practice for the past year. So it was interesting to find this little blog : > If anyone's interested my art can be viewed here: www.mayple.deviantart.com
Posted by: Monika | October 11, 2007 5:15 AM
I needed to know how do someone make photo small enough to fit inside the bottle caps? Where do someone find small enough vintage image to fit inside the bottle caps? I would appreciate any help I get.
Posted by: Lillian | January 1, 2008 8:54 PM
Lillian, I normally resize my photos using photo software (I use Adobe Photoshop, but there are much cheaper options available). You can either print the photo yourself or use a photo-printing service (like Snapfish.com).
As far as vintage images go, you could try some of Dover's vintage art books (which have lots of high-quality royalty-free images), or online sources like Miss Mary's Gazette or Twisted Papers. You're still likely to need to re-size the image, though. Good luck!
Posted by: Angela Mabray | January 1, 2008 11:25 PM
I love this website. I have always wanted to know how to make things with botle caps. I collect them and I just don't know what to do with them.
Posted by: Morgan Ledford | March 22, 2008 8:45 AM
Thanks for your great tips. I'm having one problem - I'm trying to make one of these for my mom with pictures of her grandkids (I'm printing out pictures). Every medium that I've tried to use ends up making the ink bleed together - any suggestions? Thanks!
Posted by: Cookie | May 10, 2008 3:45 PM
Cookie, I've had some projects that were fine & some that bled – so I suspect different papers & inks all factor into it. What you might try is putting your photo between two layers of tape (or laminating it, if you have a Xyron or other laminating tool) – and see if that protects it from bleeding. Good luck with your project!
Posted by: Angela Mabray | May 10, 2008 11:12 PM
Hello, I was so excited to try this! But, when I did the bottle cap did not come out round. I wanted the flattened, framed look. What did I do wrong? Can you help me?
Posted by: Carolyn | June 7, 2008 7:26 PM
Carolyn, I'm glad you asked. I should have clarified that the only caps that you can get this framed effect with are ones that *haven't* been used for bottling. You can buy these online, or perhaps even locally if you have a nearby bottling supply company. If you're buying caps anyway, you could save yourself some trouble & buy them pre-flattened. Try searching eBay for "flattened silver bottle caps scrapbooking" or similar terms.
Posted by: Angela Mabray | June 8, 2008 11:12 AM
Thanks Angela, So I would just buy the bottle caps that are already pre-flattened? So if I place my image in the center will it still look framed?
Thanks for getting back to me. I spent last night hammering the bottle caps in different positions. Talk about frustrating.
Carolyn
Posted by: Carolyn | June 8, 2008 12:56 PM
I think the pre-flattened ones will work well for you. I bought mine on eBay a while back, so I don't remember the exact price. But I know it seemed like a steal compared to the time I would have spent flattening the caps otherwise! This Mother's Day Bottle Cap Necklace is an example of a project I used the pre-flattened ones on — they definitely have that nice framed look. Good luck!
Posted by: Angela Mabray | June 8, 2008 2:44 PM
Ohhh that Mother's Day Bottle Cap Necklace is cool! I just ordered them off of ebay and it came to 13.00 with shipping for 100 pre-flattened bottle caps. Thank you so much for the advice!!
Carolyn
Posted by: Carolyn | June 8, 2008 3:07 PM
Thank you for the great tip! I needed help figuring out how to make a necklace for a b-day party craft this weekend! -amo
Posted by: Anne-Marie Older | March 2, 2009 9:47 PM
i just started can someone please tell me where i can get the picture images for my bottlecaps thanks cindy
Posted by: cindy | June 28, 2009 12:13 PM
Cindy - I listed several suggestions in my comments to Lillian (scroll up a bit to read them). Another idea I saw recently is postage stamps. Hope that helps!
Posted by: Angela Mabray | June 28, 2009 5:06 PM
I used dimensional glue but it dried weird, the middle sunk and the sides were high any suggestions? Thanks!
Posted by: Holly | August 9, 2009 10:01 AM
Holly: If you put on enough for it to dry unevenly, my guess is that you used too thick of a layer. I know when I've used the Glossy Accents product, I've had to use very thin layers, building it up gradually (letting each layer dry) to get a thicker coating. If you're going for a thick coating, a resin like East Cast might be a better choice for you.
Posted by: Angela Mabray | August 9, 2009 3:28 PM
Hi everyone, just looking at the posts and thought I'd make a few suggestions. If you get an image that you print out on your regular home printer (ink jet) and are afraid that your ink will bleed, print them on glossy paper and then cover them in a clear nail polish. It seals your ink. Also, if you go to etsy.com and punch in bottlecap graphics you'll find all kinds. I get stuck on etsy for hours! Or you can download clipart images and make them yourself from the internet.Hope this helps!
Posted by: rachel | August 28, 2009 1:09 PM
I have a question!! What dimensions should you use when u are resizing the images(resolution, pixels)so the images will not be blurry? I've been having such a hard time with it! And does anyone know a free website to do this? I make bottelcaps for hairbows so just wanted to know!Thanks!
Posted by: amanda | August 31, 2009 2:17 PM
Thanks for the comment, Rachel! I'd never thought to look on Etsy for this type of graphics -- good tip!
Posted by: Angela Mabray | September 9, 2009 5:10 PM
Amanda, The general rule is that print images need to be at least 300 dpi. I just did a Google search and came across this site that provides info on resizing: http://www.mmprint.com/highres_photos.cfm
One thing it explains is that you can't just resize a low-resolution image... you must start with a high-resolution image, or you may end up with a blurry image. Hope that helps!
Posted by: Angela Mabray | September 9, 2009 5:27 PM
Wow thanks!As for resizing the images, do you need software to do so or do you resize in like Microsoft word or a program that's already on most computers?Thanks soo much for the help!!
Posted by: Amanda | September 9, 2009 5:40 PM
Amanda, I've always had Photoshop (an expensive & powerful image software) on my computer because of our web development business. So I haven't really used any alternatives. I've heard GIMP, which is free, has a lot of the same features as Photoshop... but I suspect it's more that what you need and probably has a steep learning curve. You might try this list of free web-based Photoshop alternatives: http://www.lifeclever.com/10-free-web-based-alternatives-to-photoshop/
Posted by: Angela Mabray | September 9, 2009 6:00 PM
You can use a free program called Paint.net to resize and edit photos. It is very helpful for fixing color issues as well.
I have used it for years and it is great.
http://www.getpaint.net/
Posted by: mi | September 30, 2010 7:51 AM