
TLS Image Transfers, Part 3
 I had just bought the Kato Polyclay Clear Medium & hadn't tried it yet, so I decided to follow their instructions exactly for my first image transfer attempt. I excitedly pulled out the pamphlet and started looking at their directions, feeling optimistic that this just might do the trick.
My heart sank a little when I read these words: "ink-jet printed image"
Surely they don't mean ink-jet printers are the only ones this will work for? I've been waiting all my polymer clay life for the day I'd have easy access to a laser printer for projects, and now that I only have a laser printer, they want an ink-jet...?
I decided maybe they just wrote that because they felt like everyone would assume they were supposed to print to laser printers, like with every other polymer clay transfer project. So I carried on, following the rest of the instructions from Kato Liquid Polyclay's product pamphlet:
- Make an inkjet copy of the image, then trim to leave a small border around the actual image.
- Place transfer image on parchment paper. Paint a thin smooth layer of Kato Liquid Polyclay on the image, extending it to the edge of the paper.
- Holding a heat gun about 1" from the paper, cure the transfer until it is shiny and clear. After cooling, repeat the painting and curing 2 more times.
- Heat the back of the image, through the parchment paper, for about 2 minutes. While still warm, cut away the border. Then carefully peel the transferred image away from the paper.
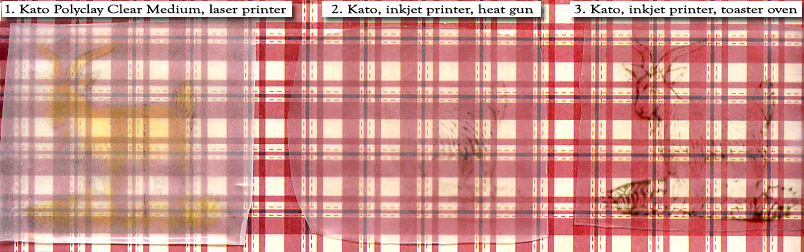
What do you know? My laser printed image didn't work at all... so maybe they meant that part about the ink-jet printer! There was a faint yellow image -- I'm guessing this is because the laser printer does multiple passes, printing one color, then the next, then the next. Yellow must be the top color that's printed on this printer, so that's the only color that got transferred.
Other than the small detail where not much actually transferred, the transfer seemed pretty promising. Very little, if any, paper reside. And it was very clear. The finish itself seems more glossy than the TLS.
So there was a slight delay in my experiment while I waited for an opportunity to use an ink-jet printer. These aren't easy to find -- copy shops, offices, libraries & the like all tend to have lasers. Fortunately we ended up visiting my in-law's house, and they were more than happy to let me use their ink-jet.
Happy to have the project back on track, I tried the ink-jet transfers almost as soon as we got home. I followed the same steps as above... and I ended up with even worse results than above! There were a few very faint black lines -- but that was all that transferred.
I also tried following the other method Kato recommended in their pamphlet -- which is painting the clear medium on the image and baking it in the oven, then cooling and repeating before soaking the transfer in water to separate the paper from the transfer. Separating the paper from the transfer proved to be much easier for Kato's Liquid Polyclay than for Sculpey's TLS. And the transfer medium itself was even clearer with this method -- I'm guessing because it was 2 layers instead of 3. But the results were still bad. I had slightly darker black outlines this time (you could even imagine that the outline might be a goat!), but no color.
One thing that could have affected my results was that I printed the images on Kodak Glossy Inkjet Paper because it was the photo-quality paper we had on hand -- but it's not one of the ones the Kato brochure recommended. They recommend the following:
- Epson Photo Quality Ink Jet Paper (Matte)
- Great White Imaging & Photo Paper
- Canon High Resolution Paper
- Epson Photo Paper (Glossy)
- Kinko's Coated Color Copier Paper
- Office Max Gloss Photo Paper
Since I don't currently have easy access to an ink-jet, I'm not going to experiment with the other papers right now... but if you have, I'd love to hear your comments.
Stay tuned for a wrap-up of what I've learned in my liquid clay transfer experiments.
Other posts in this series include:

Comments
Thanks for sharing all these details. I tried TLS transfer and it did not work. I am trying to think of uses why someone would want to use TLS? I was looking for sharp image transfer (no smearing) with close to original color - I want this to be a photo image transfer of people on some kind of medium for a pendant. Perhaps, clay. I found that Lazertran silk (on laser paper) is a winner. The image transfer was sharp. Make you all of the image is properly burnished. The challenge I have is double sided transfer and to cut the clay (the cutters made a little dent where the seams meet). And to put the hold thru, without smearing the image. It was too much work. But the image transfer onto clay works with lazertran paper.
Posted by: Vani | September 15, 2008 10:26 AM
Thanks for the tip, Vani. I've heard of Lazertran but wasn't sure it was worth the expense. Glad to hear it's a good option.
As an update to the ink-jet image transfer portion of this post, my polymer clay guild recently had a lesson on ink-jet transfers. The paper we used was Avery "Personal Creations" Ink Jet T-Shirt Transfer Paper for light backgrounds (available at Staples). We applied the transfers directly to the clay (no liquid clay). While I still don't have an ink-jet of my own, our teacher supplied some print-outs for use on our projects... and the results were wonderful! The photographs transferred very clearly. So that paper might be an option for folks interested in ink-jet transfers.
Posted by: Angela Mabray | September 23, 2008 1:59 PM