Translucent Clay Image Transfers, Part 1
 I love Translucent Liquid Sculpey (TLS) as a polymer clay adhesive. But I've never had much luck using it for image transfers.
So when I came across Sculpey's new tutorial [PDF], I thought I should give it another shot. I now have ready access to a color laser printer to generate the toner-based images, and I thought experimenting with different papers and different methods might fix the problems I had in the past.
I’ve separated the results of my experiments into three posts. Today I’ll go over my first attempts -- kind of a control group. Next time I’ll tell you about my attempts to use Hammermill papers (a brand I've seen recommended), along with my attempts at using the heat gun technique. And last, I’ll tell you about using Kato Liquid Polyclay.
First Transfer Attempts
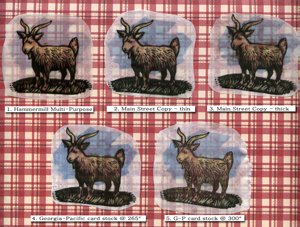
I decided to try first on the various papers we already had on hand. I used my Dell 3100cn color laser printer to print 4 images:
- 1 on a multi-purpose office paper (Hammermill Fore MP 20 lb. paper, ivory)
- 2 on regular copy paper (Main Street 20 lb. copy paper, white)
- 1 on card stock (Georgia-Pacific 110 lb. card stock, white)
I used the following process for the transfers:
- I used my finger to spread a very thin layer of TLS on each image. On one of the copy paper images, I spread it a little thicker to see how it would turn out.
- After letting them sit a few minutes (so the TLS could settle), I put them in the toaster oven at 265° for 15 minutes.
- I plopped the images into the sink to soak the paper, then rubbed and peeled off the paper with my fingers.
Of the various paper types, I had the most trouble getting the copy paper off -- it really seemed to stick. The copy paper where I did a thicker layer actually seemed to turn out clearer, which was surprising to me. Maybe by getting the TLS layer too thin, I was making it harder to separate the paper from the TLS...? Although the card stock initially seemed to come off prettily easily -- it peeled off in big clumps -- there was still quite a bit of paper fiber left. The Hammermill did the best of the group, but was still a lot less clear than I was hoping for.
Turnin’ Up the Heat
I printed another image, this time just on the card stock. I followed the same steps as before, but this time I baked it at 300°, which is recommended for higher transparency.
I liked the initial look when I took it out of the oven. I'm not sure why, but it seemed like the black ink portion of the image had kind of "popped out" -- maybe a difference in the way the different types of inks reacted to the higher temperature. It gave it a cool 3-D look.
But I had even more trouble removing the paper this time. I tried scrubbing with a washcloth in addition to my finger, but I think that may have taken off some of the image transfer too. Or at least at some point in all of that scrubbing, my black ink lost its cool 3-D effect, along with some of its darkness. I was disappointed with that. And I still ended up with a white-fibered background.
But there's still more to try... Stay tuned!
Other posts in this series include:

