
How to Make Your Own Molds with Amazing Mold Putty
Making molds to use with polymer clay is super-easy -- but, like anything else, it can be a little intimidating to try for the first time. I talked about the basics of silicone mold putties in my Amazing Mold Putty review, but here are a few more pointers to get you on your way.
Making a Mold
 Measure and Mix. Mix equal amounts of the different-colored putties together until they're a uniform (not marbled) color. If you're using Amazing Mold Putty, don't stress too much about getting precisely the same amount of each color. I never use measuring spoons -- I just roll out balls of putty that look roughly the same size. Since I've never had any problems doing it this way, I'm guessing this brand is pretty forgiving on amounts.
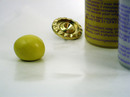 Roll into Ball. Roll the putty mixture between your hands to eliminate creases. In my experience, applying pressure to really compress the putty ball helps here, especially if you're nearing the end of the putty's workable time.
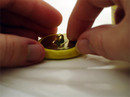 Mold and Set. Shape the putty over whatever you're molding, pressing down completely to get a good impression. If it works better for the item you're molding, you can also put the mold putty on wax paper (it sticks to regular paper!) and press the item into it. If you're molding something large and flat (like for texture sheets), you can even run your mold putty through the pasta machine first to get a thin sheet. If you find you've mixed up more putty than you need for your item, quickly roll the excess into a ball and find something else to mold. And you do have to work fairly quickly: depending on conditions, 5 minutes is about as much good molding time as you'll have.
After you're done molding, let it sit undisturbed, according to the package directions (Amazing Mold Putty sets in 20-30 minutes).
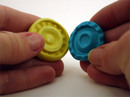 Tweak and Use your Mold. Once it's set, your mold is ready to use as is -- or you can tweak it some more. The mold putty will stick to itself, so if you happened to get a thin spot in your mold, you can patch it with more putty and allow it to set again. You can also cut the mold with scissors or a craft knife -- which is really handy for cleaning up edges on texture sheet molds.
To use the mold, roll your polymer clay into a ball, eliminating all creases. Press it into the mold, then use an aluminum scraper to trim off any extra clay, leaving the back of the clay even with the top of the mold. (You can also use a clay knife to do this, but be careful not to cut the mold!) Gently press the clay out of the mold, then make any necessary modifications before baking. If you have a thin, flat mold, you can use a brayer to press it into a clay sheet -- or you can even run the mold and clay sheet through the pasta machine together.
Ideas for Molds
You can make molds of anything. (Can doesn't mean should, BTW. Copyright laws apply, so it's probably not a good idea to make molds from your Precious Moments collection!) Here's a few ideas to get you started:-
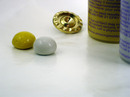
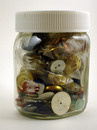 Buttons: Want to make handmade polymer clay buttons to match some wonderful fabric? (Or to replace a missing button?) A button mold is a great way to keep all your buttons the same size and shape. Button molds are also a fun way to practice your molding skills -- grab that big jar o' buttons and start playing.
 - Textures: Make your own texture plates by finding interesting textures and making molds from them. Try baskets, lace, leaves -- or anything else that's got a great texture. You could also use extruded clay to make interesting patterns on a sheet of clay, then create a texture sheet from that.
- Handmade Items: Once you get the hang of making your own molds, you'll really appreciate what a wonderful tool molds can be. Did you create one earring & want to make sure the other matches it perfectly? Make a mold! Want to mass-produce a favorite handmade polymer clay creation? Molds are a great way to speed up the process.
More Resources
Here's a couple of sites with good mold-making info:- Sarajane Helm shares her advice for making and using molds, especially face molds.
- Polymer Clay Central talks about more advanced molding techniques, like 2-part molds & 3-D molds (don't miss the article's second page).
I hope this inspires you to give mold-making a try. Good luck!
Other posts in this series:
- Review: Amazing Mold Putty
- How to Make Your Own Molds with Amazing Mold Putty
- Video: How to Make Button Molds & Buttons
- Video: How to Make Your Own Texture Molds
- Mold Putty Wrap-Up
Start molding today with the Mold Putty Project Pack.

Comments
Great tutorial! (and photos, btw) :)
Do you prefer this type of mold over using scrap clay to make a mold?
Posted by: Christie | January 30, 2008 12:06 PM
Thanks Christie. I've had better luck using this stuff for molds than clay. (I talked about my clay molding days a bit more in this post, if you haven't already read it.) It's easier to get great details -- really good for textures -- and it's so nice when clay just pops out without needing a release agent. That & it's just plain *fun* to use... I refused to go to bed the other night til I had made molds of every button in my button jar! (Course that may say more about my compulsive nature than about the mold putty!) :-)
Posted by: Angela Mabray | January 30, 2008 12:39 PM
i would like to know how do the people in holywood make the faces for actors who would be playing a double roll....like eddie murphy does all the time.....how do they recounstrcut and build a new face patern ? and what materials do they use ....how do they do it ? do you have any idea? it would be great if you did .
thank you .
Posted by: rares dan | August 4, 2008 3:14 PM
Sorry, rares dan, I don't have any experience with that. Try looking for a "making of" segment on a DVD version of one of those movies. Good luck.
Posted by: Angela Mabray | August 5, 2008 8:11 AM
I really have a hard time envisioning anything that's simple. So...I want to make a large press sheet for fondant that would be a background landscape for 3D figures. My question is can I make the original sheet using parafin wax sculpture and then cover it with the Amaz. Putty ( will the wax melt?). Or will I need to do it in 3 steps and create a clay form from the wax mold and then do the Amaz. Putty mold as a 3rd step? Also how large can I expect to be able to mold? I want to be able to cover the sides of a two tiered 10 inch cake? So would it be better to mold the piece in sections? Need to get this done by winter.
Thanks for the help. BP
Posted by: Barbara Pendergrass | June 30, 2009 9:10 AM
Thank you very much for this helpful information!
Posted by: Valeriana | July 30, 2009 12:59 PM
Thanks for commenting, Barbara. Unfortunately, I don't know much about cake decorating and I can't picture what you're describing. The sheet itself doesn't sound like a job for the Amazing Mold Putty, though the 3D figures might be. Amazing Mold Putty is food-safe, but not if you've used it to mold polymer clay first (never use tools for food prep that you've used with polymer clay). That's as much as I can help though -- you might buy some of the mold putty and see if it can do what you're wanting. Or you might try a cake-decorating forum for more assistance.
Posted by: Angela Mabray | August 7, 2009 2:13 PM
Barbara yes you can do exactly what you asked. I actually JUST did this with amazing putty and I was doing a search to see if anyone else was doing the same thing when I came across this post. Amazing putty works great for such things. Make sure you get a lot of putty and make sure that you have ALL of your supplies close at hand. Once the putty starts setting up you will be out of luck if you have to run and get extra stuff to stick on the putty.
Posted by: Sarah | October 20, 2009 11:52 PM