
Quick Bottle Cap Jewelry and Card for Mom
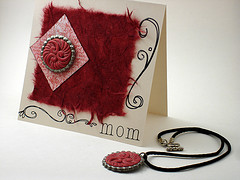 Still looking for a gift for mom? Look no further than your craft supply stash! Here's an easy way to make a matching card and necklace — perfect for Mother's Day or any other time you need a quick handmade gift. The card features a bottle cap button embellishment made from polymer clay, and the necklace features a matching pendant.
Materials
- Buttons. Raid that button jar to find a design you like. The large ones (just about the same size as the inside of the bottle cap) work great.
- Amazing Mold Putty or molding compound of your choice
- Bottle caps. For this project, I like the fluted ones, which are available in craft stores or online. You could also use recycled bottle caps that you've flattened.
- Patterned paper & card stock for the card
- Rubber stamps (optional)
- Polymer clay to match your paper
- Large jump ring, jewelry findings, & cord for the necklace
- Tools: hammer & nail, plus assorted paper crafting, polymer clay & jewelry making tools
Instructions
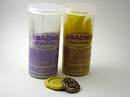 Use Amazing Mold Putty to create a mold of your button. Let this set.
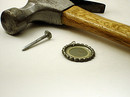 Use a hammer and nail to punch a hole near the rim of the bottle cap you're using for the necklace. Feed a large jump ring through the hole.
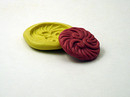 Use polymer clay and your mold to create buttons in your desired color. (Note: Decide which paper you're using first, then mix your clay to match that color. It's much easier to do in this order than vice versa!)
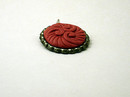 Press the unbaked polymer clay button into the bottle cap, smoothing the edges as needed. If the button is too small, you can use a clay extruder to add a border around the edge. Bake your bottle cap according to the polymer clay manufacturer's instructions.
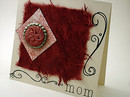 Fold a cardstock base and apply your scrapbooking paper. If you need some help coming up with a layout, check out this random layout generator (it's meant for scrapbooks, but you can make it work for cards with a little imagination!), or search for "card sketches." Decorate the card with rubber stamps and/or other embellishments, then use a strong double-sided tape to add your bottle cap embellishment.
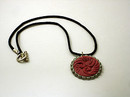 For the necklace, string the bottle cap onto your cord and add necklace closures.
Variations
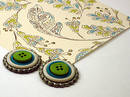 Try stacking different colors of buttons for a trendy look.
- Instead of (or in addition to) a necklace, make earrings or a ring.
- Different finishes can give one button lots of different looks. Try adding chalk or Pearl Ex before baking. Alcohol inks, acrylic paints, or clear glazes are good options after baking.
- Insert your own variation here. (I'd love to see what you come up with!)
I hope you have a wonderful weekend with your family this Mother's Day!

Comments
Very cool project. I may have to try this sometime.
Posted by: Susan Daly | May 9, 2008 4:59 PM
Oh I love that idea! I love the mold putty too! I will have to try that out.
Posted by: Tsoniki | May 9, 2008 5:23 PM
Great tutorial Angela! Still working on a polymer clay necklace for my mom, so the info is timely!
Posted by: Cindy Lietz | May 9, 2008 7:55 PM
I liked your informative article. Who would have ever thought that bottle caps would be a jewelry making technique when we were sipping on soda pops years ago? Not I! he he he
Thanks for giving me such GLEE!!!
Posted by: April Blue | June 5, 2008 5:48 PM
Oh, goodie -- I'm always glad to share some glee! :-)
Posted by: Angela Mabray | June 8, 2008 11:22 AM
hi.my name is sea.i'm a chinese girl. my english is not very well,but i like your blog ,because it has a lot of things that i want to know which about ploymer clay.
thank you so much.
Posted by: sea | February 17, 2009 9:40 AM