
How to Use and Clean the Makin's Ultimate Clay Extruder
Back when I got my Makin's Ultimate Clay Extruder, the packaging was a bit on the sparse side. I had a little trouble figuring out where things went, what that O-ring was for & how exactly I was supposed to use the thing.
That's been a few years now, so Makin's may have improved the packaging. But just in case anyone else is puzzled, here's some instructions on how to use and clean your Makin's extruder.
How to Use It
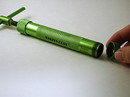 Open the extruder by unscrewing the green cap at the bottom.
-
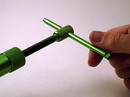 Twist the handle until there's enough room in the barrel for the amount of clay you want to extrude.
 Check to make sure the black rubber O-ring is in place, pushed against the plunger piece inside the barrel.(See update below.) 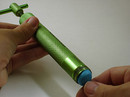 Use conditioned clay, rolled into a cone about the same diameter as the extruder tube. Insert clay into barrel. Note: You're not limited to Makin's brand clay. I've successfully used Premo, Studio by Sculpey, and mixtures including other brands... maybe everything except Makin's!
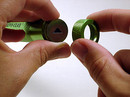 Pick which extruder disc shape you want to use. Place this on the open end of the tube, and screw the green cap back on to hold the disc in place.
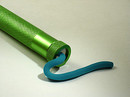 Twist the handle to push the clay through the extruder disc. You'll notice a bit of resistance as you get to the end of the clay. Don't force it past this point! In fact, I usually give the handle about a half a turn in the opposite direction before I unscrew the bottom cap. This relieves the pressure and makes it easier to take it apart.
How to Clean It
The black O-ring does an excellent job of scraping the barrel's sides as you extrude, so the Makin's extruder is usually self-cleaning. Still, here's a couple of cleaning tips for when things get extra-messy.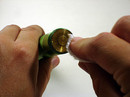 To clean the plunger, remove the bottom cap and twist the handle until the plunger is exposed. Use a paper towel or a piece of scrap clay to remove any excess clay on the plunger. (Makin's has a photo tutorial here.)
To clean the O-ring, twist it inside out between your fingers. The clay should pop off as you twist.
Stay tuned for tips on getting the most use out of all those discs that come with your clay extruder.
Update 6/4/08: Jenny from Quilted in Clay left a comment cluing me into the actual purpose of that O-ring in the extruder package. It's a spare part for the O-ring that's already hidden inside the extruder, sandwiched between the bottom and top piece of the plunger. Yeah, that makes way more sense than the way I was using it. While it probably doesn't hurt to do it the way I originally said above, after running doing a few tests, I don't think it helps either. I've changed the appropriate places in my post to reflect this. Thanks so much to Jenny for her correction.
Also, one cleaning tip I didn't mention previously. If you get clay in the threads of the screw-on cap, it can keep it from closing securely. Just run a toothpick or needle tool around them to remove the build-up.
Posts In This Series:
- Review: Makin's Ultimate Clay Extruder
- How to Use and Clean the Makin's Ultimate Clay Extruder
- Getting to Know Your Extruder's Discs
- Video: Extruder Basics PLUS Making Coiled Extruder Beads
- Silent Extruding: Getting Rid of the Squeak
Buy the Makin's Ultimate Clay Extruder now.

Comments
That's great to know, since your article convinced me to buy one of these today. :D
Posted by: Nycteris | May 29, 2008 8:15 AM
Thanks for such a great explanation!
Posted by: Susanna | May 29, 2008 1:42 PM
Angela, are you saying that you put the o-ring in, up against the the plunger? If so, this is not right. If you take the plunger out of the tube, you will see a "U" shaped section in the brass end. This is where the o-ring goes. The extra o-ring in the package is a replacement, in case the one on the plunger needs replacing.
Hope this helps
Jenny P
Posted by: Jenny Patterson | June 4, 2008 12:48 AM
Thanks for the clarifications, Jenny -- I updated the post to reflect this.
Posted by: Angela Mabray | June 4, 2008 2:01 PM