
Quick Tip: Perfect Polymer Clay Squares
 Need to cut a polymer clay square but don't have the right size cookie cutter? Here's an easy way to get a perfectly straight-edged square (or rectangle) every time:
 Find a sheet of graph paper. If you don't have any -- or if the grid on yours is the wrong size to be useful -- you can print your own graph paper online, selecting just about any size grid you like.
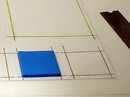
If you know what size you need your polymer clay square to be, count out how many squares that equals on the grid (i.e., 7 across by 7 down). It may be helpful to outline the edges with a pen or highlighter, especially if you'll be re-using the template to cut lots of pieces the same size.
Find a sheet of graph paper. If you don't have any -- or if the grid on yours is the wrong size to be useful -- you can print your own graph paper online, selecting just about any size grid you like.
If you know what size you need your polymer clay square to be, count out how many squares that equals on the grid (i.e., 7 across by 7 down). It may be helpful to outline the edges with a pen or highlighter, especially if you'll be re-using the template to cut lots of pieces the same size.-
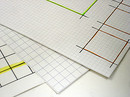
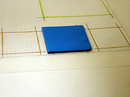 Place the graph paper under a sheet of wax paper. (Working directly on the paper could lead to an accidental image transfer.) Roll out a sheet of clay to the desired thickness, and lay it on top of the wax paper. It helps if you press it down lightly so it sticks to the wax paper -- that way it won't wiggle while you're cutting.
 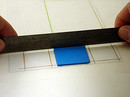 Line up your clay knife with the grid lines, and cut out your square. Viola -- perfect every time!
This post is the first in a new category on my blog: Quick Tips. It'll be a spot for me to jot down interesting observations & quick tricks I've found useful -- and with any luck, a spot where you'll discover some new things now & then too!

Comments
Thank you! this is a great tip!
Posted by: Iris Mishly | May 15, 2008 2:52 AM