" /> CraftyGoat's Notes: June 2009 Archives

« May 2009 | Main | July 2009 »

June 30, 2009

After surveying the site's visitors, Polymer Clay Central has changed the rules for all future challenges. Now you can enter by sending them photos of your work — no more costly trips to the post office required! I think this is a great move on their part: it'll make it much easier for folks like me to get in last-minute entries. I also like that they're keeping a mail-in option for folks who aren't comfortable taking their own pictures. You can read the new rules here.

Here's a list of the upcoming challenge themes:

  • July - CELEBRATION
  • August - OVER THE RAINBOW
  • September - GLITTER & GLITZ
  • October THAT REALLY "BUGS" ME
  • November - CARVE IT UP
  • December/January - RING IN THE NEW YEAR

Polymer Clay Central has held challenges since March 1999, with July marking their 110th challenge. Not only do the winners get bragging rights, but the top 3 vote-getters also win generous prizes. If you haven't entered one of their challenges, give it a try!

June 26, 2009

Recycled Tissue Paper Postcards by CraftyGoat

If you're like me and have trouble throwing away possibly-useful things, then you may not even want to read this post. I had a lot more storage room before I realized I could cut up all my cereal boxes and use them for crafty purposes. And I used to only keep the tissue paper that looked nice enough to re-use... now I feel obligated to keep even the stuff the gift recipient crumples up and tosses aside dismissively. So, pack-rats, consider yourselves warned. This may be another thing you'll have to find room for in your "nest."

The postcards are made from cereal boxes and recycled tissue paper. Or other stuff (see more suggestions in the materials). And the possibilities are pretty much unlimited.

Materials

  • Paperboard. You can recycle this from cereal boxes, soda can boxes, Kleenex boxes, etc. If you don't have those, you could use heavy duty poster board or cardstock.
  • Tissue paper. Old, crumpled stuff works fine. You could also use other patterned paper products, such as paper tablecloths or paper napkins (if using 2- or 3-ply napkins, make sure to separate the layers first)
  • Adhesive. I used decoupage glue (i.e. Mod Podge or Crafter's Pick) for my project. A Xyron machine or spray adhesive would also work.
  • Decorations. Stamps, paint, antiquing inks, chalks, glitter, etc. (Nothing 3-D, though, or it won't qualify for the postcard rate.)

Instructions

  1. Paperboard for PostcardsCut the paperboard to size. The post office has rules about postcard sizes: they must be at least 3.5" high x 5" long, but no larger than 4.25" high x 6" long. There's also an aspect ratio requirement for the postcard rate. The aspect ratio, which you determine by dividing the card's length by its height, must be between 1.3 and 2.5. For example:
    • A 4.25" high x 6" long postcard has an aspect ratio of 1.4 (6 divided by 4.25). It qualifies for the postcard rate. Other good sizes include 4" × 6"; 4" × 5.25"; and 3.5" × 5".
    • A 4.25" high x 5" long card would not qualify since its aspect ratio is 1.2.
  2. Crumpled Tissue PaperCut a piece of tissue paper that's slightly larger than your paperboard. I like for my postcards to have a little extra texture, so I gently crumple then un-crumple the tissue paper.
  3. Spreading Glue on PaperboardSpread a thin, even layer of glue onto the printed side of the paperboard.
  4. Gluing Tissue Paper on PaperboardGently place the tissue paper onto the glue and spread it flat. One advantage of crumpling it first is you don't have to be perfect during this step. Wrinkles and air bubbles look intentional. Just make sure all the edges are well-adhered.
  5. Antiquing with Walnut InkNow's a good time to add walnut ink or chalks if you're using them, since they won't stick well after we add the top layer of glue in the next step. If there are parts where the paperboard design is particularly showing through, concentrate your inks in that area to hide it.
  6. Adding Top Layer of GlueLet everything dry, then spread another layer of decoupage glue on top.
  7. Trimming EdgesLet the glue dry again, then trim the edges so the tissue paper layer is the same size as the paperboard layer.
  8. Stamping PostcardOptionally, decorate the top by stamping or adding glitter. If you're stamping, you may want to use StazOn inks, since they're permanent on slick surfaces like Mod Podge. You could also repeat the above steps to add contrasting layers of tissue paper.

Variations / More Ideas

Recycled Tissue Paper Postcard Variation by Crafty Goat

  • I personally think the plain paperboard surface for the message area looks all earth-friendly... but if you'd prefer a more traditional look, you can glue white scrap paper on the back.
  • These would be a great gift for a kiddo who's going to camp or a loved one who's going on vacation. Make a matching set for however many days they'll be away, then wrap them up with a coordinating ribbon. Go ahead and add stamps (postcards stamps are up to $0.28 now) to save them the trouble (and to make sure they don't have any excuses!)
  • We had lots of personalized paper napkins left over from our wedding.You only need so many for keepsakes, so what do you do with the rest? Use this basic idea to create custom Thank You cards with the extras. OR, if you're doing a themed kids' party, buy an extra paper tablecloth and use it to make invitations.

I'd love to hear your ideas, too.

Note: You may have noticed I'm using bigger photos in my tutorials. Like it? Hate it? Take too long to load? Let me know if you have an opinion one way or the other.

June 22, 2009

craftroom-swatch.jpgMy birthday's not til August, but I already know that I'm getting a great gift from my mom. She offered to paint my craft room for me. It's something I've wanted to do for at least a couple of years, as this old blog post from the archives so pointedly reminds me. Once we had Sam, I wondered how projects like that would ever get done. So I was thrilled when my mom offered.

I'm pretty sure I'm going with an earthy orange. The orange swatch above is my current fave. I'll probably also add some shelves (the bookcase is overflowing, plus there are some thing I've made that I'd like to display). And I've got a few ideas for wall decor — even some including polymer clay. (Surprise, surprise!)

Something I'll be paying close attention to is lighting. Darker walls can make the room seem darker, and I like to have as much light as possible while I'm crafting. Full spectrum lighting is supposed to be best for crafting since seeing true colors is important. I already have full spectrum overhead lights, but it would be nice to add some stylish task lighting. Bob Vila has this handy overview on task lighting, including what types of lights to use and where they should be located (to the left side for right-handed people, the right side for left-handed people).

All Modern has agreed to offer a lighting giveaway here, allowing the winner to choose any of their desk lamps up to $100 in value. I've looked through their lamp options, and they have a nice selection — brands like Knoll, Herman Miller, Artemide and Blu Dot. My choice would probably be one of their full-spectrum lamps — either the George Kovacs Comfy Eyes Desk Lamp or the Comfy Eyes 1 Light Full Spectrum Floor Lamp. Or I might go with something that fits the room's style better, replacing its current bulb with a full-spectrum bulb.

Giveaway Details:

One winner will receive a desk lamp with a value of up to $100. For your 1st entry, answer this question in the entry box below: If you were re-doing your crafting area, what's one thing you would change? (Or tell me one thing you love about your current crafting area.)

For a 2nd entry, visit the All Modern site and decide which lamp you would choose if you won. Then come back and tell me by leaving a second comment in the entry box.

Limit 2 entries per person. U.S. residents 18+ only, please. Entries must be received by 11:55 p.m. on Sunday, June 28.

June 16, 2009

CraftyGoat's Notes: 6 Masculine Gifts to Make with Polymer Clay

Crafting handmade gifts for men takes a little extra creativity — guys don't always appreciate delicate, flowery things. Fortunately, polymer clay is an incredibly flexible medium that offers a lot of options for masculine projects too.

Here are a few gift ideas for the men in your life:

1. Pen Set

Faux Burled Red Maple Desk Set

Pens are one of the quickest polymer clay projects to make, and they can be really classy-looking gifts, especially if you use a pen kit. (See my pen kit tutorial for instructions.)

I'm a big fan of Boston Craftwork's Amazing Twist Pen, because it's so easy to put together — no pen press or pounding required. If you don't mind a little assembly work, they also sell a Mechanical Pencil that looks great paired with a matching Amazing Twist Pen. Or if your guy's a more on-the-go type, he might appreciate the Mini-Keychain Pen from Penn State Industries. Each kit costs about $3.50 plus shipping, so these are very affordable gifts.

2. Business Card Case

Faux Ivory Business Card Case

If your gift is for a business man, cover a business card case with polymer clay. (You can find instructions for the carved business card case pictured at the top in my book, Polymer Clay 101.) Or you could make a business card holder for his desk, using either this Card Couch tutorial or one of these ideas for inspiration.

You can buy business card cases to cover for $3-5 plus shipping at Boston Craftworks. You can buy desktop card holders to cover at office supply stores.

3. Clock

Clocks are a good functional gift for home or office. Check out Irene Semanchuk's clocks or the many clock links on Glass Attic for inspiration. There are also several good polymer clay projects in The Ultimate Clock Book.

4. Coaster Set

Faux Leather Monogrammed Coaster Set by CraftyGoat

Sticking with the office decor theme, what would look better on your guy's desk than a set of personalized coasters? Go for the faux leather look, or use rubber stamps to create your own themed coaster set.

5. Photo Frame

Fill any photo frame with a picture of the family, and any husband or father will be proud to display it. That's even more true if the frame is a polymer clay masterpiece. You can cover a store-bought (or recycled) wooden or metal frame. Or you can use this method to make an all-polymer frame.

6. Bookmark

Polymer Clay Bookmarks

If your gift recipient always has his nose in a book, he might enjoy a polymer clay bookmark. There are lots of options for personalization. If he likes sci-fi, decorate a paperclip bookmark with a creature from his favorite author. If he's religious, stamp a favorite verse of scripture into the clay. (Here's an overview of how to make each of the bookmark types above.)

More Tips for Masculine Projects

  • Fauxs are your friends. Faux techniques are great for masculine projects. Here are a few that would work particularly well for any of the projects above:
    • wood
    • ivory/bone
    • jade
    • bronze or silver
    • onyx
    • leather
    • marble
    • burled red maple
    Try Dean's Faux Surfaces in Polymer Clay or Blackburn's Making Polymer Clay Beads for great faux instructions.
  • Personalize it. The best thing about handmade gifts is that they can be very personal. You can use your guy's favorite color, incorporate his favorite hobby, and even inscribe his name or initials. (Here's a tutorial for making a polymer clay name stamp.)

June 12, 2009

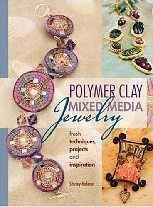
Polymer Clay Mixed Media Jewelry by Shirley Rufener

I'm embarrassed to admit it, but I'm a bit of a supply junkie. In theory, I like that all you need for polymer clay is your fingers. But in reality, I'm always tempted by the newest gadget, tool, or supply. I'll find some excuse to justify getting it — but then, more often than I like to admit, that thing will sit for months or even years unused in my craft closet. I feel guilty about it. But it doesn't stop me from doing it again the next time a really interesting-sounding product comes out.

I suspect it's a pretty common situation for crafters. I've known scrapbookers with stacks and stacks of patterned papers (none of which they wanted to actually use) and rubber stampers with literally thousands of stamps. As long as you're actually using those things, it's really not a problem. But collecting supplies you never use can weigh you down — and you don't want anything weighing down your creativity!

Shirley Rufener's Polymer Clay Mixed Media Jewelry is just the book for supply junkies. This book's projects incorporate some of those supplies you might have bought but never gotten around to using: things like chalks, alcohol inks, metal leaf, embossing powders, custom stamp-making kits, precious metal clay, resin, and more.

There are a couple of things that really set this book apart. First, it has an excellent introduction. At 22 pages, it's longer than normal, but it includes instructions for using polymer clay and precious metal clay, plus the basics of jewelry assembly. I especially liked the examples of matching end cap and closures made from polymer clay. I also found the introduction to precious metal clay helpful (that's one of those supplies I've had in my closet and have been afraid to use). Rufener has instructions for working with it and firing it, plus step-by-step instructions for making your own metal clay bails. She also has a nice picture showing the different effects you can achieve using liver of sulfur patina.

The other thing that sets this book apart is its wide variety of projects and styles. Rufener says in the intro that she included a variety of jewelry styles "in the hope that something will catch the eye of a very diverse group of readers, crafters, and artists." That's a nice goal for an author to have, and I think she succeeded. While there were some projects that didn't appeal to me at all (but presumably appeal to someone out there with different tastes), I did find several projects I really liked. She encourages readers to make the projects their own — use favorite colors and experiment with embellishments. "Allow yourself to unleash the creativity inside."

The Projects

The book has 18 projects. Here's a list, along with the materials and techniques each one features:

  • Altered Pastel Brooch: pastel chalks, translucent clay, and a backfilling technique
  • Organic Bead Bracelet: pastel chalks, rubber stamps (I love the way she creates the domed strips on this one.)
  • Chalk Pod Floral Pendant: pastel chalks, resin
  • Love Letters Collage Pin: polymer clay transfer, pastel chalks, wire framing, gold leaf
  • Curved Tile Bracelet: curved polymer clay transfer, pastel chalks with Fantastix applicator (I like her method for creating beading channels.)
  • Etched Leaf Pin: silver leaf, alcohol inks, and a cool masking technique
  • Faux Dichroic Glass Necklace: gold leaf, alcohol inks, EnviroTexLite, and a nice method for creating your own bezels
  • Asian Influence Dangles: embossing powders, rubber stamping
  • Sicilian Spice Bracelet: liquid clay, alcohol inks, metal leaf, and carving a mold from baked polymer clay
  • Champleve Molded Earrings: liquid clay, alcohol inks, metal leaf, and molding
  • Cabochon Ring: metal clay and setting crystals in polymer clay
  • Champleve Seahorse Necklace: metal clay, liquid clay, alcohol inks, silver leaf, and using a custom stamp-making kit
  • Lots of Dots Charm Bracelet: metal clay, silver leaf
  • Mosaic Collage Bracelet: mosaic with polymer clay and rhinestones
  • Bird on a Limb Mosaic: mosaic
  • Mosaic Lapel Brooch: 3-D mosaic
  • Felt Bead Neckpiece: polymer clay cane bead caps for felt beads
  • Galaxy Bead Bracelet: gold leaf and bead roller tricks

While I like many of the projects, the project instructions are just so-so. I found a lot of problems — things like typos, errors, pictures out of order, and confusing instructions. For example, there were a couple of places where I was almost sure she was telling me to sand an unbaked clay piece. Most of the unclear stuff can be figured out with a couple of re-reads, especially for folks who are familiar with polymer clay. But I think the book really would have benefited from a more thorough editing job.

And while supply junkies may enjoy finding projects they can use their stockpiles on, others may be a little overwhelmed at the long supply lists. I have a pretty well-stocked craft room, and there were quite a few of the supplies that even I don't have. In some cases, it seemed to go a little overboard — for example, requiring a white pencil to sketch a pattern to carve into the clay. While more experienced clayers may know of other supplies that would work just as well, I worry that beginners may feel the need to buy supplies that aren't really necessary.

And that's another thing. Rufener says the book is aimed at beginners and intermediate crafters (though she hopes accomplished artists will find mixed media applications and techniques too). Even with its extensive introductory info, I'm not sure this book would be good for beginners. The supply lists are awfully long, and the projects are all fairly complex. Combine that with the confusion some of the poorly-edited parts caused me, and I'm just not sure beginners will find success with these projects.

But I do think intermediate — and probably advanced — clayers will find something useful here. There are some really unique ideas included in the projects. She also includes various helpful tips for working with clay... some that I've figured out over the years, but others that were new to me.

My Results

This book gave me the push I needed to pull out my precious metal clay kit and give it a try. Unfortunately my kit didn't have enough clay for the ring project. My attempts to make it work anyway plus my inexperience with the medium caused a minor catastrophe. But after re-reading her intro, I think I'll order more PMC and give it another try:

"Everyone is creative — you just have to take the time to find your niche. Part of that includes giving something a shot that you haven't tried before. More importantly, allow yourself time to get the hang of it. Don't expect perfection on your first or even second or third attempt... It's a learned art."

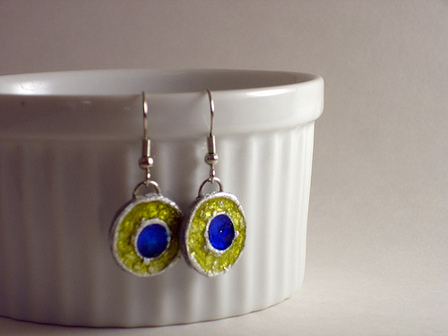
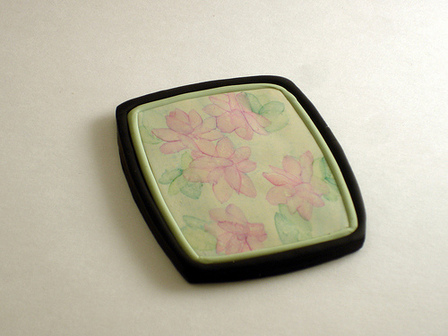
The other projects I tried went better. I used the instructions for the Sicilian Spice Bracelet, making earrings instead. I also made the Chalk Pod Floral Pendant, and was very happy with the way it turned out (still deciding if I'll make it into a pin or a necklace, though).

Peacock Earrings

Floral Pastel Pendant

Summary

  • Title: Polymer Clay Mixed Media Jewelry by Shirley Rufener
  • Price: $15.63 plus shipping
  • Pros:
    • Covers a nice variety of mixed media using a wide variety of projects and styles.
    • Long intro section covers polymer clay, precious metal clay and jewelry techniques.
  • Cons:
    • Poor editing causes some parts to be confusing.
    • Extensive supply lists may make for pricey projects.

June 3, 2009

Bake Shop Clay

Polyform recently announced their new Bake Shop Clay. It's a part of the Sculpey line and is marketed towards school-age children. And while serious polymer clay artists and crafters may not be interested in this clay, many polymer clayers also clay with little ones who might be interested in it. So here's my impressions, along with the impressions of 5 little clayers.

About the Clay

Bake Shop clay is non-toxic, lead-free, and phthalate-free. (Interestingly enough, when I asked about the phthlates in their other clays, Polyform's Education Manager Iris Weiss said, "All of our clays comply to Prop 65, almost all are phthalate-free, all of our children’s products are definitely phthalate-free.") Bake Shop is sold in individual 2-ounce packets, or in a multi-color sampler pack. Colors include: Red, Orange, Yellow, Green, Blue, Purple, White, Brown, Black, Beige, Hot Pink and Tan.

My Impressions

The Polyform folks are marketing this to kids, not polymer clay artisans, although they point out that they "have seen masterpieces created from Original Sculpey." Good point. So even though I'm not their target audience, I wanted to give the clay a test run myself.

The metallic packaging looks nice, though it means you don't see the exact shade of the clay until you open it. The instructions seemed clear enough for beginners, even including guidelines on how long to condition the clay.

The clay itself is very, very soft, as you might expect from a Sculpey clay targeted at kids. It was as least as soft as Original Sculpey (the stuff you buy in big white blocks), maybe even softer. It actually reminded me of Play Doh in softness, though it was stickier than that. It ran through a pasta machine pretty nicely, even at thin settings. I baked a couple of strips that I ran through the pasta machine to check its baked strength: one at my pasta machine's 2nd-thickest setting and one at its next-to-thinnest setting. It's been a while since I've used Sculpey or Sculpey III (and I don't have either handy now for comparison), but this seemed a little stronger I remembered those being. Both sheets developed cracks after I bent them several times, but they did have some flexibility — not the extreme brittle quality I remember from Sculpey III.

My Bake Shop Birdies

I tried a fairly simple sculpt from Christi Friesen's Birds of a Feather (reviewed here). While this clay may work well for kiddos, I just didn't have the patience to enjoy using it for even this simple sculpt. It distorted too easily for my tastes. Plus I was hoping to create something without obvious fingerprints (maybe kids are less concerned about that). One up side of a clay this soft is you can brush it with an alcohol-dipped paintbrush at the end to help hide those fingerprints. Still, as soft as it is, the only time I could see myself using this clay is in situations where I currently use Sculpey — for example, mixing it with liquid clay to make a grout for mosaics (in fact, having the clay pre-colored would make that much easier!). In general, though, this clay is much too soft for my tastes.

The Little Testers

But like I said, I'm not the target audience. So I recruited some little testers — kids of artists and crafters I know — to give it a try too. I had a total of 5 kids, aged 4 through 10 try it. And the verdict was unanimous: they all liked it. (Note: I'm using the kids' first initials for privacy.)
  • "A. loved working with this clay." - Tracey, grandmother of 5-year-old girl
  • "Z. played with it with a friend who has never used clay before and they both found it very easy and fun to use." - Kellie, mom of 9-year-old girl
  • "My 4 and 7 year old boys just got done using the clay and I have to say it was a very nice product." - Staci, mom of 4- and 7-year-old boys
  • "I. really likes the clay." - Andrea, mom of 10-year-old boy

I asked for the kids' feedback on several aspects of the clay: softness, usage, clean-up, and durability. Here are a few of their responses:

Softness

How easy was it for them to condition and use the clay?
  • "Very easy to condition. It took about 1/4 of the time for her to condition it - which meant a lot less of the conditioning being done by me (for her)." - Tracey
  • "Very soft and easy to work with." - Z. "It's very, very soft. They sculpted a clown out of it over an aluminum armature and it was very easy to smooth, almost like a paste." - Kellie
  • "It was softer than Sculpey and therefore easier to condition, though they did whine for my pasta machine, which is what they're used to." - Staci
  • "It worked up really easily." - Andrea

It seemed like a worthwhile point that parents are the ones doing most of the conditioning for younger kids' clay projects. So an easier-to-condition clay means less work for the parents before the kids can jump in and have fun. I also thought it was neat that 4- and 7-year-olds are used to using a pasta machine to condition their clay, and that the 9-year-olds used an armature for their sculpture. The kids these days are so advanced — just think what they could be doing with polymer clay in a few years!

Usage

Did it take details well? Did one part get distorted while they were working on another part?

No complaints here. Everyone thought the clay took details well. Z. added that there wasn't any distortion. Staci said, "The clay was easy for them to work and took a fairly decent impression, though not, I think quite as good as the regular product."

Clean-up

Was it hard to get colors or clay residue off their hands after using it?
  • "Easy clean up. Didn't seem to leave as much residue." - Tracey
  • "It left a noticeable residue on your hands but washed off easily." - Kellie
  • "Cleanup was a breeze, even taking into account that the boys get a little liberal with the baby powder to keep from getting sticky." - Staci
  • "Left no icky stuff on his hands." - Andrea

Again, using baby powder to keep from sticking to the clay was a trick I didn't learn for years. Totally impressed with these kids!

Durability

If they had a chance to bake any creations, did they seem pretty strong?
  • "The end-product seems to be the same consistency as our other clay creations and they seem strong." - Tracey
  • "I baked the products, which ranged from volcanoes to spacemen to a flat map of North America (my 7yo is a cartography geek), in the requisite 275F oven for 15 minutes and they came out just fine." - Staci

Summary

Adults may not find a lot of use for this clay, other than in situations where they might have already been using Sculpey. But Bake Shop clay is made for school-aged kids, and the kids in that age range really seem to like it. It's easy for them to condition and work with, it's easy to clean-up, and they didn't notice any problems with durability of baked products. For kids who are currently using Sculpey or Sculpey III, this clay may be a good choice.

Giveaway

Bake Shop Variety PackWanna try Bake Shop for yourself? I have a
Bake Shop Variety Pack to give away to one lucky reader.
To enter, fill out the form below with your name, email address, and your answer to the question. One entry per household. Enter by 11:55 p.m. on June 10, 2009. Open to U.S. residents ages 18 and older. See the “Details” tab for complete rules.

About this Site

CraftyGoat's Notes is all about sharing polymer clay tips & tricks that have worked for me. (And even a few that haven't!)

Read more about CraftyGoat's Notes...

Buy My Book

Archives

Enter your address to get CraftyGoat's Notes by email:

Delivered by FeedBurner