" /> CraftyGoat's Notes: June 2008 Archives

« May 2008 | Main | July 2008 »

June 26, 2008

Spearmint Lip Balm Tin (Open)Recently, my dentist's office started including a spearmint lip balm along with their normal care packet of toothbrush, toothpaste, and floss. I'd never tried spearmint lip balm before, and I fell in love with this particular one. I used it daily (at least) and ran out well before I was scheduled for another dentist's appointment. After searching the internet, I found that the maker only sold it in large quantities as a promotional item.

Faced with the options of:
A) buying 500-1000 tubes of lip balm
B) scheduling an extra trip to the dentist, or
C) trying to make some lip balm of my own
... well, let's just say it was an easy decision! And fortunately it turned out pretty well.

Here's some tips on making your own homemade lip balm (with fresh spearmint leaves), plus instructions for making a perfectly coordinated spearmint tin out of polymer clay to put your balm in. Use spearmint straight from your garden to give an extra-special touch to this wonderful homemade summertime gift!

Minty Lip Balm Tin

You have to pour the lip balm into its final container to set, and you don't want to be decorating — and baking! — a container that's already full of lip balm. So let's start by decorating the tin.

Materials

  • Lip Balm Tin Lip balm tin: I got mine from Specialty Bottle (Item TNF1/2), but you might be able to find something locally or creatively re-purpose something you already have.
  • Polymer clay (green and brown): For the leaves in particular, use only a strong brand of clay. Sculpey III is too fragile for this project.
  • Sprig of Spearmint Leaves Sprig of fresh spearmint
  • Acrylic brayer, clay blade, polyfill
  • Optional: Pasta machine, round cookie cutter, clay extruder

Instructions

  1. Cutting out Clay for LidsUse a pasta machine or brayer to roll out a medium sheet (3rd or 4th thickest pasta machine setting) of brown polymer clay. If you have a cookie cutter that's the same size as your tin's lid, use this to punch out 2 clay circles. If you don't have the right size of cookie cutter, you can place the lid upside down on the clay and trace around it with a clay blade.
  2. Separate the top and bottom halves of the tin. It's easier to work on them separately — plus this way you can make sure you don't accidentally seal it shut! To cover the top half of the tin, apply one clay circle to the top, making sure that you pop any trapped air bubbles.
  3. Adding Flat Ribbon to SideIf you have a clay extruder, use a flat ribbon disc to extrude clay for the tin's edge. If you don't have an extruder, just cut a thin ribbon from your clay sheet. Apply the clay ribbon to the tin's side, gently smoothing the spot where its ends meet.
  4. Adding Snake to Top EdgeExtrude a very thin snake (or roll it out by hand) to fill in the gap between the top circle and the side clay ribbon.
  5. Tin: Top Half DoneRepeat steps 2-4 to cover the bottom half of the tin.
  6. Spearmint Leaves On ClayUse your pasta machine or brayer to roll out a very thin sheet of green clay (I used the next-to-the-thinnest setting on my machine). Choose the spearmint leaves you want to copy. Clean them first if they're dirty, then spritz them with water. Place them onto the clay sheet so that the back of the leaf is pressed into the clay. Use your brayer to roll the leaf into the clay, making a very good impression of the texture. Now use your clay blade or a needle tool to trace around the edges of the leaf. Depending on the clay you're using, you may even be able to skip the blade and just tear away the clay from the edges of the leaf. Once you've cut out the polymer clay leaf, peel the actual leaf off the top. Repeat for as many leaves as you want (I made 10).
  7. Propping Leaves up with PolyfillGently place the leaves on the top lid of your tin. Larger leaves go on bottom; smaller leaves go on top. I added a ball of clay between one of my layers to give it added height. To make sure the leaves don't droop during baking or stick together where they shouldn't, I recommend adding small amounts of polyfill to your assembly.
  8. Before baking, make sure there's no clay along the lip where the two parts meet. Trim anything that would keep the tin from closing properly. Now bake the two pieces, still separate, according to the clay manufacturer's instructions.
  9. Spearmint Lip Balm Tin (Closed)Wash the container thoroughly, then dry it to prepare it for the balm.

Spearmint Lip Balm

I'm pretty new to this part, so I'll just point to the recipes I used and add a couple of tips.

I started with this Fresh Spearmint Lip Gloss recipe, using almond oil and beeswax (which I found at a local health food store) and spearmint from my garden. I doubled the recipe, which gave me enough for one tin, one tube, plus a little extra on the side.

While I mostly followed the above recipe, I also added honey because this Chocolate Lipgloss Recipe mentioned it and it sounded sweet and yummy. The honey didn't work so well for me, but it could've just been my inexperience. It didn't mix in well with the other ingredients: I noticed some separation in the last container. Course, I wasn't expecting to need that last container, so the mixture cooled a bit while I searched for something. Re-melting and re-stirring it might have prevented the separation.

So my newbie's tips for success on the lip balm?

  • Have enough containers on hand! :-)
  • Melt well. Mix well.
  • Use a funnel. Pour into containers before the mixture has a chance to separate.

Variations

Variation: Faux Bottlecap Lip Balm TinFor even more of a gift, create a whole set of matching items. Here's a lip balm tin I made to match my Bottle Cap Necklace & Card.

Your gift recipient will be positively wowed!

June 20, 2008

Using Corn Starch to Prevent Air BubblesDon't you just hate air bubbles? Your polymer clay piece may look perfect when you put it in the oven, but then those air bubbles appear during baking and ruin the look. There are various ways to prevent bubbles, such as conditioning the clay properly (don't trap air inside clay folds as you run it through your pasta machine), or looking for and popping air bubbles trapped when you're covering something with clay.

But my tip today is specifically for the air bubbles that are created when you're baking a flat sheet of clay — the sort of sheet you might use for stamping or scrapbooking punches or for Artist Trading Cards. I've found that, especially if I work on the same surface I'm baking on, the clay may stick to the baking surface in places. It's easy to trap air in the places where it's not stuck, in which case the sheet may end up as a bubbly and not-so-flat sheet after baking.

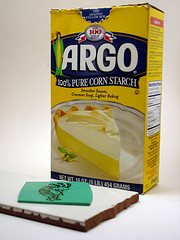
Here's how to prevent those air bubbles. Put a light dusting of cornstarch all over your baking tile. The cornstarch will prevent the polymer clay from sticking to the tile, which helps prevent the bubbles.

If you're working and baking on the same tile, try lifting the polymer clay sheet up before baking to make sure it's not stuck. Dust with cornstarch before you replace the polymer clay sheet.

Once you've baked the clay, you'll want to wash and sand off any extra cornstarch, at least if the back of your clay sheet will be visible in your project. That may mean an extra step if you're not normally a sander. Still, I find this is much easier than trying to sand down the air bubbles that would otherwise appear on the project's surface!

I've been dusting my baking tiles with cornstarch for a while now and have noticed a definite improvement. Give it a try & let me know if it works for you!

June 18, 2008

Different Powder TypesSaturday's lesson at my guild went well. We had a big group, & I think everyone enjoyed making coasters.

One question came up that I wasn't prepared for, though. I was talking about the different types of "resists" (also called release agents) you can use to keep your rubber stamp from sticking to polymer clay when you're stamping without ink. A spritz of water is one option, though it doesn't work for all clays (specifically, UltraLight Sculpey gets sticky when wet). Another option is dusting the sheet of clay with powder (such as baby powder, corn starch, or baking soda) before stamping.

As I was going over these options one of my guild members asked, "How do you keep the powder from filling in the grooves?" Apparently when she'd tried this in the past, the powdery bits had gotten stuck in the impressions of her stamped clay. I asked which type of powder she was using, thinking some powders might work better than others. But when she answered, I realized I didn't know what I was using!

See, I've had the same little baggie of white powder sitting on my craft desk for years. I poured a bunch of something into it a long time ago, and just haven't needed to refill it. And in the meantime, I've forgotten what I used. As an aside, this makes me slightly uncomfortable every time I drive to guild. What if a highway patrolman pulled me over? How would it look to have a little baggie full of white powdery stuff, especially if I couldn't readily identify what it was? I always drive especially carefully on guild days. :-)

Anyway, after I got home, I did a taste test to see what I'm actually using. (I don't recommend this, by the way. Baby powder and baking soda do NOT taste yummy.) Turns out my baggie's filled with corn starch.

The Test

I ran a few tests using some other powders to see if corn starch is in fact the best one to use. I used the same stamp to stamp into 5 sheets of unbaked clay, each of which had one of the following sprinkled on top: Baby Powder, Baking Soda, Baking Powder, Corn Starch, and Nothing

Polymer Clay Powders Test In each case I sprinkled the powder on fairly liberally, but rubbed almost all of it off before stamping. All that was left was a faint powdery residue. All of the powders resisted the stamp just fine (no sticking). After stamping, I used a paper towel wet with rubbing alcohol to dab off the excess powder before baking. Here are my results for each powder:

  • Baby Powder: The baby powder did not readily dissolve or wipe away. Instead it seemed to rub into the clay. It also brushed into the grooves and lodged itself there.
  • Baking Soda and Baking Powder: These two are both a little more gritty than the other options, meaning you may find yourself adding a little unintentional texture if you use them. But they did dissolve readily.
  • Corn Starch: It has a nice (non-gritty) texture. It dissolved pretty well, although I could see some evidence of it in the impressions after baking.
  • Nothing: This particular test used a very small stamp without a lot of intricate parts, so it didn't stick to the clay enough to actually need a release. In this case, using nothing would be an option, but you'll often find you need something for larger stamps or sticky clay.

The winner? They all have their pros and cons, but corn starch is still my favorite, primarily because I don't like the grainy texture of the baking powder or soda. Baby powder was my least favorite. Of course, if you're antiquing the clay after baking, you may not mind a little powder residue. In that case any of the options are fine. If, however, you really need a clean, un-powdery impression, a water resist is probably your best bet.

Tips for Success

  • Powder Lightly: My main tip is to keep the powder coating very light. If there's not a lot of extra powder there, it's less likely to build up in the grooves.
  • Get Rid of the Excess: Wiping the excess off before baking is optional. Sanding it off afterwards works just as well (and may be necessary anyway).
  • Clean out the Grooves: If you do get some powder in the grooves, try soaking it, then digging out any embedded stuff with a needle tool. Rubbing alcohol on a Q-tip may also do the trick

Thanks to the guild for making my Saturday an enjoyable one and for asking questions that made me think. I'm happy to say that, I can now look that highway patrolman straight in the eye and say, "It's corn starch, sir."

June 13, 2008

Polymer Clay CoasterHey folks... Just wanted to mention I'll be teaching at tomorrow's meeting of the Central Oklahoma Polymer Clay Guild. The project is Rubber Stamped Polymer Clay Coasters, and I think it'll be a fun one. I'll be teaching some basics of using rubber stamps with polymer clay and going over some interesting techniques — plus I'll have a big ol' stack of rubber stamps for folks to play with. If you're in this area, I hope you'll come by. Here's the meeting info.

For folks who aren't in the area, here's a couple of online places you can find me.

  • Twitter. If you're not familiar with Twitter, it's somewhere between a chat room and a mini-blog. My Twitter username is craftygoat — feel free to "follow" me if you're a Twitter-er too. I tend use it for quick, random thoughts — some craft-related and some not.
  • GoodReads. While I've had an account on GoodReads for a while, I've mostly used it with local friends. I hadn't really considered using it for crafty books until Lisa at Polka Dot Creations mentioned it. I'd love to connect to some other crafty readers — so feel free to link up if you're using their site, too.
  • Etc. I've added these two sites plus a few others under the "Find Me Online" section on my About page. If you're into the whole social networking thing, check it out.

Hope to see ya soon — whether it's in person or online!

June 11, 2008

The Makin's Ultimate Clay Extruder has a lot of nice features... but there is one nagging little problem. It squeaks as you turn the handle. Squeaks like a little mouse. It drives my dogs crazy!

Admittedly, it's not a big deal in the grand scope of things. But if the squeaking has started to grate on your nerves, here's a 5-minute fix to make your extruder squeak-free. Credit for this tip goes to my fellow guild member, April (aka Kreative Karma). Our guild meetings aren't quiet by any stretch of the imagination — but since she showed us this tip, I haven't heard a squeak!

Materials

Materials: Squeak-Free ExtruderHere's what you need to make your extruder squeak-free:
  • The extruder
  • WD-40
  • paper towels

Instructions

  1. 2570449047_24cacd54c7_m.jpgFully extend the extruder's handle.
  2. Spraying Extruder with WD-40Spray WD-40 onto the exposed section of the handle and rub it around with your paper towel. Or, spray the paper towel, then use it to apply the WD-40 to the handle. Use paper towels to clean up any excess or over-spray.
  3. Enjoy your squeak-free extruder!

Since the handle doesn't come into contact with the clay (the plunger mechanism keeps them separated), you don't have to worry about the WD-40 mixing in with your clay. There's a chance you may need to repeat this every once in a while, but mine has stayed squeak-free since I first did it in early March.

Give it a try — your dogs will thank you!

Thanks again to April for letting me share her great tip here! This is the last post in my extruder series — so if you've got a favorite tip I missed, feel free to leave it in the comments.

Posts In This Series:

Buy the Makin's Ultimate Clay Extruder now.

June 8, 2008

Due to popular request, I've put together this video showing how to use & clean the Makin's Ultimate Clay Extruder. The video also shows how to use the extruder to make coiled polymer clay beads, then sand the beads to reveal the colors hidden inside. The video runs about 9 1/2 minutes.

Here are a couple of shots from the video — click the description to see a larger view:

Prefer written instructions over video? See the updated version of How to Use and Clean the Makin's Ultimate Clay Extruder.

Posts In This Series:

Buy the Makin's Ultimate Clay Extruder now.

June 2, 2008

Extruder DiscsFor some reason, I always have trouble determining which extruder disc to use on a particular project. I can picture in my mind the size snake I want, for example, but I can't translate that to picking the right size disc. I end up laying all of the circle-shaped discs side by side and studying them, holding each one up next to my project. Still, the snake I choose somehow ends up being bigger than I would have expected from the size of the disc hole.

I think I have trouble translating the hole size of the disc into what the side view will look like once it's extruded, if that makes any sense. Is it just me? Or do you guys have this problem too?

Close-Up of Extruder Disc Cheat SheetIn an attempt to make this process slightly easier for me, I made an extruder disc "cheat sheet." I extruded a sample of each shape and glued it alongside a scanned image of the disc itself. Seeing the actual snake size — not just the hole in the disc — seems to help me pick the right disc for my projects.

Here's instructions for making your own extruder disc cheat sheet, if you're interested.

Makin' An Extruder Disc Cheat Sheet

  • Place your extruder discs on your scanner and scan them in. (Feel free to use mine — it has the 20 basic discs that come with the Makins Ultimate Clay Extruder.)
  • Print or copy this onto a transparency sheet (if possible). Using a transparency will make it easier to match up discs & figure out the best sizes for projects.
  • Condition some scrap clay, and use your clay gun to extrude samples of each disc. For each one, extrude only slightly more than you need for the sampler, then switch out discs and continue.
  • Trim any misshaped edges and bake the clay samples.
  • Use LocTite Control Gel super glue to attach the clay samples to the cheat sheet.

If you prefer, you could make your cheat sheet from polymer clay. Just roll out a sheet of translucent clay and press the extruder discs in to make an impression. Attach your extruded clay sample directly to the clay before baking. You could even cut your sheet into little squares and punch holes in the corners to make a keychain sampler.

Here's hoping this helps us all pick the right disc every time!

What Are All these Discs for, Anyway?

Speaking of making better use of all your clay discs, I came across this description from Makin's explaining what all the different discs are for. It might help you brainstorm a few new ways to use some of your discs:

  • The round discs are for vines, stems, borders and letters.
  • The screen discs are for hair, grass, straw and floral stamens.
  • The flat slot discs are for weaving baskets, lattice, ribbons and bows.
  • The square, triangle, and half round discs are for bricks, logs, borders and can be cut and used for small beads.

I know I was surprised and pleased at how well the clover-shaped disc worked as a border on my Tin Can Pincushion. It definitely made me want to sit down and figure out creative uses for other discs.

Have you found unique uses for some of your extruder discs? I'd love to hear about it!

Posts In This Series:

Buy the Makin's Ultimate Clay Extruder now.

About this Site

CraftyGoat's Notes is all about sharing polymer clay tips & tricks that have worked for me. (And even a few that haven't!)

Read more about CraftyGoat's Notes...

Buy My Book

Archives

Enter your address to get CraftyGoat's Notes by email:

Delivered by FeedBurner