" /> CraftyGoat's Notes: August 2008 Archives

« July 2008 | Main | September 2008 »

August 27, 2008

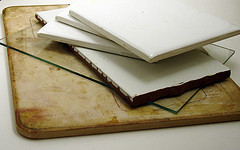
Baking Surface OptionsA few weeks back, I talked about how to avoid burning polymer clay. Several of you shared great comments with your own tips. And as part of that, folks made several suggestions for baking surfaces. I thought I'd do a separate post here talking about some of my favorite baking surfaces, as well as highlighting some of your suggestions.

My Favorite Baking Surface

My baking surface of choice is a toaster-oven sized pizza stone I found at a garage sale a few years back. (Here's a similar one available online for $17.) There are a couple of features I really like about it:
  • Even Heating: One of the great things about pizza stones is that they heat food (or polymer clay) evenly.
  • Nice Surface: Pizza stones are naturally non-stick once they're broken in. This is also the surface where my corn starch trick works best (corn starch may pool on slicker ceramic tiles). Keep in mind that these stones do have a little texture, though, so you may want to add a layer of parchment paper if you don't want your work to have a rough back.
  • Large Size: I like that the pizza stone is large enough to fill a regular-sized
    toaster oven. This makes it perfect for baking larger or multiple items.

My Other Top Choices

While I love my pizza stone, I'm always a little worried about breaking it. So for guild day, I take little 4" ceramic tiles. Less than 50 cents each at Home Depot or Lowes, they're a nice inexpensive option that can double as a work surface. I keep 4-5 on hand for when I'm doing lots of baking at once.

Another good choice (and I think the first surface I ever baked on) is the glass from a picture frame. These are pretty cheap — even cheaper at garage sales or thrift stores — and come in a variety of sizes. They're also nice as a work surface, especially if you want to see through to a grid or design below the glass. The downside is that they are fairly fragile and can have sharp edges, so you have to be extra careful using them.

What Hasn't Worked Well for Me

I used to use the flimsy aluminum bread loaf pans. While they're cheap, they tend to distort. This can be bad if you're trying to bake a flat sheet in the bottom. But if you're not concerned about that, you might give it a try. They are nice to use with polyfill: just put a layer in the bottom of the loaf pan.

Another surface that seems to work better for other folks than for me is card stock. For some reason, my card stock seems to curl in the oven — and curls the clay with it! One of my guild members suggested that the card stock I'm using may have some sort of surface finish that's causing this. It's possible that some brands work better than others.

Readers' Baking Surface Suggestions

  • In the comments of my post on burning clay, Jeanne Rhea mentioned that baking on metal trays (such as cookie sheets) made burning more likely for her. Instead, she recommends using ceramic tiles with a layer of manila folder weight paper.
  • JuLi recommends baking in an upside-down pyrex-form chicken roaster.
  • Karen T. suggests using an old microwave oven glass tray. This heavy glass sounds much sturdier than the picture frame inserts I've used!

So... what's your favorite baking surface?

August 22, 2008

Tag Options for Bottles of HopeI've been finishing up some Bottles of Hope for my guild, and I thought it might be useful to talk about some tag options.

For any of you who aren't familiar with Bottles of Hope, they're bottles that are decorated with polymer clay, then given to cancer patients. (For more info, read about Bottles of Hope or watch my video tutorial.) The name "Bottles of Hope" comes from the practice of writing wishes and putting them inside. As program founder Diane Gregoire explains:

"I told my friends to just make a wish, write it down and put it in the bottle, and it would come true. I don't know why, but we all just believed this... maybe because we just wanted to, or that it was something to hold on to."

And while many polymer clay artists choose to leave their bottles empty so cancer patients can fill them with their own wishes, a lot of artists like to include their own special quotes for the bottle recipients. If you're interested in putting a message of hope with your bottle, here are a few options for how to do it:

Ways to Enclose the Message

  • BOH: Slip of Paper TagSlip of Paper Wishes: This is a simple way to include a message in a bottle without a lid. Print and cut out the message on a narrow slip of paper, then let the paper peek out of the bottle's top. Idea Source: dragonflypath's Bottles of Hope.
  • BOH: Scroll-Style TagRolled-Up Wishes: Here's another wonderful option for bottles without stoppers. Print your message on a piece of paper slightly taller than the bottle, then roll it up scroll-style and put it inside. Idea Source: Thejoyof's Dinner Party Bottled Fortunes.
  • BOH: Accordion-Style TagAccordion-Style Wishes: To enclose a long, thin quote in a bottle that has a lid, fold your piece of paper accordion-style and attach the paper to the lid. When the recipient takes the lid off, the quote comes with it! Idea Source: Fellow guild member, Lee Ann K.
  • BOH: Tag Tied on Outside

    Wishes on the Outside: Another option is to punch a hole in the paper and tie it onto the bottle with a ribbon or rubber band.

    The official Bottles of Hope site recommends including a program description in a baggie with each bottle you distribute. That baggie would be a perfect place to include your quote. Idea Source: Bottles of Hope site

Message Ideas

And what should you write (or print) on the slips of paper? It's totally up to you: use anything you think would be inspirational to someone.
  • The Bottles of Hope site has PDFs of various quotes you can print and include. See Tags [PDF] and More Tags [PDF] on this page.
  • A friend and cancer survivor offered me one of her books to use for tag inspiration: The Language of Courage and Inner Strength. It's full of courageous quotes that work well. Here are a few of these quotes I've formatted to print for Bottles of Hope: Courage Quotes [PDF].

    Many similar quote books are available. Check your library or local hospital gift shop, or just search Google for inspirational quotes.

  • Some of the best bottles I've seen have a quote that fits the theme of the bottle. This is sometimes easier to do if you find a quote you like first, then create a bottle that embodies that theme.

Of course, the love that's shown by making and donating these handmade bottles is often enough of a message. So don't feel obligated to add a written message to every bottle.

I'm fairly new to Bottles of Hope. I imagine those of you who have worked with them longer have some other ideas for both how to include a message and what types of message work best. I'd love to hear your suggestions.

August 18, 2008

I'm the type who cringes when I see Halloween and Christmas goodies out during the summer. I've got an August birthday, and somehow I feel personally slighted when retailers rush past the end of summer to the next big holiday. Still, if you're a crafter and plan to sell fall- and winter-holiday items, it does pay to think ahead.

If you fit into that category, see Wendy's post at Polymer Clay Craft Gossip for a great way to start advertising your holiday wares. The gals at Polymer Clay Productions are working on a handmade holiday gift guide featuring polymer clay artists. They need all the entries in the next month to have time to put everything together. So act soon if you want your crafty business listed.

Just do me a favor and don't forget it's August. Some of us have birthdays coming up. :-)

August 14, 2008

I'm honored to be today's featured artist on Cyndi Lavin's Layers Upon Layers site.

If you're not familiar with Layers by Layers, it's a mixed media blog with lots of fun and inspirational features. Recently, Cyndi's been doing a series of favorite art quotes. I particularly liked Bunny Wilson's choice, taken from a Calvin & Hobbs cartoon: "“From now on, I’ll connect the dots my own way.”

Of course, you can't beat Cyndi's own quote in the sidebar: "Do not throw ANYTHING out!" (I can certainly relate to that!)

Check it out & enjoy!

August 12, 2008

Glue FavesMickey was making compacts with polymer clay on top, and she e-mailed me to ask which glues work best:

"They say E6000 pops off easily and Crafter's Pick Ultimate Glue also pops off. Any suggestions?"

As the good folks over at This to That will tell you, glue choices depend a lot on what you're gluing together. Not every glue works well for every surface. But here are a few of my favorite glues to use with polymer clay:

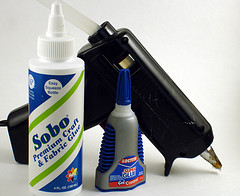
  • Loctite Super Glue Control Gel: This is my go-to glue. It works well for many surfaces, including metals, plastics, and more. I recommend rough-sanding both surfaces before gluing to give the glue a better grip.

    One thing I like is that the squeezable hard plastic sides really give you good control over how much glue comes out and where it goes. I'm a lot less likely to glue my fingers together with this stuff than with other tube-based super glues. Plus it doesn't harden quickly in the tube like some other super glues.

  • Sobo Premium Craft Glue: Sobo is a good choice for gluing polymer clay to paper. It's my favorite way to glue paper panels to the back of my Artist Trading Cards.
  • Hot Glue Gun: I've recently started using my hot glue gun when gluing polymer clay to cork for coasters. I've found this works much better on cork's porous surface than Loctite does.

Of course, there are lots of other glues out there. While I haven't tried it, I've heard good things about Lisa Pavelka's heat-resistant Poly Bonder super glue. Glass Attic lists a ton of different options on their Glues page. And if you're looking for the ultimate surface-to-surface glue advice site, check out This To That. I usually select "plastic" for polymer clay, then select whatever other surface I'm using. It's not perfect — polymer clay doesn't always work by plastic's rules. But it might give you some ideas.

And I'm sure some of you have a favorite glue. I'd love to hear what it is and what it's particularly good for.

August 8, 2008

Polymer Clay Ultrasound FrameFor this final post in my stamping with polymer clay series, I thought I'd use the heat embossing technique from my video to create a polymer clay frame.

If you've ever had an ultrasound photo you wanted to frame — whether it's to share your own good news with friends and loved ones, or to frame your soon-to-be-grandchild's photo on the fridge — you've probably run into two problems. First, ultrasound photos aren't always a standard size (2 5/8" × 4", for example). And second, well, honestly, they're not always great photos. Sometimes it's hard for the un-educated eye to find which part is the baby. Today's project is a stamped polymer clay magnet frame that fixes both of those problems. It's easy to make the frame in any size. And the hand-formed hanging heart will highlight the important part of the photo.

Even if you don't have an ultrasound photo you need to frame, you can use these steps to quickly frame any size photo with polymer clay!

Materials

  • Photo and card stock to copy photo onto for template
  • Approximately 3/4 block of strong polymer clay
  • Rubber stamp(s)
  • Pigment or embossing ink
  • Embossing powder
  • Liquid clay
  • Thread
  • Tape
  • Button magnets
  • Super glue
  • Tools: pasta machine or brayer; clay blade; baking surface; ruler; heat gun; clay extruder (optional)

Instructions

  1. Start by copying your photo onto card stock. Trim off any white edges, so all you have left is photo. Now trim off another 0.25" both ways. This copy will serve as your template for the opening of the frame. You want the opening to be a little smaller than the photo itself (thus the extra 0.25"), to allow the photo to stay in place without exposing any edges.
  2. Determine your outer frame size. This will depend mostly on the size of your image. So, for example, if your image is 2 5/8" × 4", you could add a 0.5" margin to each side, making the frame 3 5/8" × 5". Another factor to consider is the stamp you're using to decorate the frame. If it's a skinny stamp or small pattern, you don't need as much of a border as you would for a stamp with a large pattern.
  3. Cutting Frame from Clay SheetRoll out your clay sheet to your desired frame size. This sheet needs to stand alone, so don't make it too thin. I'd recommend about the 3rd or 4th thickest setting on your pasta machine. Put the clay sheet directly on your baking surface, or on an oven-safe material like card stock. Otherwise, it will be difficult to move the frame without distorting it after the next step.
  4. Cutting Frame Opening to Photo SizeCenter the photo template on your clay sheet. You may want to use a ruler to verify that it's actually centered. Now use a clay blade to trace around the edges of the template.
  5. Removing Center of FrameRemove the photo template and carefully remove the inner portion of the frame. Try not to distort the outer frame sections while you're doing this. Bake clay according to manufacturer's recommendations and allow to cool.
  6. Heat Embossing FrameApply pigment or embossing ink to your stamp(s). You may want to practice on scrap paper first if you're new to embossing, or if you're uncertain about your stamp layout. Once you're ready, stamp the clay, then sprinkle the wet ink with embossing powder. Remove the excess powders, then emboss with a heat gun. (For full instructions, see my video on heat embossing.)
  7. Adding Border to FrameUse your clay extruder to roll out a clay snake (or roll it out by hand if you don't have an extruder). Apply a light layer of liquid clay along the inner and outer edges of the frame, then adhere the snake to the edges. I cut my corners at an angle to give it a mitered look.
  8. Shaping Heart for Ultrasound FrameCreate another snake for the dangling heart. My snake was 3" long — but you'll want to adjust yours to fit your photo. One good way to measure how large your heart should be is to lay down wax paper over your photo template, then form the extruded heart on that. This gives you a nice work surface while still allowing you to see through and gauge size.
  9. Bake frame and heart.
  10. Back of Ultrasound Frame, AssembledAssemble your frame. Tie a thread around the heart. Center the photo in the frame's opening, then tape three corners down on the back. Leave one top corner un-taped so you can sneak the heart's thread between the photo and frame. Once you have the heart centered over the baby-part of the photo, tape down the thread and the remaining edge. Apply button magnets to the corners with super glue.

Variations

  • Variation: Polymer Clay Ultrasound Frame
  • This one-part frame is meant to be quick and easy. But if you're making a gift for someone, you may want to do a more elegant three-part frame: a front piece, a spacer piece, and a back piece. Victoria Hughes's Polymer: The Chameleon Clay book has an excellent tutorial, complete with templates, for doing this.
  • The hanging heart could be dressed up a bit by using jewelry findings (jump rings, chain, etc.) instead of thread to hang it. You could even connect the jump ring directly to the clay frame, though this would make the heart's position permanent and prevent you from swapping out photos later.
  • Or, if the little girl or guy in question is big enough and baby-shaped enough, you may not need any highlighting. In that case, leave off the heart altogether like I did in this second example.

More About This Project

Speaking of ultrasounds, if you're wondering why I chose this particular project... well, it's cuz I have a few ultrasound photos of my own I need to frame! Yep, hubby and I are expecting our first little one in mid-February. The photo at the top is of our little guy or gal five weeks ago (at eight weeks). Since then it's grown from kidney bean- to shrimp-sized and probably looks a lot more like a baby!

I hope you've enjoyed the ultrasound frame project, along with the other posts in this rubber stamping polymer clay series. The full list of posts is below. And, as always, I'd love to hear from you. Tell me your favorite polymer clay rubber stamping tip in the comments below.

Posts in This Series:
  1. Rubber Stamping Basics for Polymer Clay
  2. Rubber Stamp Techniques for Polymer Clay
  3. How to Make a Rubber Stamped Coaster
  4. Video: How to Heat Emboss on Polymer Clay
  5. How to Make an Ultrasound Frame

August 1, 2008

Whether you're new to heat embossing, or just new to heat embossing on polymer clay, my latest video should help you get a handle on this stamping technique. The video runs about 7 1/2 minutes, and shows how to heat emboss on both baked and unbaked clay.

Here are photos of a couple of projects from the video — click the description to see a larger view:

In my next post (the final in the polymer clay rubber stamping series), I'll show you how to use heat embossing to make a unique polymer clay photo frame.

Posts in This Series:
  1. Rubber Stamping Basics for Polymer Clay
  2. Rubber Stamp Techniques for Polymer Clay
  3. How to Make a Rubber Stamped Coaster
  4. Video: How to Heat Emboss on Polymer Clay
  5. How to Make an Ultrasound Frame

About this Site

CraftyGoat's Notes is all about sharing polymer clay tips & tricks that have worked for me. (And even a few that haven't!)

Read more about CraftyGoat's Notes...

Buy My Book

Archives

Enter your address to get CraftyGoat's Notes by email:

Delivered by FeedBurner