
How to Make a (Not Just for) Valentine's Day Box
 Back when I was a kid, we had to walk 10 miles...
Oh wait, no. That's my dad's story.
Back when I was a kid, Valentine's Day was a big deal. We'd always decorate shoeboxes with lace doilies and pink and red construction paper hearts, then we'd set those boxes out in hopes of collecting special Valentine's Day cards from special someones in our class.
Apparently this has changed, at least in some schools. Some skip the tradition all together, worried that the less popular kids will feel left out. Other schools use the same reason to mandate giving cards to every kid in the class.
Not so in my day. Getting a card from the kid you had a crush on was of utmost importance. And the design and making of the box was a big part of that.
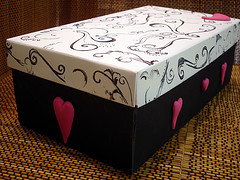
This Valentine's Day shoebox project is a grown-up version of those school day boxes. But it's also something more. The stamped background is generic, so the interchangeable polymer clay decorations, attached to brads, are what match the box to the season. The heart decorations that make it a Valentine's Day box can be swapped out with four-leaf clovers for St. Patrick's Day, or zombies for Halloween. A perfect all-occasion box!
And it's a totally easy project — it doesn't take much longer than the doily-covered version from the old days. Here's how to do it:
Materials
- Shoebox or other sturdy recycled box
- Paint or paper to cover box
- Rubber stamps and stamp pads for background (optional if you use decorative paper)
- Polymer clay
- Brass-plated fasteners (aka paper brads)
- Super glue
Instructions
- Cover your shoebox. I painted mine, using contrasting colors for the lid and box. You could also just use scrapbooking paper.
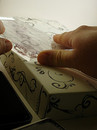 Decorate the box lid. There's lots of options here. I used rubber stamps ("Flourishes" by Rhonna Farrer) on mine. If you're an artist, you could paint or draw something. If you've got a stash of scrapbooking paper just waiting for a good use, you could use that to cover it. For a good all-occasion box, you'll want to keep this part generic — in other words, don't stamp it with your Valentine's Day stamps unless you want the box to be specifically for Valentine's Day.
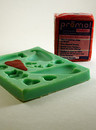 Make your polymer clay embellishments. For the hearts, I used the "With All My Heart" mold by SweetBrier Studio, but you could of course create your own clay shapes. Use a strong brand of polymer clay such as Fimo, Kato or Premo to prevent breakage later on. You can make as many different polymer clay embellishments as you like — for my box, I made nine (3 for each long side, 1 for each short side, and 1 on top).
- Add a brad. Before baking the polymer clay, turn each piece over and press a brad into the back. If you're using metal brads (which are oven-safe), you can leave these in place during baking, but it's not necessary. You really just want a good impression so you can get a better bond when you glue the pieces together after baking.
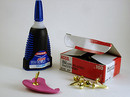 Bake and assemble. Bake the clay pieces and allow to cool. Glue the brads onto the back. Not all super glues are created equal, by the way. My preferred brand for use with polymer clay is Loctite Super Glue Control Gel. (Read more about which glues work best with polymer clay.)
- Add embellishments to box. If you have a long-handled hole punch, use it to punch holes in the appropriate places on your box. No hole punch? Carefully try an awl, craft knife, or other sharp pointed object. Now stick your brads through the holes. Your all-occasion box is complete!
If you're a teacher, this box would be great for carrying supplies back and forth to your classroom. Just change out the decorations and go. It would also be good for card makers who store up cards for different holidays: you could have one box dedicated to Christmas cards, one dedicated to birthday cards, etc. Or you could make your own gift box, decorated for the occasion. Lots of options!

Comments
Great how-to for a cute shoebox redo!I'm linking to it in a May week 2 post.
Thanks so much,
Laury
Posted by: Laury Tarver | May 8, 2012 11:00 AM