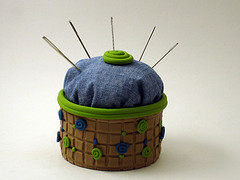
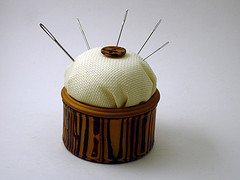
Polymer Clay Pincushion
 A couple of years back, I bought one of those generic wood-handled sculpting tool kits at Michael's. While I had no idea what most of the tools were for (& still don't for some of them!), I quickly came to rely on its needle tool. I used it for all sorts of things -- poking, cutting and otherwise. It didn't dawn on me for quite some time that I could have easily made my own needle tool. Furthermore, it wasn't til I was working through Katherine Dewey's Creating Life-Like Animals in Polymer Clay that I saw the benefit of having different-sized needles for different jobs.
I stepped out of my comfort zone and visited the sewing section at the store, stocking up on half a dozen tapestry, sewing & knitting needles to work through Dewey's book. And for the last several weeks, I've had these needles sitting casually on my craft desk... the same desk from which things often mysteriously disappear and which cats have been known to raid.
So I was thrilled when I saw this tin can pincushion project by Design*Sponge. Said cats generate more than their share of kitty food cans to use for the project, and of course I like the recycling aspect. I decided to try making a polymer-clay covered pincushion to store my sculpting needles, so they'd be in a slightly safer environment.
Here's how I made mine:
Materials
- Clean tin can, such as for cat food
- Liquid polymer clay
- Polymer clay
- Clay extruder
- Amazing Mold Putty and old button to make button mold (optional)
- Fabric
- Poly-fill
- Glue gun
Instructions

Cover can with clay. I started by covering the can with a very light coating of liquid polymer clay. Design*Sponge has an excellent suggestion for using the can's label to create a template. Keep in mind that you may need to add a bit to that if you want to hide the top rim. Your other option is to skip the template and just roll the can on a sheet of clay til the edges meet. (Need help with this? Check out my pen-covering tutorial for the basics.)
Once you've covered the can with clay, smooth the seams and embellish however you like.
 Add extruded edge. Use your clay extruder to roll out a clay snake long enough to go around the can's rim. Close any gaps between the clay sides and the extruded edge, and smooth the seams where the extruded ends meet.
 Create matching button. You can use your clay extruder to create a matching button. Or use a button mold to create a matching button from polymer clay (see example below). Bake can and button according to the clay manufacturer's instructions.
 Stuff pincushion & assemble. While the clay is baking, follow Design*Sponge's instructions to create the fabric portion. Once the clay has baked and cooled, you can start assembling your pincushion. If you're comfortable with these sort of things, you can sew your baked button onto the middle of the fabric first. Otherwise, you can use a glue gun to attach it after assembly.
 This is a very quick project that you can vary greatly by using different clay and fabric combinations.
And of course, these pincushions aren't just useful for storing sculpting needles. Try making one as a gift for your favorite seamstress or fiber artist.
Not the DIY type? You can also buy these pincushions at my store.


Comments
Very cool! I made one once with fabric and a tea tin, but I think I like the decorations made with polymer clay more.
Posted by: Elizabeth | May 19, 2008 10:40 AM
Cute idea, Angela!
BTW - I wanted to thank you for introducing me to Christine Kane's blog months ago (when she did her entry on resolutions). Crazy enough, I actually leave tomorrow for her "great big dreams" retreat in North Carolina! I'll be sure to give a full report when I return. Hope you're having a great week.
Posted by: Laura Griffin | June 3, 2008 11:54 PM
You're very welcome, Laura. Her retreats sound wonderful -- I'm sure you'll have an amazing time! Will look forward to hearing all about it.
Posted by: Angela Mabray | June 5, 2008 11:41 AM